
There’s a particular joy in transforming simple pieces of fabric into a work of art that’s not only beautiful but functional. Today, we’re taking a journey into the world of quilting beginners, where the “Folded Star” hot pad pattern awaits.
Crafted by Sharon Holland, this design is a beginner-friendly project that promises to add a touch of handmade charm to any kitchen. As someone who revels in the delight of creating with my hands, I am thrilled to share with you this pattern that is as rewarding to make as it is to behold.
In crafting the “Folded Star,” we’re not just following a set of steps; we’re layering memories and infusing love into a piece that will serve as a protector of palms and a brightener of tables. Let’s gather our colorful fabrics and set forth on a quilting quest to create a stellar hot pad that’s sure to be the star of your kitchen ensemble.
The Folded Star
Quilting, at its essence, is the art of bringing together diverse fabrics to create something unified and beautiful. The “Folded Star” hot pad is no exception. You will need a small collection of prints and solids that contrast and complement each other, much like the different personalities in a harmonious chorus.
Materials
- Fat quarters in an array of colors and patterns: teal print, gold print, large dot, green floral, and turquoise dot
- A 7” square of muslin for the foundation, the stage upon which our star will shine
- An 8” square of coordinating print for backing, the unsung backdrop
- An 8” square of cotton batting, the plush comfort within
- Needle and coordinating thread, the quiet heroes that bind our creation
- A turning stick, our trusty tool for achieving crisp points and smooth edges
Prep Work: The Foundation of Our Creation
Before a single thread graces the fabric, the preparation for our “Folded Star” begins. Like an artist preparing their canvas, we cut our materials from selvage to selvage, clearing away the factory edges to ensure a pristine starting point for each element of our “Folded Star.” It’s a process that demands precision and patience, as each cut fabric is destined to become a part of something greater.
From the vibrant teal print, we carefully measure and snip four 4″ squares; these will soon transform into the cornerstone folds of our “Folded Star” design. From the rich gold print, the playful large dots, and the elegant green floral, we prepare eight 4″ squares of each, laying the foundation for the layers of our star. And from the serene turquoise dot fabric, we cut not only four 6-½” squares but also an additional four 4″ squares, ensuring we have the necessary variety of sizes to give our “Folded Star” its depth and dimension.
 Full Pattern: Click Here
Creating the Star: A Stitch-by-Stitch Tutorial
Step-by-Step Instructions
Now, with our fabrics prepped and our hearts set on crafting, let’s begin the creation of our “Folded Star” hot pad. The process is as engaging as it is fulfilling, and every fold brings us closer to a star that’s about to be born from our very own hands.
- The Foundation of Stars: Begin with the 7” muslin square, folding it first in half and then in quarters, pressing to mark. Unfold, then repeat the process diagonally. These lines are the guiding lights for our star, ensuring every piece aligns in celestial harmony.
- First Light – The Teal Triangles: Fold a 4” teal print square in half twice, press, then unfold once to form a rectangle. Create a triangle by folding the corners down to the center crease. This is the first whisper of our star taking shape. Repeat until you have four folded triangles.
- Aligning the Cosmos: Place the teal triangles onto the muslin square, using the creases as your guide, positioning them with their points kissing in the center. Secure them with pins, then machine baste around the edges, before securing the points with a few hand stitches.
- Expanding the Universe: With the same method, fold the gold print squares into triangles and arrange them around the first set, maintaining a small space between the points. The star now begins to show its complexity and beauty. Continue with rounds of large dot and green floral triangles, each adding depth to our design.
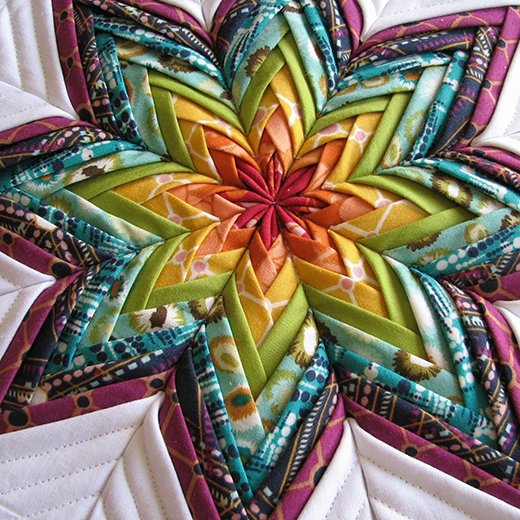
- The Final Frontier: For the last round, use both the small and large turquoise dot triangles. Position the smaller ones along the square’s lines, and the larger at the corners, covering the muslin’s edges. The star is now complete, a folded masterpiece ready for the final touches.
- Bringing the Star to Life: Layer the backing, batting, and your star, right sides together, pinning them in place. Sew around the edges with a ¼” seam, leaving a gap for turning. This is where our star transforms from a flat design into a three-dimensional creation.
- The Big Reveal: Trim the edges, clip the corners, and turn your hot pad right side out. Use the turning stick to define the corners, press flat, and hand stitch the opening closed. With this, your “Folded Star” hot pad is ready to shine brightly in your home.
Finishing with Flair
- Final Press: Ironing your hot pad after turning it right side out will give it that professional, crisp finish.
- Top Stitching: If desired, add a top stitch around the perimeter for extra durability and a defined edge.
- Embellish: Feel free to add a loop of ribbon before sewing the final seam if you wish to hang your hot pad.
Reflection and Celebration
As you hold the completed “Folded Star” hot pad, take a moment to appreciate the journey you’ve taken from simple fabric squares to a stunning and functional piece of art. Each fold, each press, each stitch was a step towards bringing warmth and beauty into your kitchen and your life.
This project, though small in size, is immense in what it represents—a constellation of creativity, a celebration of new skills learned, and the warm glow of achievement. May this “Folded Star” hot pad be a reminder of your capabilities and the magic that can be created with fabric, thread, and a bit of patience.