
Growing up, I was always fascinated by the night sky. The way the stars twinkled and danced across the darkness sparked a sense of wonder in me. This fascination didn’t just stay as a childhood memory; it followed me into adulthood and found a place in my passion for quilting. The “Twinkling Stars” quilt project is more than just a crafting endeavor; it’s a homage to those nights spent gazing at the heavens, wondering what lies beyond.
The journey of creating the “Twinkling Stars” quilt is one filled with intricate details and careful planning. It’s not just the act of sewing pieces of fabric together; it’s about creating a narrative, a story told through the patterns and colors chosen.
SEE A NEW PATTERN HERE
Each star block represents a different night sky, a different memory, making this quilt a deeply personal project for me. As I guide you through the process of creating your own “Twinkling Stars” quilt, I invite you to weave your own stories and memories into your project, making it uniquely yours.
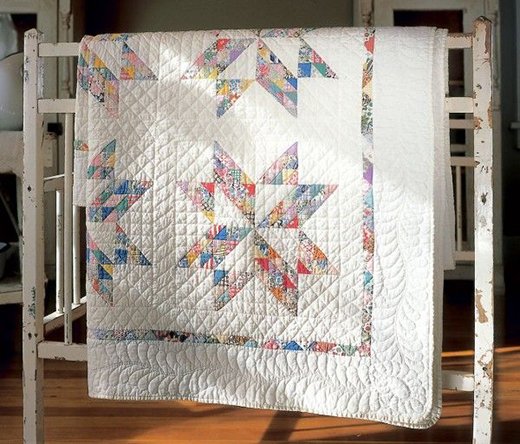
Twinkling Stars Quilt: A Canvas of Memories and Dreams
Creating the “Twinkling Stars” quilt is akin to painting with fabric. The assortment of prints and the cream solid background fabric serve as your palette, while the detailed piecing instructions are your brush strokes.
This project is not just about creating a beautiful quilt; it’s about bringing a piece of the past into the present, connecting moments of wonder and dreams of the cosmos into a tangible form. The variety of fabrics and the complexity of the blocks ensure that no two quilts are exactly the same, each a unique masterpiece reflecting its creator’s memories and dreams.
As you embark on this journey, remember that the quilt you are about to create is more than just a decorative piece. It’s a celebration of the night sky, a bridge between the wonders of the universe and the comfort of home. Whether you’re an experienced quilter or someone just beginning to explore the world of quilting, the “Twinkling Stars” project offers a rewarding experience, one that challenges and delights in equal measure.
Full Pattern: Click Here
Stitching the Cosmos: The Fabric of Our Night Sky
SEE A NEW PATTERN HERE
Embarking on the “Twinkling Stars” quilt project is akin to stitching a piece of the night sky into existence. The assortment of prints and the solid cream background fabric mimic the vast cosmos and the twinkling stars. This section will guide you through the materials needed and offer insights to kickstart your journey.
Materials: Gathering Stardust
To bring the “Twinkling Stars” quilt to life, you will need:
- Assorted prints for the blocks and the second border, totaling 4 yards. These prints will represent the varied and vibrant stars in the night sky. Consider mixing prints and plaids or brights and pastels for an interesting 1930s-looking quilt. The diversity in your fabric choices will add depth and intrigue to your quilt, reminiscent of the countless stars dotting the heavens.
- Cream solid fabric, totaling 6 1/2 yards, will serve as the background, sashing, borders, and binding. This fabric will act as the canvas upon which your stars will twinkle, offering a calm and steady base to highlight the quilt’s vibrant patterns.
- Backing fabric, requiring 6 yards, will support your quilt. Choose a fabric that complements your quilt top to add an extra layer of beauty to your creation.
- Batting, sized 74″ x 108″, will give your quilt its warmth and structure. Opt for a batting that matches the intended use of your quilt, whether it be for cozy winter nights or as a decorative piece.
Cutting Instructions: Shaping Your Constellations
Follow these cutting instructions to prepare your materials:
- From the assorted prints, cut a total of 540 squares measuring 2⅛” x 2⅛”, 270 squares measuring 2⅛” x 2⅛”, and 72 squares measuring 3¼” x 3¼”. These pieces will form the intricate patterns of your twinkling stars.
- For the cream solid fabric, you will need to cut strips and squares in various sizes as specified, focusing on precision to ensure the pieces align perfectly, creating a harmonious starry night scene.
Preparing for Lift-Off: Insights and Considerations
Before diving into the piecing process, consider the following:
- Variety is Key: An array of different prints will make your quilt truly stand out. Don’t shy away from mixing different types and colors of fabric. Each piece contributes to the overall beauty of your quilt, much like individual stars contribute to the beauty of the night sky.
- Accurate Seams: An accurate ¼” seam allowance is crucial for ensuring that your pieced border fits perfectly. Take time to measure and test your seam allowance before starting.
- Rounded Corners Option: The original “Twinkling Stars” quilt features slightly rounded corners, adding a soft, gentle touch to the overall design. Consider using a jar lid or a teacup as a template if you wish to replicate this feature in your quilt.
In the next section, we will walk through the step-by-step instructions for piecing together your “Twinkling Stars” quilt. From assembling the blocks to adding the final touches, each step will bring you closer to capturing the beauty of the night sky in fabric and thread.
As we move into the final phase of our celestial journey, creating the “Twinkling Stars” quilt becomes an act of bringing the night sky into our homes. Here, we’ll go through the step-by-step process, ensuring each piece aligns perfectly to form our constellation masterpiece.
Step-by-Step Instructions: Weaving the Starlight
Piecing the Blocks & Border Strips
- Creating Triangle-Squares:
- On the wrong side of an assorted print 2⅛” square, draw a diagonal line. Place this square on another unmarked square of the same size, right sides together.
- Sew a ¼” seam on each side of the marked line, then cut apart on the line. Press open to make two triangle-squares. Repeat to make a total of 540 triangle-squares.
- Assembling Pieced Squares:
- Using triangle-squares, assorted print 2⅛” half-square triangles, and cream solid 4⅝” half-square triangles, assemble them as shown in the provided diagrams to make pieced squares. You’ll need 180 of these.
- Constructing Twinkling Star Blocks:
- Arrange 12 pieced squares and 4 cream solid 4¼” squares to form a Twinkling Star Block, following the layout provided. Complete 15 blocks.
- Pieced Border Strips:
- Stitch together assorted print 3¼” quarter-square triangles in sequences to create border strips for the quilt’s short and long sides, following the pattern guides.
Quilt Top Assembly
- Row Assembly:
- Alternate Twinkling Star Blocks with cream solid 2½” x 15½” strips, creating 5 rows. Join these rows with cream solid 2½” x 52″ strips, adjusting for a snug fit.
- Adding Borders:
- Attach cream solid 3″ strips around the quilt, followed by the pieced border strips, ensuring to start and stop ¼” from the corners for a smooth corner fit. Finish with the wider cream solid border strips, trimming for an even edge.
Quilting & Finishing Touches
- Quilting:
- Layer your quilt top with batting and backing, then baste. Quilt as desired. The original featured 1″ crosshatching through the blocks, continuous diamonds in the sashing and inner border, and undulating feathers in the outer border. The pieced border is ditch quilted for emphasis.
- Binding:
- Bind your quilt with the remaining cream solid fabric, framing your masterpiece and giving it a finished look.
Additional Tips for Stellar Success
- Precision is Paramount: Take your time with each cut and seam to ensure the blocks align correctly. Accuracy in piecing reflects in the quilt’s overall beauty.
- Press for Perfection: Pressing each piece as you go prevents puckering and helps in aligning seams and blocks neatly.
- Quilting Choices: The quilting patterns add texture and depth. Consider the theme of your quilt and choose patterns that complement your piecing work.
- Binding Techniques: For a clean finish, ensure your binding is even and snug against the quilt’s edges. Hand stitching the binding to the back can add a personal touch.
Completing the “Twinkling Stars” quilt is not just an end but a celebration of the journey taken. From selecting fabrics to the final stitch, each step has been a testament to creativity and dedication. This quilt embodies more than just skill; it represents a connection to the universe, a piece of the night sky that will forever twinkle within the confines of thread and fabric.
As you step back and admire your work, remember the stories woven into each block, the decisions made at each step, and the satisfaction of bringing a piece of the cosmos into your home. May this quilt be a source of warmth and wonder, a reminder of the beauty that lies both above us in the night sky and within us as creators.


