
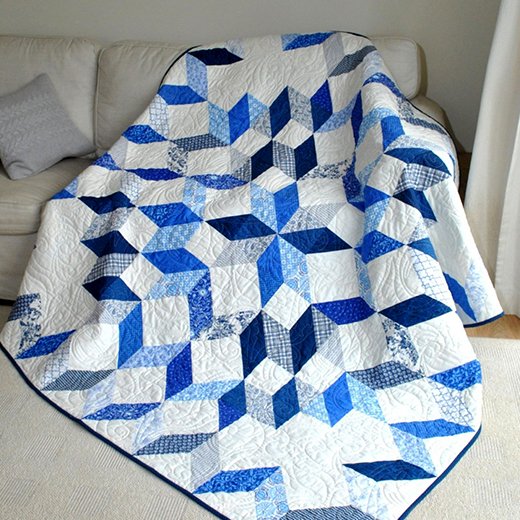
Embark on a quilting journey with the mesmerizing “Kaleidoscope Quilt,” where each stitch weaves a narrative as captivating as the dance of raindrops on the ocean’s surface.
This quilt, set in the “RAIN” color story, marries the dynamic motion of water with the serene palette of a rain-washed sky. With its final dimensions reaching 60-1/2” by 60-1/2”, the Kaleidoscope Quilt promises to be as enchanting to behold as it is satisfying to create.
As a child, I was always fascinated by the kaleidoscope my grandfather kept on the high shelf in his study. I’d spend hours gazing through the looking glass, watching as simple shards of colored glass created intricate, ever-changing patterns with each careful turn.
It was a dance of light and color, a visual symphony that never ceased to amaze.
Today, as I introduce the “Kaleidoscope Quilt,” I am taken back to those moments of wonder. This quilt, with its shifting patterns and hues reminiscent of rain-kissed oceans, encapsulates the same magical transformation I witnessed within my grandfather’s kaleidoscope.
The Quilt as a Storyteller
Now, as I lay out the fabrics and begin cutting, I’m crafting more than a quilt; I’m piecing together a narrative. Each square of INDIGO, each rectangle of NAVY, and every strip of RAIN are parts of a story – my story. The “Kaleidoscope Quilt” is a celebration of those youthful days, an ode to the child who found entire universes in the turn of a kaleidoscope.
It’s a quilt that promises to tell its own tales, with patterns that speak of ocean depths and stormy skies, of quiet moments spent with loved ones, and of the beauty found in life’s simple pleasures.
Curating Your Palette
Before we dive into the construction, let’s curate our palette of fabrics for the “Kaleidoscope Quilt.” Your collection will reflect the subtle tones and depths of the “RAIN” colorway:
- Fabric A (INDIGO): The deep hues of the night sky, 1-5/8 yards
- Fabric B (POWDER/NAVY): The soft touch of twilight, 3/4 yard
- Fabric C (NAVY): The mystery of the deep ocean, 1-1/3 yards
- Fabric D (INDIGO): The shadow beneath the waves, 1/3 yard
- Fabric E (RAIN): The essence of a rain-soaked petal, 1/3 yard and an additional 5/8 yard
Accompany these with 4 yards for backing, preparing for a creation that’s as sturdy as it is beautiful.
Preparing for the Journey
Review all instructions carefully. Precision is your compass; 1/4” seam allowances your path. Press as you go, setting each seam firmly in place, ready for the quilt’s assembly. The width of fabric (WOF) should be at least 42” to ensure ample coverage.
Precision Cutting for the Kaleidoscope Quilt
With our serene color story and fabrics ready, the cutting phase is where our “Kaleidoscope Quilt” begins to take shape. Careful and precise cutting is essential to ensure that each piece fits perfectly within the quilt’s design.
Full Pattern: Click Here
Crafting the Pieces
From Fabric A, your quilt’s foundation, cut:
- Five 5” x WOF strips, then subcut into thirty-six 5” squares.
- Five 4-1/2” x WOF strips, further divided into sixteen 4-1/2” squares, four 4-1/2” x 8-1/2” rectangles, and four 4-1/2” x 12-1/2” rectangles.
- Five 1-1/2” x WOF strips, sewn end-to-end to create two border strips, one measuring 1-1/2” x 48-1/2” and the other 1-1/2” x 50-1/2”.
From Fabrics B, C, D, and E, follow a similar strategy, focusing on squares and border pieces that will interlock to form the quilt’s complex pattern.
Embarking on the Quilt’s Construction
With all pieces cut, lay them out to preview the quilt’s kaleidoscopic effect. This visual preparation is as crucial as the sewing itself, allowing you to anticipate the quilt’s final appearance and make any necessary adjustments.
Assembling the Kaleidoscope Quilt
With our fabric cut to precision, we now embark on the assembly of the “Kaleidoscope Quilt.” This is the stage where the individual pieces are pieced together to reveal the intricate and stunning pattern of the quilt.
Assembling the Half-Square Triangles (HSTs)
- Pair a 5” square of Fabric A with a 5” square of Fabric B, right sides together (RST). Draw a diagonal line on the wrong side of one square.
- Sew 1/4” away from both sides of the marked line, then cut on the line to create two HSTs. Press toward the darker fabric and trim to 4-1/2” square.
- Repeat this process to make a total of twenty-four A/B HSTs, and follow the same steps for A/C, B/C, A/E, and D/E fabric combinations, yielding a symphony of HSTs.
Creating the Quilt’s Centerpiece
- Arrange the HSTs and Fabric A squares and rectangles according to the pattern guide, being mindful of the fabric placement and the orientation of the HSTs.
- Sew each row together, pressing seams in opposite directions with each subsequent row for a flat and neat assembly.
- Continue to join the rows together in pairs and then sew pairs together until you are sewing two quilt center halves together.
Finishing with Borders
- Attach the top and bottom border 1 pieces to the quilt center and press toward the borders.
- Add the side border 1 pieces, followed by border 2 and border 3 pieces, each time pressing toward the borders to maintain a flat and even surface.
Your “Kaleidoscope Quilt” top is now complete. The final steps of basting, quilting, and binding will encase your work in a beautiful frame, ready to be showcased and enjoyed. Choose a quilting pattern that complements the dynamic design of your quilt top and finish with binding that defines and protects its edges.