
Ever since I was a little girl, quilting has been a part of my life. My grandmother, a master quilter, passed down her love for this craft to me. She taught me the value of patience, precision, and the joy of creating something beautiful and warm.
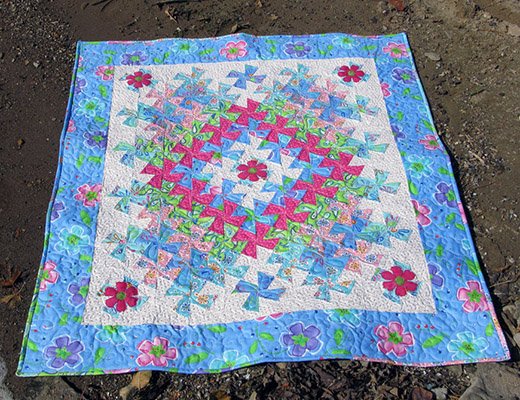
Among the many quilting projects I’ve embarked on, the “Worldly Lil Twister Quilt” holds a special place in my heart. This quilt, with its vibrant colors and intricate patterns, reminds me of the countless hours I spent learning the ropes of quilting under my grandmother’s watchful eyes. It’s not just a piece of fabric; it’s a mosaic of memories and a testament to the bond we shared.
Recently, I decided to revisit this beloved project, this time with a twist—using the Lil’ Twister template. The process brought back so many memories and also introduced me to new techniques and possibilities. The Worldly Lil Twister Quilt is perfect for a baby quilt, combining traditional quilting elements with a touch of modern flair.
In this article, I’m excited to share with you a step-by-step guide on how to create your own Worldly Lil Twister Quilt. Whether you’re a seasoned quilter or just starting, this project promises fun and creativity.
A Twist on Tradition: The Worldly Lil Twister Quilt
The Worldly Lil Twister Quilt is more than just a baby blanket; it’s a gateway to exploring the rich traditions of quilting while incorporating a unique, modern tool—the Lil’ Twister template. This tool has revolutionized the way I approach quilting projects, allowing for intricate patterns to be created with ease.
The quilt we’re about to make is not only visually striking but also imbued with the warmth and love that only a handmade quilt can offer. As we dive into this project, remember that each stitch is a step on a journey, and each piece of fabric a part of a larger story.
Full Pattern: Click Here
Embracing the Swirl: The Heart of Our Quilt
The essence of the Worldly Lil Twister Quilt lies in its captivating swirl pattern, a dance of colors and shapes that brings life to the fabric. This pattern, achieved with the Lil’ Twister template, is not just a design choice; it’s a narrative element, weaving stories and memories into the quilt’s very fabric. The process of cutting and piecing together the squares to form the swirls is like piecing together moments of joy, laughter, and warmth. As we prepare to embark on this creative journey, let’s gather our materials, each piece a building block for our masterpiece.
Materials
Gathering the right materials is the first step in bringing our Worldly Lil Twister Quilt to life. Here’s what you’ll need:
- Six Fat Quarters in assorted colors. For my quilt, I chose a palette of blues, pinks, and greens to evoke a sense of tranquility and warmth.
- 1½ yards of White Print Fabric for the background, adding contrast and making the colors pop.
- 1½ yards of Border Print Fabric to frame our creation beautifully.
- 1½ yards of Backing Fabric to complete the quilt.
- Scraps of Dark Pink and Green Fabric for the applique, adding a touch of elegance and personality.
- Heat n Bond Lite, essential for the applique process, ensuring our designs are securely attached and lay flat.
The selection of fabrics, particularly from Me & My Sister Designs, offers a variety of colors similar to my chosen palette, ensuring your quilt will be just as vibrant and lively.
Preparing for the Journey: Cutting and Piecing
Before we dive into the assembly of our quilt, it’s crucial to approach the process with a clear plan and an open heart. Quilting is not just about following steps; it’s about pouring a part of ourselves into the creation. As you cut each piece and sew them together, let your imagination and creativity guide you. Remember, each quilt tells its own story, and the Worldly Lil Twister Quilt is no exception. It’s a canvas for expression, a space for innovation, and above all, a labor of love.
With our materials ready and our hearts set on the journey ahead, we’re poised to begin crafting our Worldly Lil Twister Quilt. This project, a blend of tradition and innovation, invites us to explore the depths of our creativity and to share a piece of our story through the art of quilting.
Step-by-Step Instructions
1. Piecing the Quilt Top
- Begin by arranging your 5-inch squares according to the color scheme you’ve chosen. This quilt utilizes a beautiful mix of blues, pinks, and greens set against a white background to create a dynamic and visually appealing design. Arrange the squares on a flat surface, following the layout provided in the tutorial, to visualize the quilt before sewing.
- Sew the squares together with a ¼ inch seam allowance, starting from one corner and working your way across. Pay close attention to the color placement to ensure the pattern flows seamlessly.
- After sewing the squares, add the white print border around the edges. Cut two 3-inch strips for the longer sides and two more for the shorter sides, adjusting the length to fit your quilt top.
2. Creating the Twister Effect
- With the quilt top pieced together, it’s time to introduce the Lil’ Twister template. Place the template at the intersection of the squares, aligning it carefully to ensure even cutting. The magic of the Worldly Lil Twister Quilt lies in how these cuts will transform the quilt top into a swirling pattern of colors.
- Cut around the template, then rotate it as you move along the quilt top, creating a series of twister blocks. This process might reduce the size of your quilt significantly, so prepare for the transformation with excitement.
3. Assembling the Twisted Blocks
- Once all your blocks are cut, lay them out to form the twister pattern. This step requires a bit of patience and creativity as you find the perfect arrangement. The blocks should come together like a puzzle, each piece integral to the overall design.
- Sew the twister blocks together, being mindful of the pattern’s flow and ensuring that the colors blend harmoniously. This step will bring the dynamic twister effect to life, marking the culmination of your quilt top’s transformation.
Additional Tips for Success
- Precision is Key: Take your time with cutting and sewing, as accuracy is crucial for the twister pattern to align correctly.
- Quilting and Binding: Choose a quilting style that complements the twister pattern, whether it’s simple straight-line quilting or something more elaborate. For binding, consider a color that frames the quilt beautifully, tying the whole project together.
Conclusion: Reflect and Appreciate
As you complete your Worldly Lil Twister Quilt, take a moment to reflect on the journey. From the initial selection of fabrics to the final stitches of the binding, each step has been a testament to your creativity, patience, and passion for quilting. This quilt, a harmonious blend of colors and patterns, is not just a cozy blanket; it’s a work of art, imbued with personal meaning and the joy of creation.
Encourage yourself to share this project with others, whether as a heartfelt gift or a display of your quilting achievements. Let the Worldly Lil Twister Quilt inspire you to explore new patterns, techniques, and ideas in your quilting endeavors. Remember, every quilt tells a story, and your Worldly Lil Twister is a beautiful chapter in yours.