
Quilting, an art form rich in tradition and creativity, presents a unique canvas to blend patterns, colors, and textures, creating masterpieces that are as much about storytelling as they are about craft.
The Snail Trail Quilt Block, a distinguished part of the “Sew Easy Block of the Month” series by Ladybug Threads, exemplifies this blend of narrative and technique. As the March feature, this Snail Trail project transcends conventional crafting; it’s an exploration into the heart of quilting, where precision meets creativity.
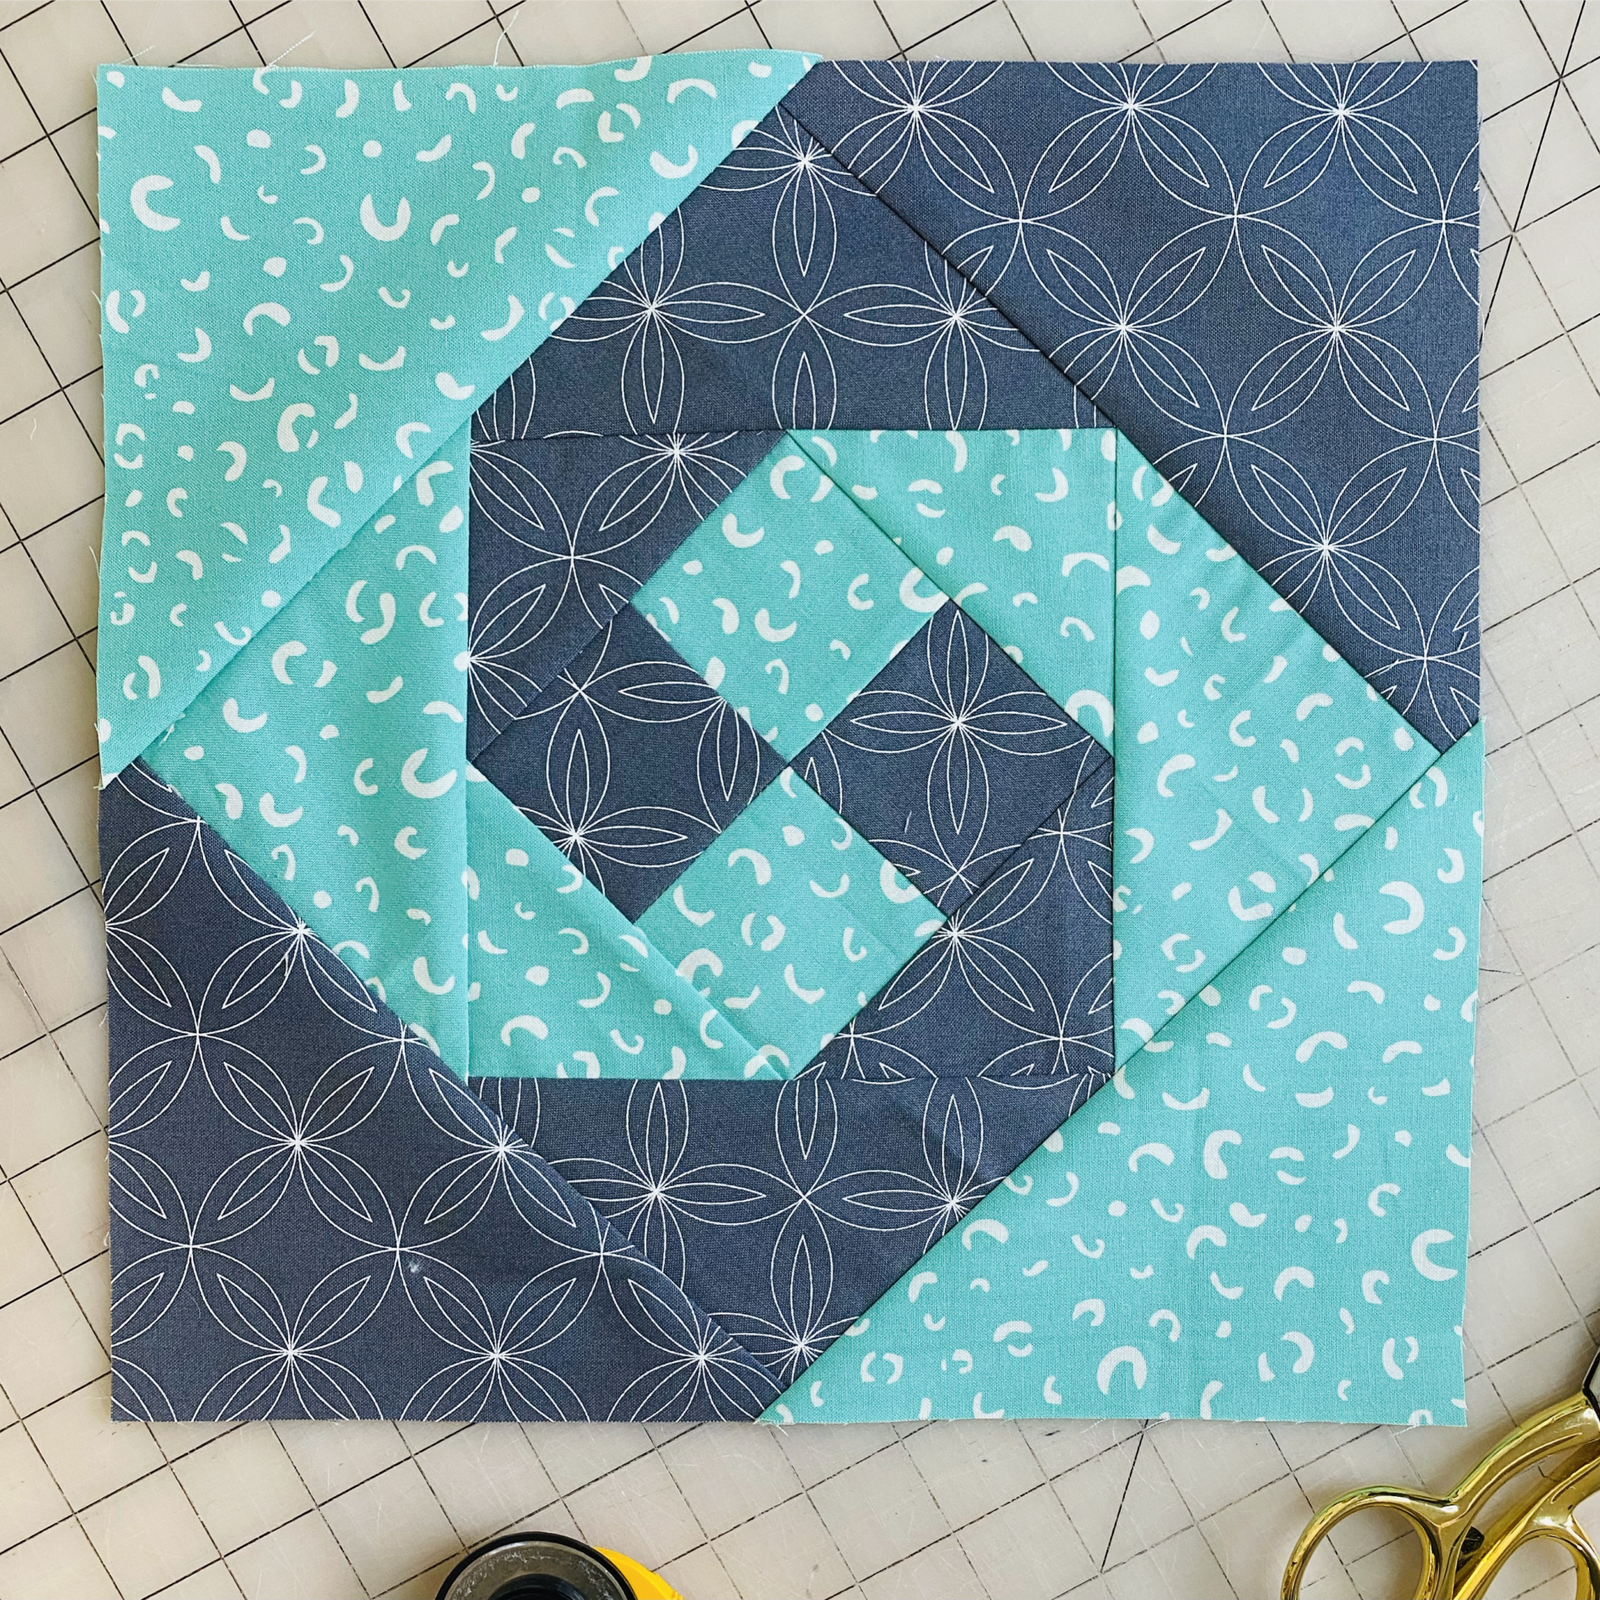
The Snail Trail pattern, known for its captivating spirals and visual depth, invites quilters of all skill levels – from beginners to experienced artisans – to immerse themselves in a project that promises both a challenge and a profound sense of achievement. Each stitch in the Snail Trail block is a testament to the quilter’s journey, a harmonious dance of fabric and thread that results in a piece of art that resonates with the personal touch of its creator.
A Spiral Dance: The Aesthetics of the Snail Trail
The Snail Trail Block captivates with its spiral design, reminiscent of the slow yet purposeful journey of a snail. This pattern is a beautiful metaphor for the quilting process itself – a slow and deliberate art that rewards patience and attention to detail.
The beauty of the Snail Trail lies in its versatility; a simple change in fabric colors can transform the entire feel of the block, making each creation a unique masterpiece. This section delves into the history and visual impact of the Snail Trail, exploring how this pattern has evolved and what it symbolizes in the quilting world.
Precision in Pieces: The Technical Intricacies
Quilting is an art that demands precision, and the Snail Trail Block is no exception. This section focuses on the technical aspects of the block – the importance of accurate cutting and the challenges of piecing together the spiral design.
The odd-sized squares and the need for consistent rotation to avoid a skewed pattern highlight the meticulous nature of this craft. Understanding these technical details is crucial for quilters to appreciate the complexity and skill required to bring this block to life.
Preparing for the Journey: Insights and Considerations
Embarking on the creation of the Snail Trail Block is akin to starting a new adventure. This section aims to prepare quilters for the journey ahead, offering insights and tips for tackling this project.
From selecting the right fabrics to understanding the importance of precision and patience, this part of the article sets the stage for the detailed instructions that follow. It’s a guide to help quilters approach the project with confidence and enthusiasm.
Full Pattern: Click Here
Materials:
- Assorted fabric pieces (usually quilting cotton) in various colors
- Rotary cutter and cutting mat
- Quilting ruler
- Sewing machine
- Thread matching the fabric
- Iron and ironing board
- Pins or fabric clips
- Scissors
- Template for the Snail Trail pattern (if available)
For a project like the Snail Trail Quilt Block, a detailed step-by-step might involve the following stages:
- Fabric Selection: Choose fabrics with complementary colors and patterns. Consider contrast to highlight the spiral design.
- Precise Cutting: Use a rotary cutter and quilting ruler to cut the fabrics into exact dimensions. This may include long strips and squares of various sizes.
- Arranging Pieces: Lay out the cut pieces following the Snail Trail pattern. This helps visualize the final look and plan the sewing.
- Sewing Pieces Together: Start by sewing smaller pieces, typically squares and triangles, to form blocks. Precision is key to align the pattern lines perfectly.
- Block Assembly: Join the smaller blocks to form the larger Snail Trail block. This usually involves aligning pieces and sewing them in a specific order to create the spiral effect.
- Pressing: Press the seams after each sewing step for a smooth, professional finish.
- Checking and Adjustments: Regularly check if the pieces are aligned correctly. Make adjustments as needed to maintain the pattern and symmetry.
- Finishing the Block: Once all pieces are sewn and the Snail Trail pattern is complete, do a final pressing and trim any excess fabric.
Each step is crucial to ensure that the final block is visually appealing and technically correct. As exact instructions may vary depending on the specific Snail Trail design, it’s always advisable to refer to the specific pattern for precise details.
In conclusion, the Snail Trail Quilt Block represents a beautiful amalgamation of precision, creativity, and traditional quilting techniques. Each step, from selecting the right fabrics to the final pressing of the block, plays a pivotal role in creating a stunning piece of art. This project not only challenges quilters to refine their skills but also offers an opportunity to create a piece that is both aesthetically pleasing and deeply personal.
As quilters piece together this intricate pattern, they weave a story, stitch by stitch, celebrating the enduring beauty and craft of quilting. Whether for a seasoned quilter or a beginner, the completion of the Snail Trail Quilt Block is a rewarding journey, culminating in a work of art that can be cherished for years to come.