
Embarking on a quilting project like “Pinwheels and Paddlewheels” is not just about crafting a piece of fabric art; it’s about engaging in a story woven with threads of tradition, creativity, and meticulous skill.
This project, detailed in the provided PDF, is a delightful exploration of quilting techniques that bring together intricate patterns and vibrant colors to create a visually stunning piece.
The allure of this project lies in its ability to blend classic quilting methods with a contemporary twist, offering both seasoned quilters and enthusiastic beginners an opportunity to delve into a world where fabric transforms into a mesmerizing display of artistry.
A Dance of Color and Design: The Essence of Pinwheels and Paddlewheels
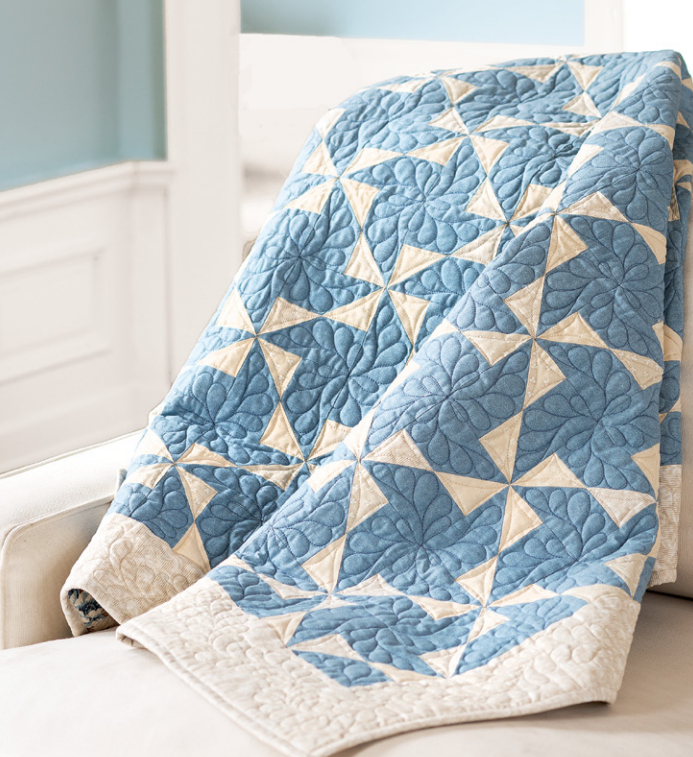
The “Pinwheels and Paddlewheels” quilt project stands as a vibrant testimony to the dynamic world of quilting. At its heart, this project is a celebration of the timeless beauty of pinwheel patterns, known for their playful and dynamic movement, paired with the strong, steady flow of the paddlewheel design.
This unique combination captures the essence of motion and stability, symbolizing the ever-evolving journey of a quilter’s experience. This section of the article delves deeper into the historical significance and the modern interpretation of these patterns, illustrating how they come together to form a quilt that is both an artistic statement and a cozy, functional piece.
The Fabric of Creativity: Technical Aspects Unraveled
“Pinwheels and Paddlewheels” is more than just a visual treat; it’s a technical feat. This section focuses on the meticulous aspects of the project, from the precision in cutting each piece of fabric to the art of aligning them to perfection.
The intricate interplay of colors and patterns demands not just skill, but a deep understanding of how each element contributes to the overall design. Here, we explore the technicalities of quilt-making that elevate this project from a simple blanket to a masterpiece of textile art.
Preparing the Palette: Setting the Stage for Quilting
Before the first stitch is made, the journey of creating the “Pinwheels and Paddlewheels” quilt begins with preparation and planning. This section aims to equip the reader with essential insights and tips to embark on this quilting adventure.
From selecting the right fabric palette to understanding the nuances of pattern layout, this part of the article sets the tone for the exciting and detailed process that lies ahead.
Full Pattern: Click Here
Materials: Gathering the Essentials for “Pinwheels and Paddlewheels”
To embark on the “Pinwheels and Paddlewheels” quilt, you’ll need a collection of materials that are both functional and expressive. The list includes:
- Assorted Fabric: Choose colors and patterns that resonate with the pinwheel and paddlewheel themes. Consider a mix of vibrant and subtle tones.
- Cutting Tools: A sharp rotary cutter, scissors, and a quilting ruler are essential for precise cuts.
- Sewing Machine: Ensure it’s in good working condition for smooth stitching.
- Thread: Select colors that complement your fabrics.
- Batting: Choose a quality batting that suits the quilt size.
- Backing Fabric: This will be the quilt’s reverse side, so pick a fabric that complements the front.
- Binding Material: For the quilt’s edges, matching or contrasting binding can be used.
- Pins and Clips: Essential for holding fabric pieces together before sewing.
- Iron and Ironing Board: For pressing fabric and seams.
- Template: If available, a template for the pinwheel and paddlewheel patterns.
Step-by-Step Instructions: Crafting the Quilt
- Fabric Preparation: Wash, dry, and iron all fabrics to prevent shrinkage post-construction.
- Cutting: Follow the pattern guide to cut fabric into required shapes and sizes.
- Piecing: Sew fabric pieces together, beginning with smaller sections and advancing to larger parts of the pattern.
- Assembling the Quilt Top: Join all pieced sections, ensuring alignment and pattern consistency.
- Quilt Sandwich: Lay the backing fabric, batting, and quilt top in layers, securing them together.
- Quilting: Machine or hand-quilt following the desired design, ensuring even stitching.
- Binding: Sew the binding around the quilt’s edges for a neat finish.
Additional Tips: Enhancing Your Quilting Experience
- Color Coordination: Pay extra attention to how colors interact within the pinwheel and paddlewheel patterns.
- Precision in Piecing: Take your time to align edges and corners for a flawless look.
- Regular Pressing: Iron seams during piecing for flat and crisp lines.
- Quilting Design: Choose a quilting pattern that complements the overall design.
- Binding Technique: Experiment with different binding techniques for a unique edge finish.
Nearing the Finish Line: The Beauty of Pinwheels & Paddlewheels
As the “Pinwheels & Paddlewheels” quilt nears completion, the true beauty of the patterns becomes increasingly evident. The harmonious dance of the Pinwheels & Paddlewheels patterns creates a dynamic yet comforting rhythm, reflecting the quilter’s dedication and creativity.
This stage, where the intricate Pinwheels & Paddlewheels come to life, is where quilters truly appreciate the magic woven into each fabric piece, bringing the quilt’s story to a beautiful crescendo.
Reflecting on the Quilting Journey
Completing the “Pinwheels and Paddlewheels” quilt is a journey through the heart of quilting, blending creativity, skill, and patience. Each step, from selecting fabrics to the final stitch, contributes to creating a quilt that is not just a cozy cover but a piece of art.
This project offers quilters a chance to express themselves, learn new techniques, and enjoy the satisfaction of creating something truly beautiful. As you fold or display your finished quilt, take a moment to appreciate the journey, the skills honed, and the story each stitch tells.