
Growing up, I spent countless summer afternoons with my grandmother in her sunlit sewing room, surrounded by fabrics and threads of every color.
She taught me the art of quilting, and I fell in love with the process of creating something beautiful and lasting from simple materials.
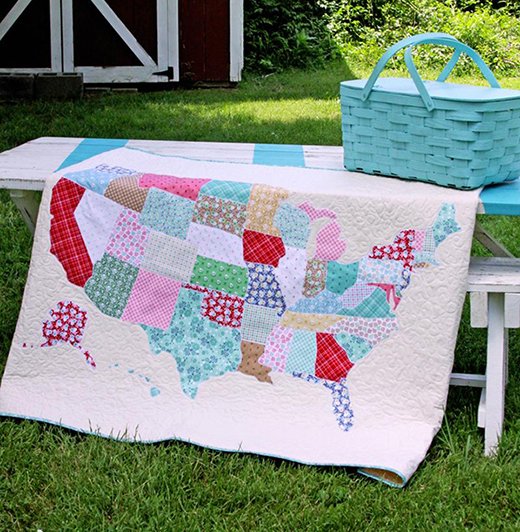
One of my most cherished memories is working on a quilt that depicted a map of the United States, each state a different patchwork piece. This project inspired me to create my own version, which I’m thrilled to share with you today.
Discovering the “Fields of Alsike” Quilt
The “Fields of Alsike” quilt is more than just a beautiful piece; it’s a journey through America’s diverse landscapes, brought to life by the stunning fabrics from Bonnie Christine’s “The Open Road” collection.
Each fabric tells a story, and together they create a vibrant map that is both a work of art and a homage to the spirit of exploration and adventure. The “Fields of Alsike” quilt invites you to embark on a creative journey, combining artistry and craftsmanship to produce a quilt that is both visually striking and deeply meaningful.
Full Pattern: Click Here
The Heart of the Quilt: A Patchwork Map
Creating a quilt that features a detailed map requires meticulous attention to detail and a love for the craft. The “Fields of Alsike” quilt, with its rich colors and intricate design, offers a wonderful opportunity to delve into the specifics of quilting while also celebrating the uniqueness of each state.
This project not only enhances your quilting skills but also provides a meaningful way to connect with the geography of the United States through the “Fields of Alsike” quilt.
Materials
To begin this project, gather the following materials for the “Fields of Alsike” quilt:
- Backing Fabric: TOR-13862, 4 ½ yards (suggested)
- Binding Fabric: TOR-13860, ½ yard (included)
- Fabric A: TOR-13860, FQ
- Fabric B: TOR-13861, FQ
- Fabric C: TOR-13864, FQ
- Fabric D: TOR-13865, FQ
- Fabric E: TOR-13869, ½ yard
- Fabric F: TOR-23860, FQ
- Fabric G: TOR-23861, FQ
- Fabric H: TOR-23863, FQ
- Fabric I: TOR-23864, FQ
- Fabric J: TOR-23867, FQ
- Fabric K: PE-436, 2 yards
- Fabric L: PE-406, ½ yard
Additional materials include:
- Fusible (Steam a Seam Lite2® or equivalent)
- Sharp pencil for tracing
- Cutting machine (Cricut® or Silhouette®) if preferred
- Iron and ironing board
- Sewing machine and thread
- Batting
- Safety pins or basting thread
Preparing to Begin
Before you start the “Fields of Alsike” quilt, it’s important to prepare your fabrics. Wash and iron each piece to ensure they’re clean and smooth. Familiarize yourself with the pattern pieces and the map layout. Print the PDF files for the United States map and state templates, and assemble the map by taping the pages together. This will serve as your guide for placing each state on the “Fields of Alsike” quilt.
Step-by-Step Instructions
Step 1: Preparing the Background Fabric
- Trim the cut edges of the background fabric (Fabric K) so that it is perfectly straight.
- Fold the fabric in half lengthwise and press a center line. Then fold it in half widthwise and press another center line. These lines will help you center the map on the “Fields of Alsike” quilt.
Step 2: Tracing and Cutting the States
- Securely tape the printed map to a large work surface.
- Place the background fabric over the map and lightly trace each state’s boundaries using a sharp pencil. This will be your placement reference for the “Fields of Alsike” quilt.
- Print each state template. Fuse the appropriate fusible material to the wrong side of the fabrics A-J. A light press is all that’s needed.
- Cut out each state, ensuring you label them as you go. Remember, the templates are mirrored, so trace them on the wrong side of the fabric for the “Fields of Alsike” quilt.
Step 3: Assembling the Quilt Top
- Working in sections, peel the remaining fusible paper from each state and place it in the correct position on the background fabric. Reposition as necessary until you are satisfied with the arrangement on the “Fields of Alsike” quilt.
- Once all states are correctly placed, press them securely with an iron.
Step 4: Stitching the States
- You may choose to stitch around each state for extra security. Options include a zig-zag stitch or a simple straight stitch.
- The Steam-a-Seam holds well, but if any edges fray, it will add character to your “Fields of Alsike” quilt.
Step 5: Final Assembly
- Trim the background fabric to 44” x 60”.
- Layer the quilt top with batting and backing fabric.
- Smooth out wrinkles and pin the layers together. Baste with long stitches or use safety pins.
- Quilt as desired, starting from the center and working towards the edges.
- Trim any excess fabric or batting from the “Fields of Alsike” quilt.
Step 6: Binding the Quilt
- Cut enough strips of Fabric L to make a 220” long strip, 1 ½” wide.
- Sew the binding strip to the “Fields of Alsike” quilt, starting in the middle of one side, and leaving a 5” tail.
- Fold and sew the corners as described in the instructions.
- Once the binding is attached, turn it to the back and hand-stitch it in place using a blind stitch.
Additional Tips
- Be patient and take your time with the tracing and cutting steps to ensure accuracy for the “Fields of Alsike” quilt.
- If using a cutting machine, follow the manufacturer’s instructions for best results.
- Experiment with different quilting motifs to give your “Fields of Alsike” quilt a personal touch.
Creating the “Fields of Alsike” quilt is a rewarding journey that combines artistic expression with technical skill. As you piece together each state, you’ll appreciate the diversity and beauty of the United States in a new way. This quilt is not just a map, but a testament to your dedication and creativity. Display it proudly, knowing you’ve crafted a beautiful and meaningful work of art with the “Fields of Alsike” quilt.