
Growing up in a home where the hum of the sewing machine was as familiar as the melody of our favorite songs, I, Julie, have always found a special kind of comfort in the art of quilting.
My grandmother, a master quilter, taught me not just the craft, but the stories woven into each pattern and the love stitched into every seam. Among the many quilts we made together, the “Red Hots Baby Quilt” holds a place in my heart, reminiscent of warm summer days and the sweet tang of red candy apples at the county fair.
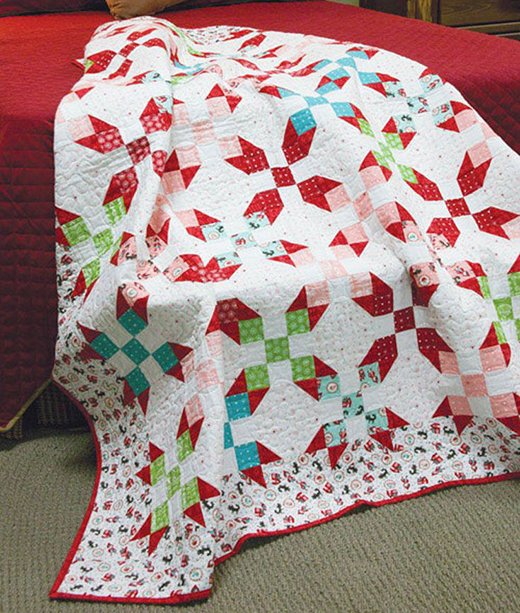
Red Hots Baby Quilt: From Simple Stitches to Cozy Nights
The creation of the Red Hots Baby Quilt came about during one of those magical summers. The vibrant reds, soft pinks, lime greens, and cheery aquas in this quilt are more than just fabric; they are a patchwork of memories, of laughter shared under the shade of an old oak tree, and of the tender moments of storytelling with my grandmother.
This quilt, with its mixture of Nine-Patch and Snowball Blocks, is not just a blanket; it’s a storybook of my childhood.
A Patchwork of Memories
Creating the Red Hots Baby Quilt is like compiling a scrapbook. Each piece of fabric, with its unique hue and texture, represents a different chapter of my life. The bright reds remind me of my first bike, the lime greens of summers spent running through sprinklers, the soft pinks of birthday cakes and party dresses, and the cheery aquas of afternoons spent at the pool.
This quilt, with its stars appearing when the Nine-Patches and Snowball Blocks come together, symbolizes the unity and beauty of different moments coming together to form a single, cohesive story.
Full Pattern: Click Here
Embracing the Palette: The Joy of Color Selection
Choosing the right fabrics for the Red Hots Baby Quilt is akin to selecting the perfect palette for a painting. The bright reds, lime greens, soft pinks, and cheery aquas are not just colors; they are the medium through which we express the quilt’s vibrant energy and warmth. This selection process is not just about the visual appeal; it’s about how these colors interact with each other to create a dynamic and inviting piece that’s as much a joy to look at as it is to snuggle under.
Materials
Before diving into the construction of our quilt, let’s ensure we have all the necessary materials at hand. Here’s what you’ll need:
- Fabric for Nine-Patch Blocks: 4 assorted prints (1 fat eighth each). Choose vibrant reds, lime greens, soft pinks, and cheery aquas to capture the quilt’s essence.
- Fabric for Snowball Blocks: White/pink heart print (½ yard) to add a playful and tender touch to the quilt.
- Accent and Binding Fabric: Red print (¾ yard), which will serve as both some blocks and the binding, framing our quilt with warmth and energy.
- Background and Border Fabric: White solid (½ yard) for the Nine-Patch Blocks and white multicolor print (1⅜ yards) for the pieced border and outer border, providing a canvas that makes our colors pop.
- Backing Fabric: 2⅝ yards of your choice, pieced lengthwise to cover the back of the quilt.
- Batting: A 46″ x 46″ square, providing the cozy middle layer of our quilt.
- General Supplies: Rotary cutter, cutting mat, ruler, sewing machine with a ¼” foot, thread to match the fabrics, scissors, pins, and an iron for pressing.
A Thread of Advice: Prepping for Your Project
Before we cut and piece our quilt, consider pre-washing your fabrics to prevent any future shrinkage or dye transfer. Ironing your fabrics after pre-washing ensures a smooth cutting process, leading to more accurate piecing. Take a moment to familiarize yourself with the fabric requirements and cutting instructions, as this will streamline your workflow and make the sewing process more enjoyable.
Step-by-Step Instructions: Crafting the Red Hots Baby Quilt
Crafting the Red Hots Baby Quilt is a journey filled with precision, creativity, and the joy of watching simple fabrics transform into a cherished keepsake. Follow these detailed steps to create your own vibrant and cozy quilt.
- Prepare the Nine-Patch Blocks:
- Sew together 2 matching assorted print 2½” x 20″ strips with 1 white solid 2½” x 20″ strip in the middle to form a strip set. Press seams towards the darker fabric to reduce bulk.
- Cut this strip set into 8 segments, each 2½” wide. Repeat with the remaining fabric to make a total of 4 strip sets.
- Sew 3 of these segments together to form a Nine-Patch Block, ensuring the outer strips’ prints face outward. Make 13 Nine-Patch Blocks in total.
- Assemble the Snowball Blocks:
- Draw a diagonal line on the wrong side of each 2½” red print square.
- Place a red square on each corner of a 6½” white/pink heart print square, right sides together. Sew along the drawn lines.
- Trim ¼” away from the sewn line and press the red corners open. This completes a Snowball Block. Make 12 of these.
- Create the Pieced Border Units:
- For the pieced border, sew a red print 2½” square to each end of a white multicolor print 2½” x 6½” rectangle.
- Press the seams towards the red squares to make the pieced border unit. Repeat to create 20 rectangles and 4 squares in total for the inner pieced border.
- Quilt Assembly:
- Lay out your Nine-Patch and Snowball Blocks alternately to form rows, following the quilt’s design. This step reveals the star pattern that emerges from the block arrangement.
- Sew the blocks into rows, then sew the rows together, carefully matching seams for a neat finish.
- Add the pieced border units around the quilt center, followed by the white multicolor print strips for the outer border. Ensure that the borders are sewn on straight to prevent the quilt from waving.
- Quilting and Finishing:
- Sandwich your quilt top, batting, and backing fabric. Baste the layers together using your preferred method (pins, spray, or basting stitches).
- Quilt as desired. This could be a simple edge-to-edge design, stitch in the ditch, or something more elaborate to complement the quilt’s design.
- Bind the quilt with the red print fabric strips, using a double fold binding method for durability.
Additional Tips for a Flawless Finish:
- Precision is Key: When cutting and piecing, take your time to ensure accuracy. A precise ¼” seam allowance is crucial for the blocks to align correctly.
- Pressing Matters: Press your seams well between each step. This not only makes sewing easier but also results in a flatter, more professional-looking finish.
- Enjoy the Process: Remember, quilting is not just about the final product but also about the joy and relaxation found in the process. Don’t rush; enjoy each step.
As you snip the final threads and spread your completed Red Hots Baby Quilt for the first time, take a moment to appreciate the journey. This quilt, a tapestry of colors and patterns, is more than fabric and thread; it’s a warm embrace, a story told in stitches, and a new memory created.
Whether you’re gifting this quilt or cherishing it in your own home, remember that each quilt you make adds a layer to your quilting story, just as my grandmother and I added to ours under the shade of the old oak tree.