
As I sat down last weekend to perfect my quilting skills, I realized just how much joy and relaxation it brings to me.
One of my favorite projects at the moment is the Milky Way Wall Hanging – Block 4.
It’s more than just a simple craft; it’s an experience, a journey through the colorful fabric universe that I truly cherish.
There’s something about selecting the perfect colors to represent the beautiful hues of the cosmos that makes the whole process feel enchanting.
When I first started quilting, I felt a little lost among all the fabric options and techniques.
But with every new pattern I tackled, like the Milky Way Wall Hanging – Block 4, I gained more confidence and creativity.
And let me tell you, every stitch feels like a piece of art coming together.
Plus, it’s the kind of project that turns heads and sparks conversations in my home!
Unveiling the Beauty of Paper Piecing
One of the most fascinating aspects of the Milky Way Wall Hanging – Block 4 is the technique of paper piecing.
This method allows for incredible precision and the opportunity to work with intricate designs that might be difficult to achieve otherwise.
It’s a fantastic way to use various fabric scraps while still producing a clean and stunning block.
The steps involved in paper piecing can be a bit tricky at first, but once you get the hang of it, you’ll find it rewarding.
I remember my first block; I was amazed at how the fabric transformed the paper diagram into a work of art, making the Milky Way Wall Hanging – Block 4 come to life with vibrant colors and perfect angles.
Choosing the Right Fabrics
In creating the Milky Way Wall Hanging – Block 4, fabric selection is crucial!
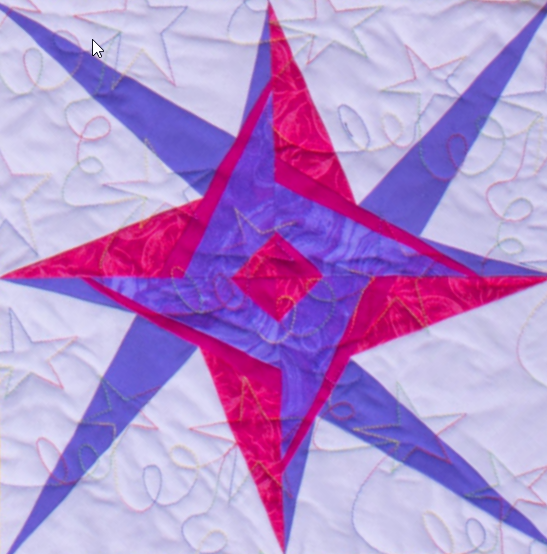
I recommend opting for colors that resonate with your theme—think celestial colors, like deep blues, purples, and sparkly pinks.
The current fabric lineup I’m using features Lavender Sorbet, Purple Marbled, Violet Dahlia, Hot Rose, and Tropical Pink, and let me tell you, it brings a whole new dimension to the quilt!
Don’t shy away from mixing and matching the fabrics to find combinations that inspire you.
The beauty of the Milky Way Wall Hanging – Block 4 lies in its rich colors and unique layout, and experimenting with fabric can be half the fun!
Materials You Will Need
- Coats Dual Duty XP® Paper Piecing thread
- Lavender Sorbet – CSFSESS.SORBE
- Purple Marbled – CBFS005.SPLAS
- Violet Dahlia – CSFSESS.DAHLI
- Hot Rose – CBFS004.HOTRO
- Tropical Pink – CSFSESS.TROPI
- 4 copies of Block 4 foundation (page 3)
- Sewing Machine
- Basic Sewing Supplies
- Printer
Preparation is Key!
Before diving into the Milky Way Wall Hanging – Block 4, it’s essential to prepare your workspace.
Have your materials organized and your sewing machine ready to rock.
Trust me; this will save you tons of time and frustration later!
I like to have all my fabric pieces cut and ready to go before starting on the actual sewing.
Additionally, print your templates at 100% to ensure the sections align correctly.
This tip will make all the difference in achieving that polished look as you piece together your quilt!
Step-by-Step Instructions Ahead!
Now, without further ado, let’s jump into the step-by-step instructions for the Milky Way Wall Hanging – Block 4.
Below the image, I’ll provide detailed instructions to guide you through the entire assembly process.
Remember, if you want the full pattern, check the provided link!
Full Pattern: Click Here
Additional Tips for Success
When you’re working on the Milky Way Wall Hanging – Block 4, don’t hesitate to take breaks.
Stepping away from the sewing machine allows your creative juices to flow and gives your eyes a rest.
Plus, it helps maintain the passion for your project as it progresses.
Also, if mistakes happen—and they will—just embrace them!
Sometimes the quirkiest mistakes can turn into unique features of your quilt, making it even more special.
Exploring Advanced Techniques
To elevate the beauty of the Milky Way Wall Hanging – Block 4, consider incorporating additional quilting techniques such as free-motion quilting or embellishments.
These techniques can add texture and depth, making your design pop!
Utilizing contrasting threads while quilting can also enhance the vibrant colors of your fabrics.
Don’t shy away from trying out a few different options—a little experimentation goes a long way!
Celebrate Your Craft!
As you finish up the Milky Way Wall Hanging – Block 4, take a moment to appreciate the hard work you’ve put into it.
Every stitch, every color, every choice reflects your creativity and personality.
Hold your quilt up and admire the beautiful cosmic design you’ve lovingly crafted!
If you’re looking for more inspiration or fun projects, this blog has tons of amazing content waiting for you to explore.
I’ve prepared a fantastic piece you can check out by clicking here.
Trust me, you won’t want to miss it!
And as we wrap up our quilting adventure, remember each journey through fabric is unique and full of stories just waiting to be told.
I can’t wait to hear about your experiences with the Milky Way Wall Hanging – Block 4 and what you create next!