
Hey there, fellow quilters!
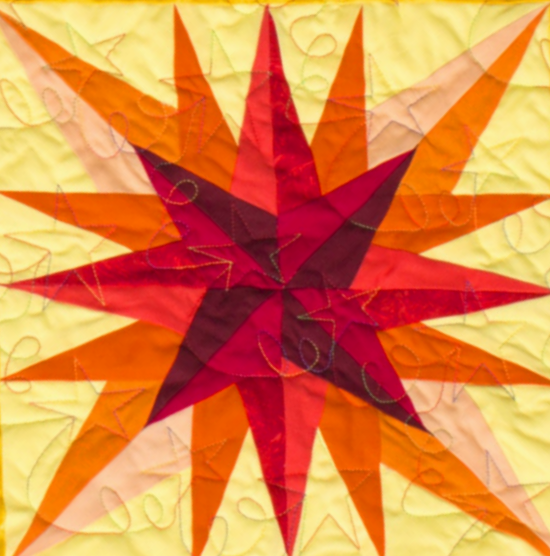
Today, I’m thrilled to dive into one of my latest obsessions—the Milky Way Wall Hanging–Block 5!
It’s honestly a stunning project that allows your creativity to shine as brightly as the stars we aim to depict.
The first time I laid eyes on the pattern, I was instantly captivated by its celestial inspiration, and I couldn’t resist bringing a piece of the cosmos into my living space.
Not only is the Milky Way Wall Hanging a joy to quilt, but it also weaves together rich colors and intricate designs that tell a story of galaxies far away.
My personal adventure with this pattern started on a rainy afternoon when I decided to transform my room into a cosmic quilt sanctuary.
If you’ve ever found yourself puzzled about how to tackle complicated designs, fear not!
I’m here to guide you through this heavenly project.
Stitching Stars: The Allure of Paper Piecing
What makes the Milky Way Wall Hanging so special is the technique of paper piecing.
This method allows for precision and complexity that is often hard to achieve with traditional piecing methods.
With paper piecing, you can create intricate designs like the celestial motifs in this project, which might otherwise seem impossible!
Many people shy away from paper piecing, believing it’s too complicated—but once you get the hang of it, trust me, you’ll wonder how you ever lived without it!
The Milky Way pattern invites you into a space where you can let your imagination run wild while learning a fabulous technique that’s here to stay.
The Perfect Palette for a Celestial Masterpiece
The color palette for the Milky Way Wall Hanging is essential if you’re looking to capture that space-age magic.
Choosing vibrant hues that mimic the cosmos adds depth and excitement to your finished piece.
With colors like Pineapple, Cherry Red, and Radish Red, you’ll find yourself surrounded by a rich tapestry that reflects light just like stars.
Don’t forget to play with shades!
Combining Light Orange Burst with Red Marbled can give absolutely stunning effects when piecing the layers.
Each selection you make brings the Milky Way Wall Hanging to life, so make sure to have fun with it!
Materials:
- Coats Dual Duty XP® Paper Piecing thread
- Pineapple (CSFSESS.PINEA)
- Cherry Red (CSFSESS.CHERR)
- Radish Red (CSFSESS.RADIS)
- Red Marbled (CBFS005.AUTUM)
- Red (CSFSESS.REDXX)
- Kumquat (CSFSESS.KUMQU)
- Mesa Orange (CSFSESS.MESAX)
- Light Orange Burst (CSFSESS.BURST)
- 4 copies each of Block 5 foundation sections A and B (page 3)
- Sewing Machine
- Basic Sewing Supplies
- Printer
Setting Up for Stellar Success
Before diving into the Milky Way Wall Hanging, it’s worthwhile to set up your workspace.
Organize your materials and lay them out in a way that makes sense to you; trust me, it saves you time and sanity!
Use small bins or baskets to separate your fabric color selections and the paper foundation sections.
It’s also crucial to read through the entire pattern before starting.
This process helps you wrap your head around the instructions and visualize the steps you’ll follow as you embark on this enchanting journey through the cosmos.
Get ready, as below are the step-by-step instructions for crafting your Milky Way Wall Hanging.
Don’t forget that I’ve included a link for accessing the full pattern if you need a deeper dive into the instructions!
Full Pattern: Click Here
List of Steps:
- Roughly cut fabric to cover each labeled area of the foundation sections, ensuring you’ll need four of each piece.
Cut the fabric **at least 1/2” larger** on all sides than the corresponding area.
- Cut the foundation sections apart before you begin sewing.
Place fabric piece A1 right side up on the unmarked side of the paper foundation for section A.
- Continue placing pieces A2 and A3 as instructed, pinning them in place securely.
- Before trimming the seam allowances to about 1/4”, ensure you double-check your fabric placement.
- Check off each step on the pattern as you complete it to maintain your momentum till you form the final block!
Additional Tips for a Stellar Finish!
As you work on the Milky Way Wall Hanging, keep in mind the importance of pressing.
Pressing your seams as you go not only keeps your fabric looking sharp but also helps to prevent any wonky blocks!
Grab a good quality iron and don’t skimp on this step.
Also, if you’re finding it challenging to tear away the paper from the back of the block, try lightly spritzing it with water to loosen the paper fibers.
This little trick can save you a lot of stress and time.
Everything will flow more effortlessly—and you’ll thank me later!
The Heart of Cosmic Design
One aspect of the Milky Way Wall Hanging that I adore is how versatile it is!
You can play with the sizes or add borders for those looking to take it up a notch.
The blocks can also be arranged in various layouts to create quilts, table runners, or wall art!
The cosmos is really your playground.
As you dream up your designs, don’t forget to share your progress!
It’s so much fun to see how personal touches transform this stellar pattern.
Whether you go cosmic or keep it simple, every quilt tells a story.
Celebrate Your Quilting Journey!
In the end, creating the Milky Way Wall Hanging is more than just about crafting a beautiful piece—it’s a celebration of creativity!
Every stitch is a step towards finishing a project that embodies your dedication and flair as a quilter.
So, raise your quilting scissors high and relish in every moment of your creation!
If you’re looking to explore more vibrant ideas and projects, I encourage you to check out other articles I’ve cooked up just for you.
You’ll discover tons of fabulous content that’s sure to inspire your next crafting adventure.
Feel free to dive deeper into my world of creativity via this magical link.
Happy quilting!
So there you have it!
The Milky Way Wall Hanging is waiting to invigorate your own creative journey, and I can’t wait to see how you make this celestial pattern your own.
Resistance might be futile against the irresistible call of the cosmos!