
Hello, fellow fabric enthusiasts! I’m Juliue. I’m here to unfold the tale of my very first Moda Bake Shop project, which started with a spark of inspiration—a light bulb moment—that brightened my creative path.
Flipping through the pages of a quilt block book, the Castles in Spain block caught my eye, and it struck me: this was the perfect block to pair with Kate Spain’s Horizon line.
Envisioning the vibrant oranges, purples, and greens dancing together across a quilt brings me back to that initial burst of creativity. The “Castles on the Horizon Quilt” is a playful pun, but it’s also a testament to the challenge I set for myself: to recreate the intricate block patterns using only Half Square Triangles (HSTs) instead of the typical Flying Geese. It was a journey of meticulous sewing and pressing, but every stitch was a step towards a quilt that I am proud to share with you.
Gathering the Colors of the Horizon
Before we take our first stitches, let’s prepare our palette:
- 4 Moda Horizon by Kate Spain Charm Packs: These are the colors of our quilted landscape.
- 3 Bella Solid White Charm Packs: The canvas upon which our castles will stand tall.
- Additional Fabrics: We’ll need white fabric for the inner border and backing, as well as a special print for the binding that complements our Horizon.
In the next part, I will walk you through the HST magic that transforms these simple squares into the majestic castles of our quilt.
The Craft: From Charms to Castles
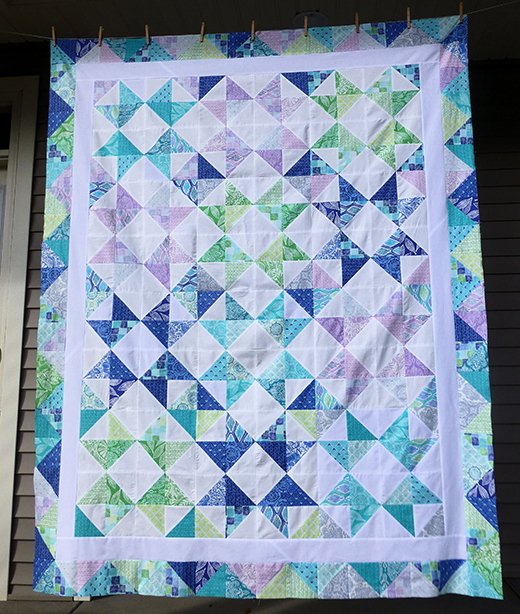
With the image of our “Castles on the Horizon Quilt” now firmly in mind—a tapestry of blue and green hues framed by a crisp white border—it’s time to turn our charm packs into the half-square triangles that will be the foundation of our quilt’s architecture.
The Half-Square Triangle (HST) Alchemy
Begin by pairing each white charm with a colorful print charm, their union soon to become the cornerstone of our castles. Mark each white charm from corner to corner and let the sewing adventure begin:
- Sew a quarter inch from either side of the marked line, a technique that magically transforms these squares into a battalion of HSTs, ready to form the ramparts and towers of our quilted kingdom.
- As you slice along the marked lines and press the seams open, you’ll see the HSTs take shape, like watching castles rise from the mist at dawn.
Full Pattern: Click Here
Precision and Care: The Hallmarks of our Castle
The image of the quilt serves as our blueprint. It’s crucial to trim and square each HST to 4 1/2″ x 4 1/2″, ensuring our castles stand strong and our quilt lies flat. As Juliue recommends, careful pressing and back tacking at each seam are the meticulous moves that ensure our quilt’s longevity and beauty.
Laying Out the Kingdom
With our HSTs ready, it’s time to lay them out, ensuring the contrasting colors pop at the corners of each block, like the sun glinting off a turret. Each block is a story, and each pairing a subplot in the grand narrative of our “Castles on the Horizon Quilt.”
Erecting the Castles: Block Assembly
The construction of each “Castles in Spain” block is akin to laying the foundation of a fortress. We piece together the HSTs, ensuring the colors contrast and complement, crafting a visual feast that mirrors the vibrant quilt image we’ve been inspired by.
Joining the Ramparts
- Lay out your HSTs to form the iconic Castles in Spain pattern, with the contrasting cornerstones set like jewels in a crown.
- Sew the HSTs into rows, carefully joining each to its neighbor with precision, as if they were stones in a castle wall.
The Majesty of Rows
- Pin and stitch the rows together, methodically aligning seams and points with the care of an artisan. Each row is a narrative; when joined, they tell the story of your creative journey.
- Press every seam open, maintaining the quilt’s flatness and ensuring a smooth surface, much like the well-trodden floors of ancient castles.
Unfurling the Horizon: Quilt Top Completion
As we piece together the blocks into rows and the rows into a quilt top, the image of the “Castles on the Horizon Quilt” hanging majestically comes to life.
Inner Border: Framing the Scene
- Cut and attach the inner border of Bella White, giving a breathing space between our vibrant castles and the horizon beyond.
- Ensure each strip is measured and sewn with the same precision that has guided you thus far, framing the central panel like the gates of a citadel.
Final Border: The Distant Horizon
The remaining charms are transformed into a final border, encapsulating our quilt like the distant sky surrounds a lofty landscape.
- Arrange the HSTs into a continuous flow, creating a border that echoes the quilt’s theme. Your choices here define the quilt’s final impression—a scrappy HST layout or a meticulously planned color scheme, each lending its unique character to the finished quilt.
Quilting the Landscape: Adding Texture and Depth
Layer your quilt with batting and backing, and quilt as desired. Let your stitching be inspired by the quilt’s theme—waves crashing against castle walls, winds sweeping over open meadows, or the geometric precision of man-made fortresses.
Binding: The Finishing Touch
- Select a binding fabric that complements the quilt’s color story. Sewing the binding is the last step in fortifying your quilt, enclosing it with a protective and decorative edge.
- As you fold over the binding and hand-stitch it into place, reflect on the journey of creation you have undertaken, from a simple spark of inspiration to a finished quilt rich with imagination and care.
And there it stands, the “Castles on the Horizon Quilt,” a tangible manifestation of creativity and dedication. It’s a quilt that tells a story, not just of castles and horizons, but of the journey