
From the cozy corners of my grandmother’s living room to the vibrant threads of my own quilting studio, the art of quilt-making has been a colorful thread woven through the fabric of my life.
My name is Julie, and my latest journey into the world of textiles has brought me to the Calippo Quilt.
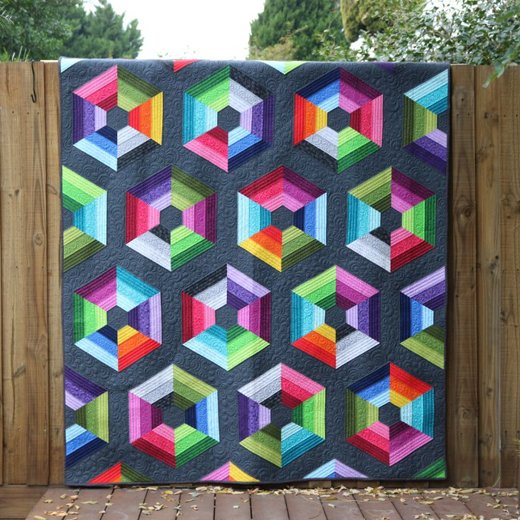
Calippo Quilt Elegance: A Dance of Design and Color
This quilt, with its intricate design and playful use of colors, reminds me of my early days learning to stitch under my grandmother’s watchful eye. Her lessons went beyond the mere mechanics of sewing, teaching me to see each piece of fabric as a snippet of a story, a patch in the tapestry of life.
The Calippo Quilt, much like my quilting journey, is a blend of tradition and innovation. It challenges the quilter to think outside the box, especially in terms of fabric selection. This project, while rooted in the age-old craft of quilting, invites a modern twist with its easy strip quilt pattern and dynamic use of color. It’s a testament to the ever-evolving nature of quilting, where each stitch contributes to both the beauty of the finished product and the story it tells.
A Symphony of Strips and Colors
The heart of the Calippo Quilt lies in its simplicity and the clever play of colors. Choosing the right blend of light, medium, and dark fabrics sets the stage for a quilt that’s as visually striking as it is cherished.
While the original pattern suggests blenders, the true magic unfolds when quilters dare to experiment with florals, solids, or even themed fabrics like Christmas patterns. This versatility not only showcases the quilter’s personal style but also highlights the Calippo Quilt’s adaptability to various aesthetic preferences and occasions.
The Canvas of Creativity
Embarking on the Calippo Quilt project is an invitation to play with color and texture. The essential materials you’ll need are:
- A selection of light, medium, and dark fabrics, chosen to bring out the quilt’s dynamic contrast and depth.
- A reliable sewing machine, ready to handle the quilt’s many seams.
- A 12″ 60-degree triangle ruler, crucial for achieving the quilt’s signature shapes.
- A standard ruler for assisting with precise cuts.
- A design wall or spacious floor area to layout and assess your color placement.
- Pins and a good quality iron for pressing seams and ensuring crisp, clean lines throughout your work.
- Binding materials to neatly finish the quilt’s edges.
Setting the Stage
Before diving needle-first into the project, it’s important to approach the Calippo Quilt with a sense of adventure and openness. Remember, the joy of quilting comes not just from the finished product but from the process itself. Take your time selecting your fabrics, considering how different textures and patterns might play together under the unifying geometry of the quilt’s design.
Full Pattern: Click Here
Step-by-Step Instructions
Creating the Calippo Quilt involves a delightful journey through cutting, piecing, and finally assembling the quilt top. Here’s how to bring this beautiful quilt to life:
- Prepare Your Fabrics: Begin by washing, drying, and ironing all your fabrics. This not only pre-shrinks them but also ensures smooth cutting and sewing. Cut your fabrics into strips according to the pattern’s specifications, focusing on a balanced mix of light, medium, and dark shades.
- Piecing the Strips: Sew the strips together, mindful of alternating the shades to achieve a harmonious yet dynamic effect. Press each seam to one side to reduce bulk and ensure a flat, neat appearance.
- Cutting Triangles: Once your strip sets are pieced and pressed, use your 12″ 60-degree triangle ruler to cut triangles. To maximize efficiency and accuracy, align another ruler on the opposite edge instead of turning your fabric. This technique ensures sharp, precise cuts.
- Layout and Design: Arrange your cut triangles on a design wall or a large, flat surface. This step is crucial for visualizing the quilt’s final appearance and allows you to adjust the color placement until you’re satisfied with the balance and flow of the design.
- Sewing Triangles: Begin sewing your triangles together, pinning at each seam to ensure that all points and seams align perfectly. Press seams to one side for individual triangles, then press the joining seams open to minimize bulk.
- Assembling the Quilt Top: Sew your triangle blocks into rows, and then join the rows together. Take your time with this step, aligning and pinning each seam carefully to ensure a smooth, flat quilt top.
- Quilting: Whether you opt for custom quilting or a simpler edge-to-edge design, this is where your quilt truly comes to life. Quilting not only secures the quilt layers together but also adds texture and depth to the overall design.
- Binding: Choose a binding fabric that complements your quilt. Cut strips, join them end to end, and press them in half lengthwise to create the binding. Sew the binding to the front of your quilt, fold it over to the back, and hand stitch it in place for a neat finish.
Additional Tips
- Fabric Selection: Don’t shy away from experimenting with different fabric types and patterns. Each variation can dramatically alter the quilt’s personality, making each version unique.
- Precision is Key: Take your time with cutting and piecing to ensure accuracy. Small deviations can add up, affecting the final appearance of your quilt.
- Pressing: Consistent pressing between steps is crucial for a professional-looking finish. It helps seams to lie flat and makes joining pieces easier.
- Enjoy the Process: Remember, quilting is as much about the journey as it is about the end product. Embrace the learning curve and allow yourself to experiment and learn with each step.
The Calippo Quilt is more than just a pattern; it’s a canvas for creativity, a puzzle of colors and shapes that come together in a stunning display of quilting artistry. As you stitch each piece, remember that every quilt tells a story.
Through your fabric choices, the precision of your piecing, and the care in your stitching, you’re not just making a quilt; you’re weaving your own tale into the rich tapestry of quilting tradition. So take a step back, admire your work, and know that with each quilt you create, you’re adding your voice to a centuries-old craft, continuing a story that’s as timeless as the stitches that hold it together.