
Quilting, for me, has always been a bridge between the past and present, a way to weave together stories, memories, and scraps of fabric into something both beautiful and functional. The “Green Star Cascade Quilt” project began as an endeavor to tame my overflowing bin of 2 1/2″ scrap strips.
It was a journey that not only challenged my creativity but also brought me closer to the essence of quilting: making something extraordinary out of the ordinary. As I embarked on this project, I realized that each scrap of fabric held a piece of a past project, a whisper of a memory that could be brought back to life in a new form.
This quilt is a celebration of those pieces, a testament to the joy and fulfillment that comes from giving new purpose to what might otherwise be overlooked.
A Cascade of Creativity: Unveiling the Green Star Cascade Quilt
The inception of the “Green Star Cascade Quilt” was not born out of a grand vision but from a simple necessity—the need to declutter my workspace and make use of the seemingly endless pile of scrap strips that had accumulated over time. However, as I sorted through the strips, selecting shades and hues, coordinating and contrasting, the quilt began to take shape in my mind.
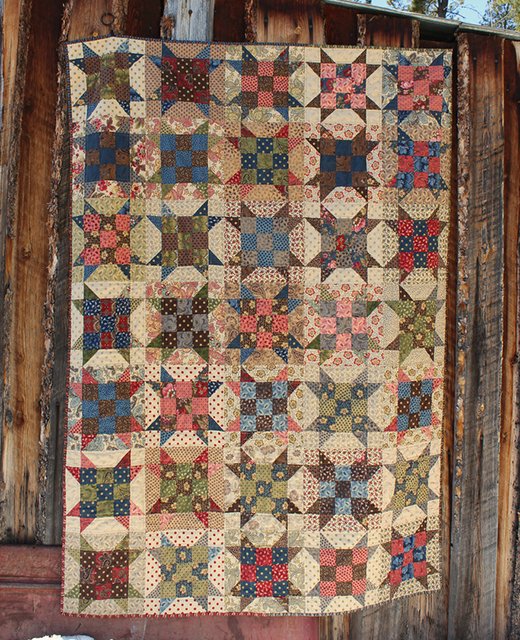
The central motif of green star points in the “Green Star Cascade Quilt” emerged as a unifying theme, a beacon guiding the design process. These stars, set against a patchwork of pinks and surrounded by a multitude of neutrals in the quilt, symbolize growth, renewal, and the endless possibilities inherent in the art of quilting.
As the “Green Star Cascade Quilt” project unfolded, it became a meditation on the nature of creativity itself. The constraints of using only materials from my scrap bin pushed me to explore new combinations, to see potential in the forgotten and overlooked pieces within the quilt’s design. This quilt is not just an exercise in frugality or a way to reduce waste; it’s a celebration of the scrappy quilter’s spirit, of making do and creating something truly beautiful from the remnants of past projects.
Full Pattern: Click Here
Gathering the Palette: Materials and Preparation
The “Green Star Cascade Quilt” is a testament to the creative potential of what many might consider waste. To embark on this journey, you’ll dive into your collection of scraps, discovering the treasures hidden within. Here’s what you’ll need to start:
- 2 1/2″ Scrap Strips: The stars of our show, these strips come in various colors but with a focus on pinks for the patchwork and greens for the star points.
- Neutral Scraps: Ranging from white to tan, these will serve as the background, bringing balance to the vibrant colors.
- A Sense of Adventure: Perhaps the most crucial ingredient, your willingness to experiment and play with colors and patterns will drive this project forward.
Step 1: The Sorting Ceremony
Begin by sorting through your bin of 2 1/2″ strips, separating the colors and neutrals. This process is not just about organization; it’s about reacquainting yourself with fabrics from past projects and envisioning their new roles in your quilt.
Step 2: Cutting with Intent
- For the 9-patch centers, cut your colored strips into 11″ lengths. You’ll also need one extra 2 1/2″ square for the corner of each 9-patch.
- Neutrals are cut into two sizes: 2 1/2″ squares for the block corners and 2 1/2″ x 6 1/2″ rectangles for the sides.
- Green Strips for the star points are also cut into 2 1/2″ squares, with each star point block requiring 8 squares.
Pioneering Techniques: Sewing with Purpose
- Chain Piecing with a Twist: To manage thread tails and prevent fabric from being pulled into the needle plate, start and end your sewing with a scrap piece of fabric, known as a “leader” or “ender”. This not only keeps your work neat but also results in an additional patchwork of 4-patch blocks, a bonus project born from efficiency.
- Accuracy is Key: Use a seam guide to ensure your pieces are sewn with precision. This will make your blocks come together smoothly and your quilt top lay flat.
As we move into the final phase of our “Green Star Cascade Quilt” journey, we’re ready to piece together the quilt top and add the finishing touches that will elevate our collection of scraps into a stunning piece of art. This part of our guide is where patience and precision meld with creativity to bring our vision to life.
Constructing the Quilt Top
Assembling the 9-Patch Centers
- Start with the 9-Patch: With your 11″ strips sewn and cut into pairs of squares, lay out your 9-patch blocks. This is where your earlier decisions on color and placement start to form the heart of your quilt. The additional 2 1/2″ square completes each 9-patch block, anchoring the design.
- Sewing the Blocks: Carefully sew the squares together, row by row, then join the rows. Press your seams to reduce bulk, opting to press them to one side or open, based on your preference.
Adding the Star Points
- The Green Stars: Position a green 2 1/2″ square on each corner of your 2 1/2″ x 6 1/2″ neutral rectangles. Sew diagonally across the square, then trim the excess, leaving a 1/4″ seam allowance. Press towards the green triangle to form your star points.
- Assembly: Carefully sew these star-point units to your 9-patch center, ensuring the points “V” away from the center. This creates the dynamic star effect that gives the quilt its name.
Constructing the Block
- Final Layout: With the 9-patch center and star points complete, lay out the block with the neutral 2 1/2″ squares in the corners and the 2 1/2″ x 6 1/2″ rectangles along the sides. This step reveals the full design of each block, a satisfying moment where you see the individual components come together.
- Sewing the Block Together: Sew the components into rows, then join the rows to complete the block. Press well to ensure a flat and smooth finish.
Reflection and Celebration
As you complete your “Green Star Cascade Quilt”, take a moment to appreciate the journey. From sorting through bins of scraps to the final stitches of the binding, this project is a testament to your creativity, skill, and dedication to sustainable crafting. Each block tells a story, each seam holds a memory, and together, they form a quilt that’s not only beautiful but also deeply personal.