
Quilting has always been a canvas for storytelling, with each pattern holding its own tale and historical significance. The Log Cabin quilt block is deeply rooted in the pioneering spirit of quilt-making, symbolizing the warmth of the hearth and the light of a welcoming window.
“Curve it Up – Block 7 – Log Cabin” breathes new life into this traditional design, infusing it with a modern twist that speaks to the boldness of contemporary quilting while honoring its storied past. The evolution of the Log Cabin block through the “Curve it Up” series by Dueling Threads is a celebration of quilting’s timeless charm and the ever-evolving creativity of its crafters.
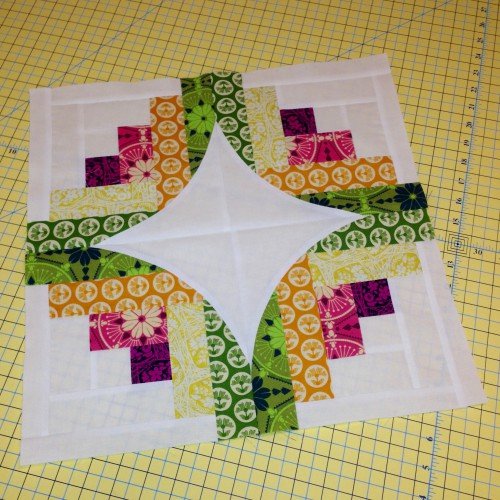
Embracing the Curve: A New Twist on a Classic Design
The Dueling Threads’ “Curve it Up” series presents a novel take on the conventional Log Cabin block by introducing curves that challenge and intrigue the modern quilter. This innovation not only adds a contemporary flair to a classic pattern but also invites quilters to step outside their comfort zones and engage with the material in a new, dynamic way.
The curve represents the quilter’s personal journey, a path that bends and weaves through the fabric of their creative process. In this section, we delve into the significance of introducing curves into traditional patterns and how it reflects the evolving narrative of quilt-making.
A Palette of Personal Expression: The Colors of the Log Cabin
In quilting, color is not merely a choice; it’s an expression of the quilter’s voice. “Curve it Up – Block 7 – Log Cabin” takes this philosophy to heart, with the creator’s personal transformation mirrored in the transition from disliking to embracing the color pink.
Preparing the Pieces: Insights Before the First Stitch
Before the needle pierces the fabric, the quilter embarks on a journey of preparation, from selecting the right tools to understanding the nuances of the curved design. This stage is as much about mental preparation as it is about gathering materials.
It’s about envisioning the finished piece, the interplay of light and shadow, and the tactile satisfaction of fabric under fingers. This part of the article shares valuable insights and tips for quilters as they prepare to translate the “Curve it Up – Block 7 – Log Cabin” pattern from concept to reality.
Full Pattern: Click Here
Materials to embark on the Curve it Up
You will need to curate a collection of materials and tools that will aid in bringing the curved log cabin design to life. The careful selection of materials not only ensures a seamless quilting experience but also enhances the beauty of the finished block. Here’s what you’ll need:
- Fabric Selection: Opt for a palette that resonates with your vision for the block. For the “Curve it Up” block, consider choosing a central color that symbolizes a personal story or sentiment.
- Rotary Cutter and Mat: Essential for making precise cuts, especially for the unique curved shapes.
- Curved Quilting Rulers: These specialized rulers will assist in achieving the perfect curve for your log cabin block.
- Sewing Machine with a Quarter-Inch Foot: A necessity for accurate seam allowances.
- Curved Piecing Foot (Optional): If available, this foot can make sewing curves easier.
- Quality Sewing Thread: Pick threads that match or complement your fabrics to ensure that the stitches blend beautifully.
- Pins and Fabric Clips: To hold your fabric pieces together, particularly important when managing curved seams.
- Iron and Ironing Board: Pressing your pieces will keep them crisp and make piecing easier.
- Starch or Fabric Stabilizer: Helpful when working with bias edges and curves to prevent distortion.
- Seam Ripper: Always handy to have for any adjustments or corrections.
Step-by-Step Instructions: Constructing the “Curve it Up – Block 7 – Log Cabin”
- Preparation: Pre-wash your fabrics if necessary and press them with starch or stabilizer for easier handling of curves.
- Cutting the Pieces: Use your rotary cutter and curved rulers to cut the fabric pieces required for the block, paying special attention to the grain line for the curved pieces.
- Piecing Together: Begin with the central square and add strips in rounds, alternating between the light and dark fabrics to create the classic log cabin effect. The curved pieces will add a unique twist as you go.
- Sewing the Curves: Pin or clip the curved pieces carefully, and use a slow sewing speed to maintain control as you guide the fabric.
- Pressing: After each strip is added, press the block to keep it flat and even.
- Trimming: Once the block is complete, trim any excess to ensure it measures correctly according to the pattern specifications.
- Finishing Touches: Admire your work and correct any puckers or pleats before joining this block to others or finishing the quilt.
Curved Log Cabin
In completing the “Curve it Up – Block 7 – Log Cabin,” quilters not only add a block to their quilt but also stitch a new chapter in their quilting journey. This block, with its unique curved lines and personal color story, becomes a symbol of the quilter’s growth and evolving narrative. It is a testament to the quilter’s ability to embrace new challenges and express themselves through the timeless art of quilting.
As the final stitch is placed, and the block is pressed and admired, there is a profound sense of accomplishment knowing that traditional quilting has been expanded upon, curved, and made uniquely one’s own.