
Quilting has always been more than a hobby for me—it’s a way to connect with tradition while bringing something unique to life.
One of my earliest quilting memories was working on a project that demanded precision and careful thought: the Carpenter Star quilt.
Though I had completed many quilts by that point, this pattern felt like a test of both my skills and my patience, combining traditional blocks with intricate design elements. It became a turning point for me, challenging me to push the limits of my creativity while honoring a design steeped in history.
The Carpenter Star quilt pattern holds a special place in the world of quilting, and it captured my heart because of its beautiful symmetry and craftsmanship. The intricate balance of geometric shapes felt like piecing together a puzzle—a perfect metaphor for how quilting can often bring order and beauty into our lives. Let me take you through this exciting project, where tradition meets innovation, and guide you on the journey of creating your own Carpenter Star quilt.
The Legacy of the Carpenter Star: Crafting Tradition into a Masterpiece
The Carpenter Star quilt pattern, with its radiant central star, is a blend of simplicity and complexity. Named for its resemblance to the precise workmanship of carpenters, this design honors the meticulous artistry that early quilters poured into their craft.
The Carpenter Star isn’t just about its stunning visuals—it’s also about the discipline required in its assembly. From carefully arranged squares and triangles to the intricate borders, this pattern calls for a thoughtful approach that results in a stunning, time-honored masterpiece.
Designing with Precision: The Art Behind the Carpenter Star’s Geometry
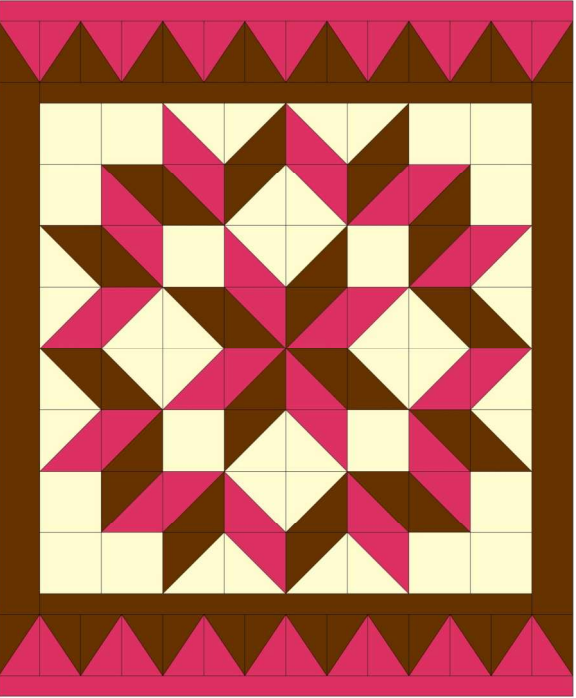
What makes the Carpenter Star pattern so captivating is its radiant starburst effect, created through a combination of squares and half-square triangles. The design seems deceptively simple at first glance, but it’s the careful placement of these shapes, along with color choices, that brings the star to life. In this project, fabric selection plays a huge role—coordinating colors for your background, pinks, and browns allows the star to shine against a beautifully contrasting backdrop.
The beauty of this quilt is in its precision, so it’s essential to measure, cut, and stitch with care. Each block is a building unit of the larger design, making accuracy critical. As you embark on this project, keep in mind that every piece is a reflection of your own craftsmanship, much like the work of a carpenter assembling a complex structure.
Full Pattern: Click Here
Materials
Before starting, you’ll need to gather the following materials:
- Fabric:
- 16 background squares (cut to 6.5 inches each)
- Background fabric for half-square triangles (cut into 6.5-inch pieces)
- Pink fabric for half-square triangles and border blocks
- Brown fabric for half-square triangles and border blocks
- Binding fabric in brown and pink (for strips: 2.5-inch and 4.5-inch widths)
- Rotary Cutter and Ruler: To ensure precise cuts, especially for the half-square triangles and rectangles.
- Sewing Machine and Thread: Choose thread colors that blend with your fabrics.
- Iron and Pressing Surface: Press your seams as you go for sharp, clean lines.
- Cutting Mat: To protect your surfaces and allow for accurate cutting angles.
Setting the Stage: Tips for Starting Your Carpenter Star
When starting on the Carpenter Star quilt, I like to remind myself that this pattern is a celebration of precision. As with any quilt, the key is in the preparation. Cutting your fabric carefully and organizing your pieces before sewing is crucial, especially given the symmetrical nature of this design. The balance of the star comes from accurate half-square triangles and squares, so don’t rush this step. Also, double-check your measurements to avoid mismatched blocks later on.
Before you begin sewing, lay out your quilt blocks on a flat surface to get a preview of the final design. This step can help you visualize the overall flow and make any color placement adjustments.
Step-by-Step Instructions
- Assemble the Center Star:
- Begin by cutting your 16 background squares to 6.5 inches each.
- For the star, create 6.5-inch half-square triangles from your pink, brown, and background fabrics.
- Piece together the half-square triangles and background squares into four sections, following the diagram of the Carpenter Star pattern. This will form the radiant central starburst.
- Piecing the Quilt Center:
- Once the four sections of the center star are complete, stitch them together. Be sure to match up your seams for a clean, professional finish.
- Press the seams open to reduce bulk in the center of the quilt.
- Constructing the Borders:
- Cut 28 rectangles (14 pink, 14 brown) measuring 7 1/8 inches by 4 3/4 inches.
- Cut each rectangle diagonally to create two triangular pieces. Sew one pink half to one brown half, ensuring the halves are mirror images for correct alignment.
- Once all triangles are paired, stitch them into border strips. The borders frame the quilt, enhancing the central star’s radiance.
- Attaching the Borders:
- Sew a 2.5-inch brown strip to the top and bottom of the quilt, followed by a 4.5-inch brown strip on the right and left sides.
- Attach your newly pieced border to the top and bottom, then follow by sewing a 2.5-inch pink strip to the top and bottom.
- Final Assembly:
- Double-check all your seams and trim any excess fabric to maintain the quilt’s square shape.
- Press the entire quilt top carefully, preparing it for layering with batting and backing fabric.
Additional Tips for Success
- Seam Allowances Matter: Use a scant ¼-inch seam allowance to ensure your blocks maintain their proper dimensions. This can make the difference in whether your blocks align perfectly.
- Rotary Cutter Precision: When cutting diagonally, remember that fabrics can stretch on the bias. Use sharp tools and handle the fabric gently.
- Pairing Blocks: Before sewing your half-square triangles, double-check their orientation against your layout to avoid having to rip out seams later.
The Carpenter Star quilt pattern is not just a quilt—it’s a testament to the power of precision and creativity. Each stitch, each carefully cut triangle, is part of a larger journey that transforms fabric into something extraordinary.
The time and care you invest in this project will reward you with a stunning, timeless quilt, one that speaks to both the traditions of quilting and your own artistic flair. As you finish, take a moment to admire the radiant starburst you’ve created, knowing that you’ve joined generations of quilters who have been enchanted by this elegant pattern.