
When I first discovered quilting, I was immediately drawn to patterns that looked dynamic and playful. One of my favorite designs is the Twisted Path quilt. Its name perfectly captures the winding, swirling pattern created by simple half-square triangles (HSTs). The first time I saw it, I was fascinated by how such a seemingly complicated design could come from such basic shapes. This quilt represents a journey, not just in its visual movement but in the quilting process itself.
The Twisted Path quilt is a great example of how fabric and layout can transform ordinary squares into something truly magical. It’s also perfect for those who want to practice their skills with HSTs while working on a project that feels both traditional and modern. I’ve made this quilt a few times now, and each time, the final result is a beautiful surprise.
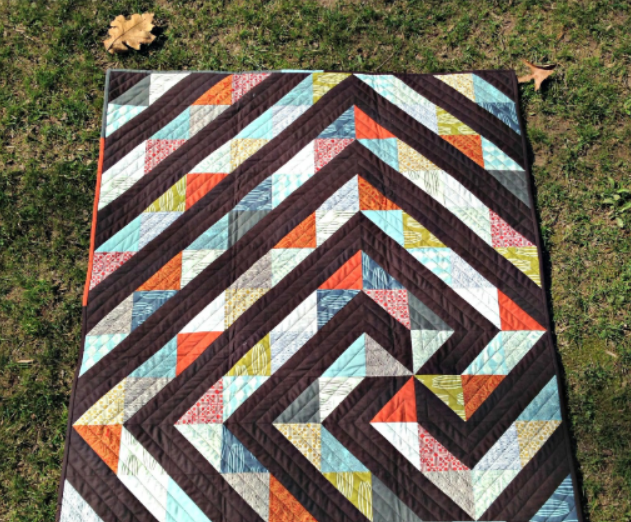
Unraveling the Design of the Twisted Path Quilt
The magic of the Twisted Path quilt lies in the optical illusion it creates. What starts as a simple pinwheel block in the corner soon grows into a twisting, swirling pattern as more HSTs are added around it. The quilt’s layout encourages you to think creatively about how you arrange your blocks, giving it a feeling of movement and flow.
This quilt is perfect for quilters of all levels. If you’re new to quilting, the HSTs provide a wonderful opportunity to practice piecing and trimming. And if you’re an experienced quilter, you’ll appreciate how the layout challenges you to keep the pattern aligned as the design expands.
Playing with Fabrics: Color and Texture in the Twisted Path Quilt
One of the exciting elements of this quilt is how you can play with color and fabric selection. The Twisted Path quilt uses fat quarters and a neutral solid to create contrast and depth in the design. The interaction between your chosen fabrics determines how bold or subtle the twisting effect becomes.
When selecting fabrics, think about how your colors will play off each other. High contrast between the fat quarters and the neutral solid will emphasize the twisting movement. You could also use a variety of textures to add dimension to the quilt, making the swirling path feel even more alive.
Materials
For the 40″ x 44″ quilt size, you will need:
- 14 fat quarters (choose a variety of colors or patterns for a vibrant look)
- 1 yard of neutral solid fabric
For alternative lap quilt sizes:
- Lap Quilt (60″ x 66″): Use 7-inch squares and 2 yards of neutral solid.
- Lap Quilt (56″ x 60″): Cut 8 squares from each fat quarter and 112 squares from the neutral solid, using 2 yards of neutral fabric.
Full Pattern: Click Here
Getting Started: Preparing Your Fabrics and Cutting
Preparation is key when making the Twisted Path quilt. Before jumping in, it’s important to cut your fabric precisely and stay organized throughout the process.
- Cut Your Fabric:
- From each fat quarter, cut 4 squares measuring 5 inches.
- From the neutral solid, cut 56 squares measuring 5 inches.
- Make the Half-Square Triangles (HSTs):
- Pair each fat quarter square with a neutral solid square to make 112 HSTs.
- Follow a standard HST tutorial to create your blocks (you can find great tutorials online, such as the one from Connecting Threads).
- Once your HSTs are sewn, trim them down to 4½ inches to ensure uniformity. You’ll have two extra HSTs left over.
Step-by-Step Instructions for the Twisted Path Quilt
- Start with the Pinwheel:
Begin by laying out a pinwheel in the lower-right corner of your design space. This will serve as the foundation of your twisted path. The pinwheel is made by arranging four HSTs in a traditional pinwheel layout. - Add the Twisting Layers:
- Once your pinwheel is in place, begin adding the next layer of HSTs around the pinwheel. You will start to see the twisting effect emerge as you continue to add rows.
- Pay close attention to the direction of your HSTs as you work. The twist happens because each row of HSTs is carefully arranged to rotate the pattern outward.
- Expand the Design:
- Continue adding layers of HSTs, always following the twisting pattern. This process will form the lower-right corner of the quilt.
- After completing this section, add 4 more columns to the left and 5 more rows to the top, expanding the quilt to its final size.
- Sew the Rows Together:
- After you’ve arranged all of the HSTs, sew them together row by row. Be sure to double-check that each row is in the correct order to preserve the twisting effect.
- Once the rows are assembled, sew them together to complete the quilt top.
Finishing Your Twisted Path Quilt
Once the quilt top is complete, it’s time to finish the quilt by layering, quilting, and binding:
- Layer Your Quilt:
- Place the backing fabric (wrong side up), batting, and quilt top (right side up).
- Baste the layers together using your preferred method (pins or spray baste).
- Quilting:
- You can quilt this design however you like. A simple straight-line or diagonal quilting pattern works well, as it won’t compete with the twisting design.
- Binding:
- Finish your quilt by attaching the binding using your favorite binding method. A neutral or complementary color will frame the Twisted Path quilt beautifully.
Tips for Success
- Stay Organized: Since the Twisted Path quilt relies heavily on correct placement, it’s a good idea to keep your HSTs labeled by rows as you work. This will prevent confusion and ensure the twisting pattern stays intact.
- Trim Accurately: Be sure to trim your HSTs to exactly 4½ inches. This will keep your seams straight and your rows aligned, which is crucial for the twisting effect to work.
- Experiment with Colors: Don’t be afraid to play around with bold or subtle color schemes. The Twisted Path quilt’s twisting movement will look different depending on your fabric choices, giving you a unique quilt every time.
The Twisted Path quilt is a fun, dynamic project that brings movement to your quilting. The pattern is simple to follow but creates a complex visual effect, making it perfect for quilters of all levels. As you sew, enjoy the process of watching the twisting path unfold. By the end, you’ll have a striking quilt that’s not only beautiful but also a testament to your creativity and patience.