
Ever since I was a little girl, quilting has been a part of my life. My grandmother, a master quilter, introduced me to the art.
I remember sitting beside her, utterly fascinated, as she transformed scraps of fabric into beautiful pieces of art. It wasn’t just the colors or patterns that caught my eye; it was the stories woven into each quilt, each stitch a testament to love, patience, and creativity.
This deep-rooted passion led me to discover various quilting projects, but one that stands out significantly is the “Woven Star” quilt block. This project, much like the quilts of my childhood, is not just about creating something beautiful to look at; it’s about weaving stories and memories into something tangible.
The Allure of the Woven Star
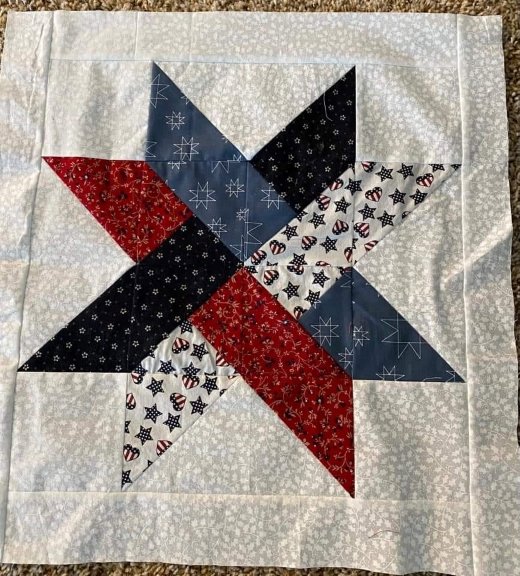
The “Woven Star” quilt block, with its intricate design and interlocking patterns, is reminiscent of the night sky. Much like stargazing, where every constellation tells a story, each segment of this quilt block holds its own narrative. This project is not just a testament to the quilter’s skill but a celebration of the craft itself. The Woven Star is more than a pattern; it’s a bridge between tradition and innovation, a perfect blend of complexity and beauty.
Full Pattern: Click Here
Exploring the Fabric Galaxy
The beauty of the “Woven Star” quilt block lies in its versatility and the complexity of its design, which can seem like navigating through a galaxy of fabrics. This block, available in three sizes—12”, 8”, and 6”—allows for a rich tapestry of colors and textures, echoing the varied hues of the night sky. What makes the Woven Star particularly enchanting is its ability to look complex while being wonderfully achievable. This duality invites quilters of all levels to embark on a journey, creating a piece that is as rewarding to make as it is beautiful to behold.
Preparing Your Quilting Voyage
Materials Needed:
For a 12″ finished quilt block:
- Background fabric: 4 squares 3 ½”, 1 square 7 ¼” (to be bisected on both diagonals)
- Fabrics 2, 3, 4, and 5: For each fabric, 2 squares 3 ⅞” (bisected on one diagonal), 1 square 4 ¼” (bisected on both diagonals)
For an 8″ finished quilt block:
- Background fabric: 4 squares 2 ½”, 1 square 5 ¼” (bisected on both diagonals)
- Fabrics 2, 3, 4, and 5: For each fabric, 2 squares 2 ⅞” (bisected on one diagonal), 1 square 3 ¼” (bisected on both diagonals)
For a 6″ finished quilt block:
- Background fabric: 4 squares 2”, 1 square 4 ¼” (bisected on both diagonals)
- Fabrics 2, 3, 4, and 5: For each fabric, 2 squares 2 ⅜” (bisected on one diagonal), 1 square 2 ¾” (bisected on both diagonals)
Note: For both sizes of triangles for each fabric, you will have extras to use in a second block.
Setting the Foundation
As you prepare to embark on this quilting journey, consider the “Woven Star” as more than just a pattern; view it as a canvas. This project offers a unique opportunity to blend colors and textures in a way that reflects your personal story or the story you wish to tell. Before cutting into your fabric, take a moment to envision the final piece. How will the colors interact? How will the textures play together under the light? This preliminary contemplation is as crucial as the sewing itself, setting the stage for a truly personal and meaningful creation.
Step-by-Step Instructions
Embarking on the journey to create your “Woven Star” quilt block is an exciting process. Follow these detailed steps to ensure your quilt block comes together beautifully.
Step 1: Cutting Your Fabric
Start by preparing your fabric according to the sizes mentioned in the materials list for your desired block size. Remember, precision in cutting is key to ensuring that the pieces fit perfectly together.
- For the background fabric, cut four squares and then one additional square that will be bisected on one or both diagonals, depending on the block size.
- Repeat a similar process for Fabrics 2, 3, 4, and 5. Ensure you have two squares from each fabric for the smaller triangles and one for the larger triangles, all to be bisected as specified.
Step 2: Organizing Your Pieces
Lay out all your pieces on a flat surface, grouping them by size and color. This organization will help you visualize the final layout and make the piecing process smoother.
Step 3: Piecing Together
Begin by piecing the smaller triangles together to form the star’s points. Press your seams open or to the side, depending on your preference, to reduce bulk.
- Join these smaller triangle units with the corresponding background fabric to start forming the star’s arms.
- Pay attention to the direction of the fabrics to ensure the woven effect of the star comes through.
Step 4: Creating the Star
Once all the arms of the star are pieced together, join them with the larger central triangles. This step requires precision, as aligning the points correctly will ensure the star looks cohesive.
Step 5: Completing the Block
With all the components of the star assembled, piece together the outer background squares to frame the star. This not only highlights the star pattern but also gives the block a finished look.
Additional Tips
- Precision is Key: Take your time with cutting and piecing to ensure accuracy. This will make your quilt block come together more smoothly.
- Pressing Matters: Regularly press your seams, either to the side or open, to reduce bulk and make your quilt top lay flat.
- Color Choices: Experiment with color contrasts and combinations to make your “Woven Star” pop. Consider using a design wall or floor space to lay out your fabric choices before sewing.
- Enjoy the Process: Remember, quilting is not just about the final product but also about the joy of creation. Take breaks, step back to appreciate your work, and enjoy the journey.
Completing your “Woven Star” quilt block is a rewarding experience that leaves you with not just a beautiful piece of quilt work but also a story woven into fabric. Each choice of color, each stitch, adds to the narrative of your creation.
As you hold your finished block, reflect on the journey, the decisions you made along the way, and the love and patience woven into each seam. May this “Woven Star” be a testament to your creativity and a beacon of inspiration for your next quilting adventure.