
As a little girl, I’d watch with wide-eyed wonder as my grandmother transformed scraps of fabric into a kaleidoscope of patterns and colors, her hands weaving not just quilts, but stories and memories.
Those cherished moments spent by her side, with the hum of her sewing machine, are stitched into my very being. Today, I share with you not just a quilt pattern, but a patchwork of my heritage the Pretty Posy quilt.
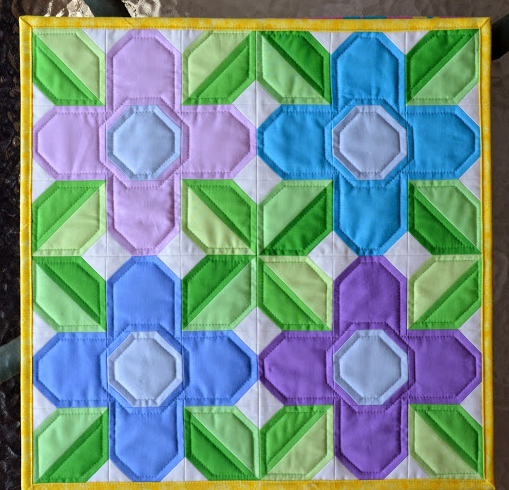
Pretty Posy Quilt Transform: The Satisfaction of Creative Bloom
The Pretty Posy quilt is more than a pattern; it’s a narrative in textile form, a tribute to the spring gardens my grandmother tended with the same patience and care as her quilting. Each posy block, with its vibrant petals and lush green leaves, is a nod to the enduring beauty and resilience of nature—a beauty that she taught me to see in the fabric of life itself.
Crafting a Legacy
The art of quilting is a dialogue between past and present, each stitch a word, every block a sentence in a story that spans generations. As we delve into the creation of the Pretty Posy quilt, we engage in a time-honored tradition, crafting a legacy with every slice of the rotary cutter and press of an iron.
Palette of Petals
In quilting, as in art, the choice of materials sets the stage for the masterpiece to come. For the Pretty Posy quilt, the fabric is our paint, and the colors are carefully chosen hues that bring the posies to life. Each selection is a petal in the garden of our creation, waiting to bloom into something splendid.
Full Pattern: Click Here
Materials
To embark on this quilting journey, you’ll need:
- (1) 3.5″ square for the Flower Center (Kona Cloud)
- (4) 1.5″ squares for the Flower Petals (Kona Wisteria, Bluejay, Peacock, and Petunia)
- (4) 3.5″ squares for the Flower Petals (matching the 1.5″ squares)
- (2) 4″ squares for the Dark Green side of the leaves (Kona Kiwi and Sour Apple)
- (2) 4″ squares for the Light Green side of the leaves (Kona Honeydew and Pear)
- (16) 1.5″ squares for the Background (Kona Snow)
Prelude to Piecing
Before the first thread is looped through the eye of a needle, take a moment to envision the finished quilt. Imagine the texture of the fabric, the interplay of colors, and the joy of the final stitch. Quilting is not just about the quilt; it’s about the journey. Embrace the process, for in each step, there’s a lesson waiting to be learned.
Step-by-Step Instructions
Embarking on the Pretty Posy quilt is a venture into the heart of quilting. Let’s begin, one patch at a time.
Step 1: The Heart of the Posy
Start with the flower’s heart, the central square. Take your 3.5″ Flower Center square and the four 1.5″ Flower Petal squares. Place a small square at each corner of the center square, right sides together. Sew diagonally across the small squares, then trim the excess fabric ¼” away from the seam and press open. This technique, known as snowballing, will form the foundation of your Pretty Posy.
Step 2: Petal Perfection
Now, take the 3.5″ Petal squares and eight 1.5″ Background squares. Position two background squares on opposite corners of each Petal square, aligning the edges. Sew diagonally across each small square, trim, and press as before. These will bloom into the full petals of your posy.
Step 3: Leaves of Harmony
For the leaves, you’ll create two-toned half-square triangles (HSTs). Place a 4″ Light Green square atop a 4″ Dark Green square, right sides together. Draw a diagonal line on the back of the lighter square, then stitch ¼” away from either side of the line. Cut along the line, press the seams, and trim the resulting HSTs to 3.5″ squares. These HSTs mimic the dual shades of leaves, offering a realistic touch.
Step 4: Assembling the Foliage
With the completed HSTs, repeat the snowballing technique used for the petals, attaching the 1.5″ Background squares to opposite corners of each HST, sewing, trimming, and pressing as before. This step fashions the leaf tips, giving your foliage its distinct Pretty Posy shape.
Step 5: The Quilt’s Quilt
Lay out the nine patches of the Pretty Posy block as illustrated, balancing color and form. Sew the pieces into rows, press the seams, and then sew the rows together. The magic is in how these simple squares, when joined, transform into the Pretty Posy.
Additional Tips
- Precision Cutting: Accurate cutting is the cornerstone of a well-fitted block. Take your time and cut precisely.
- Consistent Seams: A uniform ¼” seam allowance ensures that all the pieces fit together perfectly.
- Pressing Matters: Press your seams flat before joining pieces. This not only makes sewing easier but also gives your quilt a professional finish.
- Enjoy the Process: Relax and enjoy the act of creation. Remember, each quilt tells a story—let yours speak of joy.
Conclusion
As you hold your completed Pretty Posy block, let it be a reflection of not only your skill but the story you’ve woven into it. With every piece joined, you’ve not only created a quilt but also added to the tapestry of quilting history. May this Pretty Posy be a garden of delight in your quilting journey, and may it inspire stories of your own for years to come.