
As a quilter, I’ve always been drawn to the patterns that tell a story, capturing moments of time and emotion within their stitches.
One evening, while sitting on my porch under a clear night sky, the Moonlight Star Block came to life in my mind.
It was a reflection of that peaceful night, with the stars twinkling above me and the gentle glow of the moon casting a serene light over the landscape. That night, I felt a deep connection with the cosmos, and I knew I wanted to recreate that feeling in fabric.
This block is not just a quilting pattern—it’s a tribute to those quiet, starry nights that offer a moment of reflection and peace.
Illuminating the Night Sky: The Significance of the Moonlight Star Block
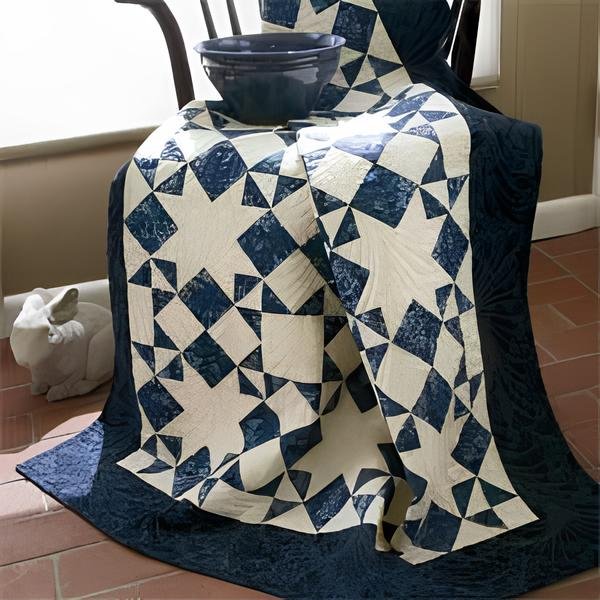
The Moonlight Star Block is more than just a beautiful design; it holds a special significance in the quilting world. This block captures the delicate balance between light and dark, symbolizing how even in the darkest moments, there is always a light to guide us.
The play between the cream and blue fabrics mimics the contrast between the moonlight and the night sky, making this block a perfect addition to any quilt meant to evoke calmness and tranquility. Whether used as a focal point in a larger quilt or as part of a series of star blocks, the Moonlight Star Block is a timeless design that carries a message of hope and serenity.
Crafting with Precision: Materials and Tools for Success
Before we begin crafting this celestial beauty, it’s essential to gather all the materials and tools needed. Precision is key when working with star blocks, so having everything on hand will make the process smoother and more enjoyable.
Materials:
- Cream Print Fabric:
- 1 square, 4½” x 4½”
- 6 squares, 2⅞” x 2⅞”
- 20 squares, 2½” x 2½”
- Medium Blue Print Fabric:
- 4 squares, 4½” x 4½”
- 6 squares, 2⅞” x 2⅞”
Tools:
- Rotary cutter and mat
- Quilter’s ruler
- Fabric marking pen or pencil
- Sewing machine
- Iron and ironing board
- Pins
The Art of Preparation: Setting the Stage for Success
Before diving into the assembly, take a moment to prepare. The success of the Moonlight Star Block lies in precise cutting and careful piecing. Ensure that your rotary cutter blade is sharp for clean, accurate cuts.
When marking the fabric, use a light hand to avoid any marks showing through on the final piece. Finally, pressing each seam as you go will help maintain the block’s crisp lines and perfect points. With everything ready, you’re set to start bringing the night sky into your quilting space.
Full Pattern: Click Here
Step-by-Step Instructions: Bringing the Moonlight Star Block to Life
Now that we have all our materials and tools prepared, it’s time to start crafting the Moonlight Star Block. We’ll go through each step carefully, ensuring that your block comes together beautifully.
Step 1: Creating the Half-Square Triangles (HSTs)
- Begin by taking the cream print 2⅞” squares and the medium blue 2⅞” squares.
- On the wrong side of each cream square, draw a diagonal line from corner to corner using a fabric marking pen or pencil.
- Place each cream square on top of a medium blue square, right sides together, aligning the edges.
- Sew a ¼” seam on both sides of the drawn diagonal line.
- Using your rotary cutter, cut along the marked line to create two triangles.
- Open the triangles and press the seams towards the darker fabric. You now have 12 half-square triangles (HSTs).
Step 2: Constructing the Corner Units
- Take three of the HSTs from Step 1 and one cream 2½” square. Lay them out as shown in Diagram II to form a corner unit.
- Sew the pieces together in rows. Start by sewing two HSTs together, and then sew the remaining HST to the side of the cream square.
- Press the seams to one side or open, depending on your preference.
- Repeat this process to create a total of four corner units.
Step 3: Making the Side Units
- Draw a diagonal line on the wrong side of each cream 2½” square.
- Take one medium blue 4½” square and place a cream square on top, right sides together, aligning one corner. Sew directly on the marked line.
- Trim the excess fabric ¼” from the seam, and press the seam towards the corner.
- Repeat this step with another cream square on the adjacent corner of the medium blue square, forming a “snowball” effect as shown in Diagram III.
- Press the seams again. Each “snowball” unit should measure 4½” square. Repeat this process to make four side units.
Step 4: Assembling the Moonlight Star Block
- Lay out all the units according to Diagram IV: place the four corner units in the corners, the four side units in the middle of each side, and the cream and blue 4½” squares in the center.
- Begin by sewing the units together in three rows. Start with the top row by joining a corner unit to a side unit, and then attach the next corner unit.
- Repeat this process for the bottom row.
- For the middle row, sew the side units to the remaining cream and blue 4½” squares.
- Finally, sew the three rows together, carefully matching the seams to ensure precise alignment.
Step 5: Press and Square Up
- Once your block is fully assembled, give it a final press. Ensure all seams are lying flat and that the block measures 12½” square (including seam allowances).
- If necessary, trim the edges slightly to square up the block.
Additional Tips: Mastering the Moonlight Star Block
- Starch Your Fabric: For crisp edges and easier piecing, consider starching your fabric before cutting. This helps prevent stretching, especially with bias edges.
- Chain Piecing: To save time, try chain piecing your HSTs and corner units. This method involves sewing several units in a continuous line without lifting the presser foot, reducing thread waste and speeding up the process.
- Accurate Seams: Double-check your seam allowances as you go. Even a slight deviation can affect the block’s final size, so aim for a consistent ¼” seam.
Reflecting on the Journey
Completing the Moonlight Star Block is not just about creating a beautiful piece of fabric art—it’s about the experience of crafting something meaningful with your hands. As you finish your block, take a moment to appreciate the intricate design and the story it tells.
This block, with its precise points and soothing color contrast, is a reminder of the peace and serenity found under a starlit sky. Whether you make just one or create an entire quilt of Moonlight Star Blocks, each piece will carry a bit of that tranquility with it, offering comfort and beauty to anyone who wraps themselves in its embrace.