
When I was a little girl, I remember my grandmother, a prolific quilter, meticulously selecting fabrics from her vast collection to piece together quilts that were not just blankets but tapestries of our family’s history.
Each stitch seemed to capture a story, a memory, or a piece of advice she was eager to pass down. It was through her eyes and hands that I learned the importance of preserving moments and crafting them into something tangible and warm.
This early exposure to the art of quilting has stayed with me, embedding a deep appreciation for the craft and the stories each quilt can tell.
This is why the Layer Cake Strip Quilt project resonates so deeply with me. It’s not just about piecing together strips of fabric; it’s a creative journey that recaptures the essence of traditional quilting while embracing the improvisation and resourcefulness that come with modern quilting techniques.
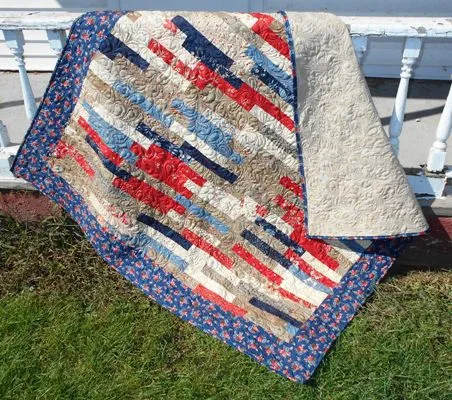
This quilt, with its patriotic hues and simple yet engaging pattern, reminds me of the quilts my grandmother made, where every piece of fabric told a part of our family’s story.
A Twist on Tradition: The Layer Cake Strip Quilt
The Layer Cake Strip Quilt project began as an improvisation, a nod to the resourcefulness and creativity that quilters have always needed to possess. My cousin Kelli and I embarked on this project with a desire to create something beautiful for a charitable cause, using the materials we had on hand. Without a jelly roll in sight but armed with an almost complete layer cake, we decided to innovate.
This quilt is the result of that innovation, a testament to the fact that constraints can often lead to the most creative solutions in quilting. It’s a project that blends the old with the new, honoring traditional quilting methods while embracing the spontaneity of modern design.
Crafting Connection: The Method Behind the Quilt
Delving into the specifics of the Layer Cake Strip Quilt, it’s crucial to understand the heart of its creation—the process of transforming a standard layer cake into a quilt rich with stories and warmth. This quilt’s design hinges on the innovative approach to the well-loved Jelly Roll Race quilt, repurposing layer cake pieces by cutting them into strips.
This method exemplifies how limitations can spur creativity, encouraging quilters to look at their stash with fresh eyes and envision new possibilities. The process is a dance of cutting, sewing, folding, and repeating, a rhythm that mirrors the cyclic nature of storytelling in quilting.
Materials: Gathering Your Story’s Threads
To embark on this quilting journey, you’ll need:
- An almost complete layer cake (we were short by about five squares, but a full one works best)
- Fabric for borders and binding (approximately 1 1/4 yards should suffice)
- Sewing machine and thread (we used red for the top stitching and cream for the back)
- Cutting tools (rotary cutter, mat, and ruler)
- Iron and ironing board for pressing seams
These materials are the building blocks of your quilt, each adding its own hue and texture to the narrative you’re stitching together. The choice of colors and patterns can reflect personal memories, hopes, or the intended recipient’s story, making the quilt a canvas for connection and expression.
Before the First Stitch: Preparing Your Palette
As we prepare to dive into the construction of the Layer Cake Strip Quilt, it’s essential to approach this project with an open heart and mind. Quilting, at its core, is about more than just creating a functional item; it’s a means of expression, a way to weave together stories and memories.
Consider the layer cake pieces as chapters of a story you’re telling, with each strip contributing to the overall narrative. Whether you’re making this quilt for a loved one, a charitable cause, or as a personal project, let the process be guided by the stories you wish to tell and the connections you hope to forge or honor.
Ready to move on to the detailed steps involved in creating your Layer Cake Strip Quilt?
Full Pattern: Click Here
Step-by-Step Instructions: Crafting Your Layer Cake Strip Quilt
Creating a Layer Cake Strip Quilt involves a blend of precision, creativity, and a bit of improvisation. Here’s how to bring your quilt to life, step by step:
- Prepare Your Strips: Begin by cutting your layer cake into 5 sets of 2-inch strips. If you’re working with a complete layer cake, you should have plenty of fabric for a full quilt. This initial step transforms your fabric pieces into the building blocks of your quilt.
- Sew the Strips Together: Mix up the strips to ensure a varied and vibrant pattern. Sew them end-to-end, creating one long strip. This continuous piece will form the body of your quilt, so embrace the randomness that comes with mixing the strips—it adds character!
- Create the Base: Trim 5 inches off one end of your long strip (this helps offset the seams for a more interesting visual effect). Then, find the midpoint of your strip and cut it in half, sewing these two pieces together along the long side. You’re starting to build the quilt top now, with each step doubling its width.
- Build the Quilt Top: Continue the process of folding the strip in half, cutting it at the midpoint, and sewing the cut ends together. With each iteration, your quilt grows exponentially in size. Repeat this process until your quilt top reaches a desirable size—ours ended up approximately 48″ x 46″, though sizes may vary based on the initial amount of fabric.
- Trim and Add Borders: Once your quilt top is assembled, trim any uneven edges to square it up. Then, measure and cut your border fabric to add a 5-inch border around the entire quilt. This not only frames your quilt but also brings it to a more usable size.
- Quilting: Choose a quilting design that complements the simplicity and movement of the strip pattern. We opted for a dense “headbands” design, which adds texture and depth without overwhelming the quilt’s design. Quilt as desired, either by machine or hand.
- Binding: Use the remaining fabric to create binding strips. Sew these strips together end-to-end, fold in half lengthwise, and press. Attach the binding to the edges of your quilt, securing all layers and giving your quilt a finished look.
Additional Tips for a Stunning Quilt
- Variety is Key: Mix your strips thoroughly to distribute colors and patterns evenly, avoiding clustering of similar fabrics.
- Precision Matters: Take care when sewing your strips together and pressing your seams. Neat seams contribute to a flat, even quilt top.
- Quilting Density: Choose a quilting pattern that suits the quilt’s use. Dense quilting adds durability but also stiffness, so consider the quilt’s intended use.
Finishing your Layer Cake Strip Quilt is a moment of immense satisfaction and reflection. This quilt, born from improvisation and creativity, not only serves a practical purpose but also carries with it stories, memories, and perhaps even a piece of your heart.
Whether you choose to gift it, donate it, or keep it for yourself, the Layer Cake Strip Quilt stands as a testament to the joy of quilting and the beauty of creating something with your own hands. Embrace the imperfections and celebrate the connections—between the fabrics, the stories, and the people—that this quilt represents.
Ready for the final touch with some potential titles for this article? Let’s wrap up this creative journey with a flourish.