
The art of quilting has always been a source of solace and creativity for me, a way to bring intricate designs to life with just fabric and thread.
I remember vividly the first time I encountered the Feathered Star pattern—it was like discovering a hidden treasure in a sea of possibilities. The sharp angles, the delicate points, and the endless potential for color combinations captivated me.
This pattern, with its rich history and challenging construction, became one of my personal favorites, a true testament to the skill and patience that quilting demands.
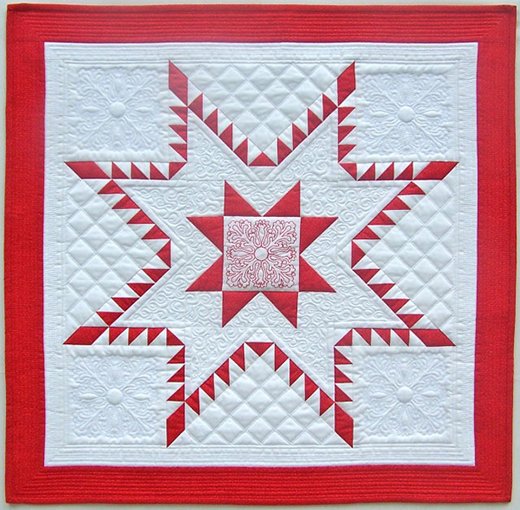
In this tutorial, I’m thrilled to share with you the Aurora Feathered Star Quilt Block. This block combines the traditional Feathered Star with a modern twist, making it a stunning centerpiece for any quilt.
Whether you’re an experienced quilter or someone eager to tackle a new challenge, this project will not only test your skills but also reward you with a breathtaking finished piece.
The Beauty of Precision: Mastering the Feathered Star
The Aurora Feathered Star is more than just a quilt block; it’s a work of art that showcases the beauty of precision in quilting. Each point and seam contributes to the overall harmony of the design, creating a visual masterpiece that is both complex and elegant.
As we journey through this project together, you’ll learn how to handle these intricate details with confidence, resulting in a quilt block that shines with the brilliance of a starry night.
The Magic in the Details: Understanding the Aurora Feathered Star
What sets the Aurora Feathered Star apart is the meticulous attention to detail required at every step. From the careful cutting of fabric pieces to the precise alignment of seams, each phase of this project is crucial.
But don’t let that intimidate you! With patience and a steady hand, even the most challenging aspects of this block can be mastered. We’ll also explore some unique techniques, such as creating feathered rows and mastering partial seams, which add depth and complexity to the final design.
Materials
To create the Aurora Feathered Star Quilt Block, you will need the following materials:
- 1-1/8 yard of white print for the block and inner border
- 1 yard of red print for the block and outer border
- 1 yard of fabric for backing
- 32″ x 32″ square of batting
- 7″ x 9″ rectangle of OESD Wash Away Embroidery Stabilizer
- White or cream Mettler 50-wt thread for patchwork
- White Mettler 60-wt thread for quilting
- Red Isacord thread for machine embroidery
- Monofilament for quilting
- Sewing machine (I used my BERNINA 780)
- Patchwork foot #37/#37D or #97/#97D
- Machine embroidery foot #26
- Free-motion quilting foot #24
- Walking foot #50
- Sharp 80/12 needle for patchwork
- Embroidery needle for machine embroidery
- Quilting needle 75/11 for quilting
- Twin needle 80/12 for quilting
- Straight Stitch plate
- 5mm or 9mm Stitch plate
- Medium hoop for machine embroidery
- Oval hoop for machine embroidery
- 6″ square ruler with diagonal line
- Disappearing fabric marker or pencil
Preparing for Success: Setting the Stage for the Aurora Feathered Star
Before diving into the cutting and piecing, it’s essential to ensure that your tools and workspace are ready. Clear a large, flat surface where you can comfortably cut and lay out your fabric pieces. Double-check that your rotary cutter is sharp and your rulers are accurate. Precision is key in this project, and having the right tools in top condition will make all the difference.
Take the time to organize your fabric pieces as you cut them. Label each piece according to the instructions—this will save you time and prevent any confusion as you move forward. Finally, remember to take breaks and pace yourself. This project is a marathon, not a sprint, and maintaining focus and patience is crucial to achieving a flawless final block.
Step-by-Step Instructions
Now, let’s embark on the exciting journey of creating your Aurora Feathered Star Quilt Block. Follow each step carefully, and don’t hesitate to revisit any section that requires a bit more attention. This block is all about the journey as much as the destination, so enjoy the process!
Full Pattern: Click Here
- Making Triangle Squares:
- Start by layering a white 9″ square and a red 9″ square, right sides facing up. Align the raw edges, and cut the squares in half diagonally.
- Cut 2-1/4″-wide strips from each half, measuring from the center cut. Keep the small triangles—you’ll need them later!
- Separate and rearrange the strips, alternating the colors. Offset the strips slightly as you join them with a 1/4″-wide seam allowance. Press the seam allowances toward the darker fabric.
- Repeat this process to create two sets of strips from each pair of squares.
- Cutting the Units:
- Align the 45° line on your square ruler with the seam line on your strip set. Starting from the lower left corner, make the first two cuts along the side and top edges of the ruler.
- Rotate the segment and align the cut edges with the ruler’s measurement lines. Make the remaining two cuts, creating a 1-1/2″ x 1-1/2″ unit.
- Continue cutting until you have 28 units labeled as A and 36 units labeled as B.
- Creating Feathered Star Units:
- Unit A:
- Fold the red 1-1/2″-wide strip in half, wrong sides together. Trim the end at a 45° angle using a ruler with a 45° line. Cut 2 diamonds measuring 1-5/8″ from the cut edge. Repeat to create 4 C diamonds and 4 reversed C diamonds.
- Sew a red C diamond to a white A1 triangle to make a diamond unit. Create a reversed diamond unit in the same way. Press seams toward the diamonds. Make 4 of each unit.
- Join one diamond unit and three A triangle-square units to form a short feather-row. Repeat with a reversed diamond unit and four A triangle-square units for a long feather-row. Make 4 of each.
- Unit B:
- For the feather rows, join four B triangle-square units and one white B1 triangle to form a short feather-row. Add five B triangle-square units and another B1 triangle to create a long feather-row. Press seams toward the dark triangles.
- Attach a short feather-row to a white E triangle, stopping 1″ from the end with a backstitch. Repeat with the long feather-row on an adjacent side. Press all seams toward the triangle.
- Complete the unit by sewing two white F triangles to the unit, forming 4 B units.
- Unit A:
- Assembling the Sawtooth Star Block:
- Attach your embroidery module, and set up your machine for embroidery. Use a red thread to embroider your selected design on a white I rectangle placed on the stabilizer.
- Trim the embroidered square to 4-1/2″ x 4-1/2″. Draw diagonal lines on the back of each red H square, layer on white G rectangles, and sew along the lines to create flying-geese units. Press the seams and arrange the pieces to form the block.
Additional Tips
- Patience is Key: This block requires time and precision. Don’t rush the process—each step builds on the last, so it’s important to work methodically.
- Press Seams Consistently: Pressing seams consistently toward the darker fabric ensures that your pieces fit together smoothly and that your points stay sharp.
- Check Measurements Often: Quilting is all about precision, so make it a habit to measure your pieces frequently. A small discrepancy can lead to larger issues later on.
As you complete your Aurora Feathered Star Quilt Block, take a moment to admire the complexity and beauty of what you’ve created. This block is more than just fabric pieced together—it’s a representation of your dedication, skill, and creativity. The journey from cutting fabric to finishing the final stitch is one filled with learning and growth, and now you have a stunning quilt block to show for it. Display it proudly, or incorporate it into a larger project that will continue to bring joy and inspiration for years to come.