
As a quilter, I’ve always been drawn to the simplicity and beauty of geometric designs. There’s something both grounding and liberating about the way shapes come together in perfect harmony, especially when using bright, cheerful colors.
Years ago, I stumbled upon a design that would stick with me—bold stars formed by the meeting of triangles and squares. At the time, I was still learning, working on smaller projects, and experimenting with color. I didn’t know then that these shapes would eventually form the basis for one of my favorite quilts: the Star Throw.
This quilt design reminds me of my own journey in quilting. Just like assembling these stars, I had to piece together my knowledge and experience, bit by bit, learning how different fabrics, colors, and techniques could work together. The Star Throw, with its sharp angles and bright blue hues, is a reflection of how I’ve grown—bold in vision but grounded in the timeless beauty of traditional quilt blocks.
The Sparkling Geometry of the Star Throw Quilt
The Star Throw quilt captures the essence of traditional quilting while adding a contemporary twist. What I love most about this project is how the precision of the diamond stars creates a rhythmic pattern, offering both a challenge and a sense of accomplishment.
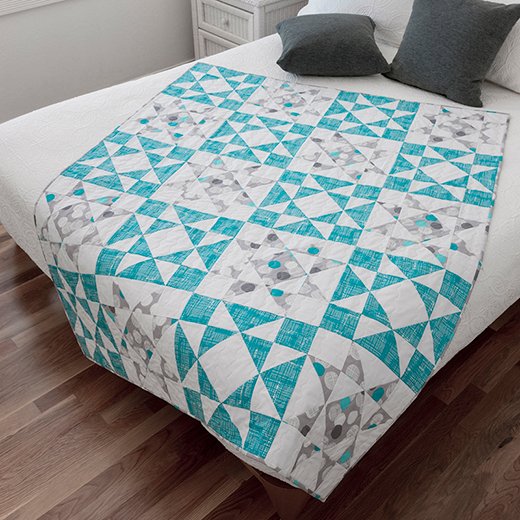
Each star is a testament to the power of simple shapes, strategically placed to create something greater than the sum of its parts. With its alternating blocks and the calming blue-gray color palette, the finished Star Throw is more than just a blanket—it’s a statement piece that brings warmth and beauty to any space.
Materials and Preparation
Unlocking the Secret of Color Harmony in the Star Throw
In this quilt, the balance between bright blue and muted gray is what truly makes the Star Throw stand out. The vibrant blue triangles bring energy to the design, while the softer gray and white tones provide a perfect counterbalance, ensuring the quilt doesn’t feel overwhelming. This combination not only adds visual interest but also helps highlight the intricate star patterns.
Now, let’s talk about what you’ll need to bring this beautiful Star Throw to life.
Materials Needed for the Star Throw:
- Bright Blue Fabric: 1½ yards for squares, half-square triangles, and quarter-square triangles.
- Gray Print Fabric: 1¾ yards for half-square triangles, squares on point, and binding.
- White Fabric: 2½ yards for squares, half-square triangles, and quarter-square triangles.
- Backing Fabric: 54” x 66” (for the throw size).
- Batting: 54″ x 66″.
- Binding Fabric: 2½” wide strips cut from gray print fabric.
In addition to the fabric, you’ll need the following cutting dies if you’re using the AccuQuilt system:
- GO! Square-3½” (3″ Finished) (55701)
- GO! Quarter Square Triangle-6″ Finished Square (55726)
- GO! Half Square Triangle-3″ Finished Square (55703)
- GO! Square on Point-4¾” (4¼” Finished) (55725)
- GO! Strip Cutter-2½” (for binding)
If you don’t have the GO! Qube system, don’t worry. You can manually cut the fabric into the appropriate shapes with rotary cutters and rulers, following the measurements listed. This precision will help bring the Star Throw to life with clean, sharp edges for each block.
Full Pattern: Click Here
Preparing to Quilt: Setting the Stage for the Star Throw
Before diving into sewing, a few key considerations will help ensure a smooth experience. First, precision in cutting is vital. This quilt relies heavily on sharp, clean edges for the triangles and squares to fit together perfectly, which is crucial for achieving the clean, crisp look of the Star Throw design. If you’re cutting by hand, take your time to make sure each piece is exact.
Another important tip is to organize your pieces by color and shape before sewing. This will save you time and prevent mistakes when you’re in the flow of piecing the Star Throw. Having everything laid out neatly allows you to focus on the fun part—putting it all together!
Step-by-Step Instructions
Now that your materials are prepared, let’s dive into the construction of your Star Throw. These instructions will guide you through the process of piecing your blocks and assembling them into the full throw quilt.
Step 1: Constructing the Square in Square Units
- Lay out your pieces: Start with four bright blue 3″ finished half-square triangles (HSTs) and one white 4¾” square on point.
- Sew the sides: Pin and sew one bright blue 3″ HST to each side of the white square. This will form a “square-in-square” unit, an essential component of the Star Throw.
- Press seams: Press the seams towards the bright blue HSTs for a crisp finish.
- Repeat: Make 10 of these units in total.
Step 2: Building the Flying Geese Units
- Prepare your triangles: Lay out two white 3″ HSTs and one bright blue 6″ quarter-square triangle (QST).
- Sew the sides: Pin and sew one white 3″ HST on each side of the bright blue QST, creating a flying geese unit, a key feature in the Star Throw.
- Press seams: Press the seams toward the white triangles.
- Repeat: Make 40 flying geese units.
Step 3: Assembling the Star Throw Blocks
- Lay out your pieces: To create a Star Throw Block, arrange four bright blue 3½” squares, four flying geese units, and one square-in-square unit.
- Sew the rows: Pin and sew the pieces into three rows. Be sure to press the seams away from the flying geese units for easier assembly.
- Finish the block: Sew the three rows together, pressing the seams towards the center row. You’ll need to complete 10 of these bright blue and white blocks for your Star Throw.
Step 4: Gray Print Blocks for the Star Throw
- Follow the same steps as above, using the gray print 3″ finished HSTs and white fabric for a second set of 10 blocks. This time, your square-in-square units will feature the gray print 4¾” squares on point, and the flying geese units will use gray print HSTs with white QSTs, perfectly complementing the overall design of the Star Throw.
Step 5: Assembling the Star Throw Quilt Top
- Lay out the blocks: Arrange your blocks in a 5×4 grid, alternating between the bright blue/white blocks and the gray print/white blocks. This layout will bring out the dynamic star pattern in the Star Throw.
- Sew the rows: Pin and sew the blocks into rows. For best results, press seams in alternating directions for each row, which will make it easier to join the rows together in your Star Throw.
- Sew the rows together: Finally, sew the five row units together, pressing seams toward the newly added rows.
Quilting and Finishing the Star Throw
- Layer the quilt: Place your batting between the quilt top and backing fabric. This is where the cozy warmth of the Star Throw starts to come together.
- Pin or baste: Pin the layers together, making sure everything is smooth and aligned for a flawless finish.
- Quilt: Quilt as desired—this can be done with a machine or by hand. The design lends itself well to straight-line quilting, which complements the geometric shapes of the Star Throw.
- Bind the quilt: Finish by adding the gray print fabric binding around the edges, mitering the corners for a clean finish to your Star Throw.
Additional Tips for Success with Your Star Throw
- Consistent Seams: Ensuring that your seam allowances are consistent (usually ¼”) will make piecing the Star Throw quilt top much easier. Inaccurate seams can distort your blocks and make assembly more difficult.
- Chain Piecing: To save time, use chain piecing when sewing similar units. This means continuously sewing your pieces without cutting the thread in between each one—it’s a great way to speed up the process of making your Star Throw.
Creating the Star Throw is not just about completing a project—it’s about the journey of seeing individual shapes come together to form something stunning. As you lay out your finished Star Throw, reflect on the beauty of its symmetry and the satisfaction of piecing each block with care.
This quilt, with its sparkling diamond stars and soothing color palette, will be a cherished addition to any home—a reminder that, sometimes, it’s the simple, geometric designs that leave the most lasting impact.