
I still remember the first time I encountered the Log Cabin quilt block. It was a warm, sunny afternoon, and I was flipping through an old quilting book that had seen better days.
The precise lines and structured beauty of the Log Cabin block fascinated me.
Over the years, I’ve explored countless variations of this classic block, each time finding new ways to bring out its charm. So, when I came across the idea of adding soft scalloped edges to the traditional Log Cabin design, I knew it was a project I had to share.
Quilting, for me, has always been about more than just stitching fabric together—it’s about finding ways to infuse each project with a piece of my story. This quilt, which I’ve come to call “Sew-Easy Scallops,” combines the timeless appeal of the Log Cabin block with a gentle, feminine twist that makes it perfect for a cozy, welcoming space.
The Scalloped Beauty of a Traditional Favorite
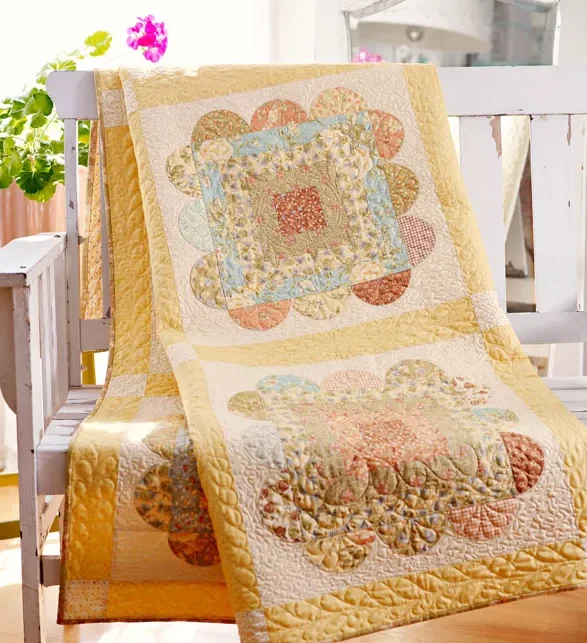
The “Sew-Easy Scallops” quilt is a delightful spin on the Log Cabin block, adding an elegant softness with scallop appliqués. These delicate curves bring a new dimension to the structured lines, creating a quilt that’s both classic and modern.
It’s a project that not only honors the history of quilting but also pushes the boundaries of what a traditional block can become. The appliquéd scallops introduce a charming, almost whimsical feel to the quilt, making it a perfect blend of tradition and innovation.
Materials and Preparation
Choosing Your Palette: A Dance of Colors
Before diving into the project, it’s essential to choose your fabrics carefully. The “Sew-Easy Scallops” quilt uses a mix of yellow, green, blue, apricot, cream, and brown prints, which together create a warm, inviting palette. The softness of the colors plays beautifully against the scalloped edges, enhancing the overall aesthetic of the quilt.
Full Pattern: Click Here
Materials Needed:
- 9-3/8 yards assorted yellow, green, blue, apricot, cream, and brown prints (for blocks and scallop appliqués)
- 1-5/8 yards solid cream (for blocks)
- 1/8 yard brown floral (for blocks)
- 1-1/4 yards yellow dot (for sashing rectangles)
- 1/4 yard cream floral (for sashing squares)
- 5/8 yard green floral (for binding)
- 4 yards backing fabric
- 71″ square batting
- Freezer paper
- Spray starch
Finished Quilt Size: 64-1/2″ square
Finished Block Size: 18″ square
Note: Quantities are for 44/45″-wide, 100% cotton fabrics, and measurements include 1/4″ seam allowances.
Setting the Stage: Preparing Your Workspace
Before you begin cutting, make sure your workspace is well-organized. Lay out your fabrics, ensure your rotary cutter is sharp, and keep your pressing station ready. The appliqué method used in this quilt—freezer-paper-and-starch—is simple but requires precision. Take your time with the prep work; it will make the sewing process smoother and more enjoyable.
Step-by-Step Instructions
Cutting the Fabric: A Precise Beginning
Start by cutting the fabric pieces as listed above. The exactness of your cuts is crucial, as it will ensure that your blocks and scallops fit together seamlessly. Cut the pieces in the following order:
- From each assorted print (yellow, green, blue, apricot, cream, or brown), cut:
- 2 pieces, 2″ × 12-1/2″, for position 6
- 2 pieces, 2″ × 9-1/2″, for position 5
- 2 pieces, 2″ × 9-1/2″, for position 4
- 2 pieces, 2″ × 6-1/2″, for position 3
- 2 pieces, 2″ × 6-1/2″, for position 2
- 2 pieces, 2″ × 3-1/2″, for position 1
- 12 scallop patterns
- From the solid cream fabric, cut:
- 18 rectangles, 3-1/2″ × 18-1/2″
- 18 rectangles, 3-1/2″ × 12-1/2″
- From the brown floral fabric, cut:
- 9 squares, 3-1/2″
- From the yellow dot fabric, cut:
- 24 rectangles, 3″ × 18-1/2″
- From the cream floral fabric, cut:
- 16 sashing squares, 3″
- From the green floral fabric, cut:
- 7 binding strips, 2-1/2″ × 42″
Preparing the Scallop Appliqués: A Soft, Curved Touch
- Trace and Cut: Lay the freezer paper, shiny side down, over the Scallop Pattern. Trace the pattern 108 times and cut out each shape along the drawn lines.
- Adhere and Cut: Using a hot, dry iron, press the freezer-paper shapes onto the wrong side of the fabric pieces designated for the scallops. Let them cool, then cut out each fabric shape, adding a 1/4″ seam allowance to the curved edges.
- Shape the Scallops: Spray a small amount of starch into a dish. Place a scallop piece, wrong side up, on a pressing surface. Using a small paintbrush, apply starch along the seam allowance of the curved edge.
- Press: With the tip of a hot, dry iron, carefully turn the seam allowance over the curved edge of the freezer-paper template and press until the fabric is dry. Peel off the template carefully.
- Repeat: Continue this process to prepare all 108 scallop appliqués.
Assemble the Blocks: Building the Foundation
- Begin with the Center: To create each block, start by sewing the matching position 1 rectangles to opposite sides of a brown floral 3-1/2″ square. Press the seams toward the rectangles.
- Add the Next Layer: Next, attach the matching position 2 rectangles to the remaining edges of the block unit. Again, press the seams toward the newly added rectangles.
- Continue Adding Layers: Keep adding the rectangles in numerical order, sewing the position 3 and 4 rectangles next, and then the position 5 and 6 rectangles, until all the rectangles are attached. Press the seams as you go to ensure the block lies flat and neat.
- Incorporate the Appliqué Strips: After assembling the basic Log Cabin block, it’s time to add the scalloped appliqué strips. Attach the short appliqué strips to opposite edges of the block, followed by the long appliqué strips on the remaining sides. Press the seams toward the appliqué strips.
- Final Touch: Each finished block should measure 18-1/2″ square, including seam allowances. Repeat the process to create nine blocks in total.
Assemble the Quilt Center: Bringing It All Together
- Layout the Blocks: Refer to the Quilt Assembly Diagram to lay out your blocks, sashing squares, and sashing rectangles in seven rows. This layout will give you a clear visual guide for piecing the quilt together.
- Join the Rows: Sew the pieces together in each row, making sure to press all seams toward the sashing rectangles to ensure a crisp, clean finish.
- Complete the Quilt Top: Once all the rows are sewn, join them together to complete the quilt top. Press the seams toward the sashing rows.
Finishing the Quilt: The Final Flourish
- Layer the Quilt: With the quilt top complete, it’s time to layer the quilt top, batting, and backing fabric. Baste the layers together to hold everything in place for quilting.
- Quilt as Desired: For this project, Diana Johnson machine-quilted a feather wreath in the center of each block, added stippling in the solid cream background, and incorporated a feather vine in the sashing rectangles. You can follow this design or choose your own quilting pattern to personalize the quilt further.
- Bind the Edges: Finally, use the green floral binding strips to bind the edges of the quilt, securing all the layers and giving your quilt a polished, finished look.
Additional Tips: Ensuring Success with Your Scallops
- Precision Matters: When working with the scallop appliqués, take your time to ensure each curve is smooth and even. This attention to detail will make a significant difference in the overall appearance of the quilt.
- Starch Wisely: Using starch sparingly helps maintain the fabric’s shape without making it too stiff. If you find the fabric getting too stiff or difficult to work with, reduce the amount of starch or dilute it slightly with water.
- Quilting Choices: While the suggested quilting pattern adds an elegant touch, don’t be afraid to experiment with other designs. The scalloped edges can be complemented by various quilting motifs, so feel free to get creative!
Reflecting on Your Quilting Journey
Creating the “Sew-Easy Scallops” quilt is not just about piecing together fabric—it’s about embracing the journey of creativity, precision, and patience. Each block you assemble and each scallop you appliqué contributes to a quilt that is uniquely yours, a piece of art that reflects your personal style and skill.
As you finish this project, take a moment to admire the interplay of colors and textures, the balance between the structured Log Cabin blocks and the gentle curves of the scallops. Quilting is as much about the process as it is about the final product, and with this quilt, you’ve crafted something that is both beautiful and deeply personal.
Whether you keep the “Sew-Easy Scallops” quilt for yourself or gift it to someone special, it will always carry the warmth and care that you put into every stitch. Happy quilting!