My fascination with the nautical world began in my childhood, sailing on the crisp waters each summer, captivated by the vastness and the rhythmic dance of the waves.
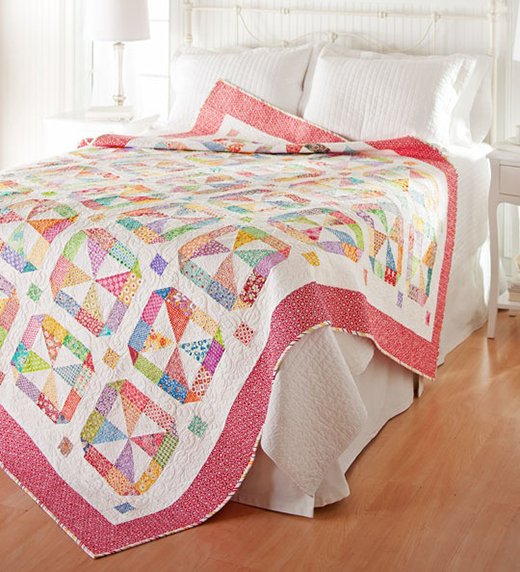
This love for the sea and its myriad of blues is what draws me to the Nautical Pinwheels Quilt.
Using a simple navy blue and white color scheme, this quilt mirrors the classic, timeless elegance of the ocean, intertwined with a playful twist of pinwheel blocks that spin like whirlpools or compass roses guiding sailors.
Crafting the Waves: The Nautical Pinwheels Quilt
The Nautical Pinwheels Quilt is a vibrant celebration of maritime adventures, designed to bring the spirit of the ocean into any home. This project utilizes the stark contrast between navy blue prints and solid white to create a striking visual effect that mimics the dynamic motion of water swirling around a ship at full sail.
Each block of the quilt is a reminder of the ocean’s endless waves and the serene blues that stretch towards the horizon.

Full Pattern: Click Here
A Palette Inspired by the Sea
The choice of fabrics and colors for the Nautical Pinwheels Quilt draws directly from nautical imagery. The deep navy paired with crisp white evokes a strong maritime vibe, while splashes of bright prints in orange, blue, green, brown, and gray mimic the colorful life both above and below the ocean surface.
Assembling Your Quilting Kit
To begin your journey with the Nautical Pinwheels Quilt, ensure you have the following materials gathered:
- Solid White Fabric: 7/8 yard for blocks, sashing, and the inner border, serving as a bright, contrasting backdrop.
- Assorted Bright Prints: 2/3 yard in total, adding vibrant color and variety to the design.
- Navy-and-White Print: A fat quarter to emphasize the nautical theme in the large triangle-squares.
- Novelty Print: A fat quarter for sashing squares, bringing unique visual interest.
- Multicolor Plaid Fabric: 1 yard for a lively outer border and binding, tying all colors together.
- Backing Fabric: 3 yards to support and frame the quilt from behind.
- Batting: A 53″ square to provide warmth and texture.
Setting Sail: Preparation Tips
Before cutting and piecing, it’s vital to prepare your materials properly. Pre-wash your fabrics to prevent any color bleeding in the future. Press all your fabrics thoroughly, ensuring they are smooth and ready for precise cutting. Arrange your workspace efficiently—make sure your cutting area is clear, your sewing machine is in good working order, and your ironing board is accessible for pressing pieces as you sew.
Step-by-Step Instructions: Constructing the Nautical Pinwheels Quilt
The construction of the Nautical Pinwheels Quilt involves careful assembly of blocks and borders to achieve the desired maritime aesthetic. Follow these detailed steps to create your quilt:
Step 1: Assemble Triangle-Squares
- Begin by drawing a diagonal line on the wrong side of each solid white 2-7/8″ square and 4-7/8″ square.
- Place a marked white square atop a corresponding bright print or navy-and-white print square. Sew 1/4″ on each side of the drawn line. Cut apart along the line to create two triangle units. Press each unit open, pressing seams toward the brighter or darker fabric, to form triangle-squares.
Step 2: Assemble Blocks
- Arrange one small triangle-square, one large triangle-square, and two rectangles of assorted bright prints in two vertical rows (refer to your quilting diagram). Sew together the pieces in each row. Press seams toward the rectangles.
- Join these two rows to form a block unit. Press the seam toward the large triangle-square. Ensure that each unit measures 6-1/2″ square including seam allowances.
- Combine four block units to form a complete block, ensuring seams are pressed in opposite directions for smooth nesting. Each complete block should measure 12-1/2″ square including seam allowances.
Step 3: Assemble Quilt Center
- Lay out the blocks, solid white sashing strips, and novelty print sashing squares according to your quilt assembly diagram in five horizontal rows.
- Sew together the pieces in each row, pressing seams away from the sashing strips for a flat assembly.
- Join these rows to complete the quilt center. Ensure that the quilt center measures 30-1/2″ square including seam allowances.
Step 4: Add Borders
- Attach the shorter solid white inner border strips to opposite edges of the quilt center. Follow with the longer strips on the remaining edges, pressing all seams toward the inner border.
- Prepare the multicolor plaid strips for the outer border. Sew the shorter strips to opposite edges first, then attach the longer strips to complete the border. Press all seams toward the outer border.
Nautical Pinwheels: Finishing Touches
- Layer your quilt top with the batting and backing. Baste the layers together to prepare for quilting. Choose a quilting design that complements the nautical theme, such as wavy lines or swirling patterns.
- Bind the quilt using the multicolor plaid fabric strips, adding a final frame to your creation.
Upon completion, the Nautical Pinwheels Quilt serves not only as a warm, functional item but also as a decorative homage to the sea. This quilt, with its dynamic pinwheels and bold maritime colors, is bound to be a cherished addition to any home, evoking the spirit of ocean adventures with every glance.
