
The holiday season has always held a special place in my heart, filled with memories of festive decorations, the scent of pine, and the warmth of family gatherings.
One tradition that has become a beloved part of my holiday preparations is creating handmade pieces that bring that festive spirit into my home.
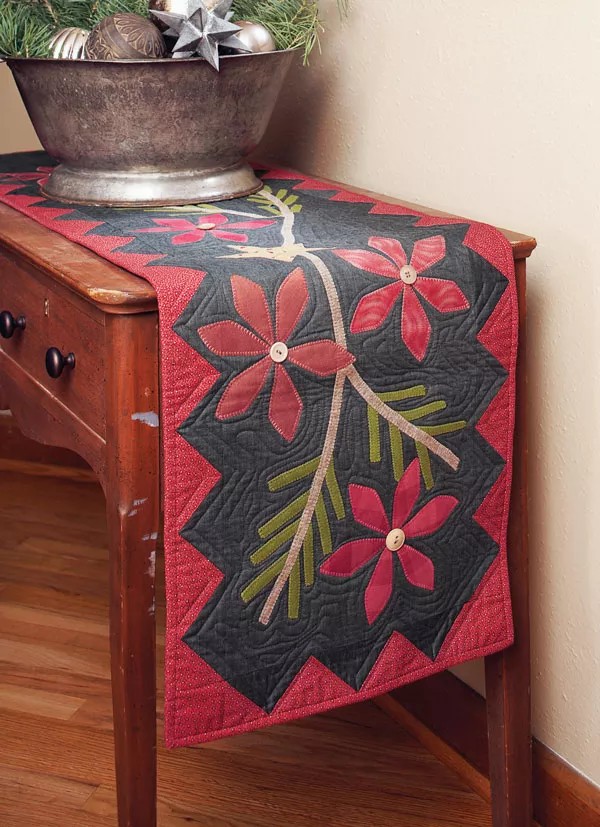
Among these, the Poinsettia and Pine table runner stands out as a favorite. Its muted colors, soft felted wool, and folksy charm capture the essence of a cozy, homespun Christmas—a perfect project to add warmth and beauty to any holiday table.
This table runner is more than just a seasonal decoration; it’s a celebration of the simple joys of the holidays, bringing together the timeless beauty of poinsettias and pine in a design that is both elegant and rustic.
The combination of traditional red and green with subtle gold accents, all set against a dark gray background, creates a piece that is as understated as it is charming. Let’s walk through the process of creating this delightful project that will surely become a staple in your holiday decor.
Rustic Elegance: The Charm of Felted Wool and Simple Appliqué
The Poinsettia and Pine table runner offers a wonderful opportunity to work with felted wool, a material that adds both texture and a comforting, cozy feel to the project. The soft, muted tones of the wool and fabric create a rustic elegance, perfect for a homey, yet sophisticated, holiday display.
Appliquéing the poinsettias, pine needles, and branches onto the dark gray background is a satisfying process, allowing you to watch the festive design come to life as you stitch each piece into place.
Step-by-Step Instructions: Bringing Your Poinsettia and Pine Table Runner to Life
With all your materials prepared and your pieces cut, it’s time to start assembling your Poinsettia and Pine table runner. Follow these detailed steps to create a charming and festive addition to your holiday decor.
Full Pattern: Click Here
Step 1: Assemble the Flying Geese Units
- Mark the Red Squares: Begin by using a pencil to draw a diagonal line on the wrong side of 64 red shirting 2-1⁄2″ squares.
- Create the Flying Geese Units:
- Align one marked red shirting square with one end of a solid dark gray 2-1⁄2×4-1⁄2″ rectangle (refer to Diagram 1 in the instructions). Sew directly on the marked line.
- Trim the excess fabric, leaving a 1⁄4″ seam allowance, and press the attached triangle open.
- Complete the Flying Geese:
- Align a second marked red shirting square with the opposite end of the same dark gray rectangle (refer to Diagram 2, noting the direction of the drawn line). Sew on the line, trim, and press the triangle open to complete the Flying Geese unit.
- Each unit should measure 2-1⁄2×4-1⁄2″, including seam allowances. Repeat this process to create a total of 32 Flying Geese units.
Step 2: Assemble the Quilt Top
- Create the Long Border Strips:
- Referring to the Quilt Assembly Diagram, join 13 Flying Geese units together to form a long border strip. Press the seams open. Repeat this process to create a second long border strip.
- Create the Short Border Strips:
- Again using the Quilt Assembly Diagram as a guide, join two red shirting 2-1⁄2″ squares with three Flying Geese units to form a short border strip. Press the seams open. Repeat to make a second short border strip.
- Assemble the Quilt Top:
- Sew the long border strips to the long edges of the solid dark gray 12-1⁄2×52-1⁄2″ rectangle. Then, add the short border strips to the remaining edges, completing the quilt top. Press all seams toward the dark gray rectangle.
Step 3: Appliqué the Quilt Top
- Prepare the Appliqué Pieces:
- Center and fuse a fusible web 3×18″ rectangle to the back of the tan wool 4×20″ rectangle. Cut this fused rectangle to make:
- Three 3⁄8×16-1⁄2″ branch appliqués.
- Three 3⁄8×9″ branch appliqués.
- Center and fuse a fusible web 3×18″ rectangle to the back of the tan wool 4×20″ rectangle. Cut this fused rectangle to make:
- Position and Fuse the Appliqués:
- Referring to the Quilt Assembly Diagram, arrange the green wool pine needle appliqués (Patterns B, C, D, and E) on the quilt top.
- Place the tan wool branch appliqués over the centers of the pine needles. Then, position the red print poinsettia leaves (Pattern A) in sets of six matching leaves.
- Finally, arrange the gold print stars (Pattern F), placing them to cover the ends of two branches. Once satisfied with the layout, fuse all the pieces in place.
- Stitch the Appliqués:
- Using matching thread, machine-blanket-stitch around each appliqué piece to secure them. Designer Tammy Johnson suggests waiting until the quilt top is layered before stitching around the appliqués, allowing you to quilt and appliqué at the same time.
Step 4: Finish the Table Runner
- Layer the Quilt:
- Layer the quilt top, batting, and backing fabric together, ensuring everything is smooth and aligned. Baste the layers together to prepare for quilting.
- Quilt as Desired:
- Tammy Johnson used gray thread to free-motion quilt the solid dark gray background, echoing the shapes of the appliqués. She also outline-quilted 1⁄4″ from the seam lines in the border, adding texture and dimension to the runner.
- Add the Final Touches:
- Hand-sew a button in the middle of each poinsettia to complete the flower’s look.
- Bind the edges of the table runner with the red shirting binding strips to give your project a polished, finished edge.
A Festive Finish to Your Holiday Table
The Poinsettia and Pine table runner is more than just a quilting project—it’s a way to bring the warmth and beauty of the holidays into your home. As you place this lovely runner on your table, you can take pride in the time and care you put into each stitch, knowing that this piece will be a cherished part of your holiday traditions for years to come.
The combination of felted wool and cotton fabrics, the rustic appliqué, and the festive colors all come together to create a table runner that truly embodies the spirit of the season.