
When I first ventured into the world of quilting, I never imagined how it would become such a vital part of my life.
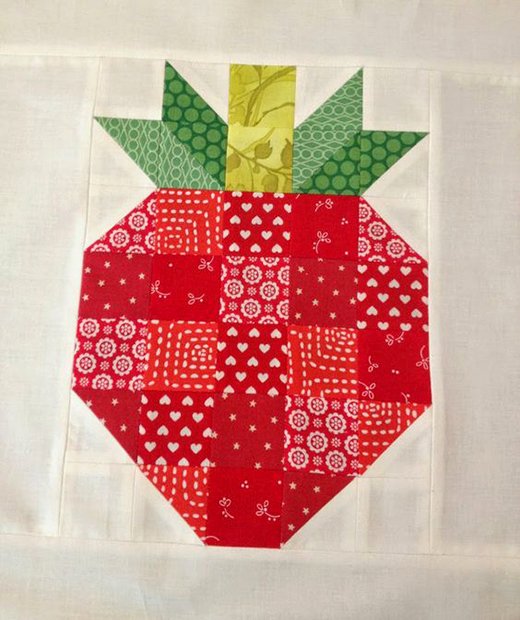
My early projects were simple, but each one taught me something new about the art of quilting and about myself. The Strawberry Block holds a special place in my heart, as it reminds me of the sheer joy I experienced during my first swap on Instagram.
There’s something undeniably charming about strawberries—their vibrant colors and delicate shape—that instantly captivated me. This project became a delightful way to blend creativity and community, using scraps from previous projects to create something fresh and beautiful.
As I embarked on creating a scrappy strawberry block for a cushion, I realized how much quilting is about sharing and connecting with others. This block is not just a pattern; it’s a piece of my quilting journey that I’m thrilled to share with you. Whether you’re a seasoned quilter or just starting, I hope this tutorial inspires you to explore the joys of quilting with scraps and to see the beauty in every small piece of fabric.
Scrappy Strawberries: Breathing New Life into Fabric Scraps
What I love most about the Strawberry Block is its versatility and sustainability. This project is all about making the most of what you have, using a mix of pinks, reds, and greens from your fabric stash.
Not only does this approach reduce waste, but it also allows for a unique, personalized touch in every block. Each strawberry is a one-of-a-kind creation, reflecting the variety and richness of the fabrics you choose. This technique is a celebration of quilting’s resourceful spirit, turning tiny scraps into a cohesive and charming design.
Materials: Gathering Your Scraps and Essentials
To create your own Strawberry Block, you’ll need the following materials:
- Pinks/Reds: 17 squares, 2 inches each (these can be cut from various pink or red fabrics).
- Greens:
- 3 squares, 2.5 inches each.
- 2 squares, 2.5 inches each from Green Print A.
- 2 squares, 2.5 inches each from Green Print B.
- 2 squares, 2 inches each from Green Print C.
- Whites: 5 squares, 2.5 inches each.
In addition to your fabric, make sure you have:
- A rotary cutter and cutting mat.
- A ruler, ideally with a 45-degree line for precise trimming.
- A sewing machine with a quarter-inch foot, which is crucial for achieving accurate seams.
- An iron for pressing seams open.
Full Pattern: Click Here
Setting the Stage: Tips for Preparing Your Workspace
Before diving into the project, it’s important to prepare your workspace. Start by organizing your scraps and cutting them into the required sizes. Having everything pre-cut and sorted will make the assembly process much smoother. Ensure your sewing machine is threaded and ready to go, with a fresh needle if needed.
Keep your ruler, rotary cutter, and iron within easy reach, as you’ll be using them frequently throughout the project. Remember, precision is key in quilting, so take your time with each step to ensure your seams and cuts are accurate.
Step-by-Step Instructions: Creating Your Scrappy Strawberry Block
Let’s dive into the step-by-step process of creating your Strawberry Block. This tutorial will guide you through each stage, from making the half-square triangles (HSTs) to assembling the final block. Take your time with each step, and enjoy the process of watching your strawberry come to life.
Step 1: Create the Half-Square Triangles (HSTs)
- Mark Your Squares: Begin by taking the 5 white 2.5-inch squares and 1 of the Green Print A 2.5-inch squares. Using a pencil or fabric marker, draw a diagonal line from one corner to the opposite corner on each of these squares.
- Pair the Squares: Pair each marked white square with an unmarked 2.5-inch square (one of the green ones). Pair the marked Green Print A square with an unmarked Green Print B square.
- Sew Along the Line: Sew a scant quarter-inch seam on both sides of the drawn diagonal line on each pair. This will create a double line of stitching.
- Cut and Press: After sewing, use your rotary cutter to slice along the drawn line, dividing each square into two triangles. Press the seams open to keep your block flat and prevent bulk.
- Trim the HSTs: It’s common for HSTs to be slightly larger than needed. Trim each HST down to a precise 2 inches by aligning the 45-degree line on your ruler with the diagonal seam and trimming the edges. Rotate the HST 180 degrees, align the already trimmed edges with the 2-inch line on your ruler, and trim the remaining edges. You should end up with 12 perfect HSTs.
Step 2: Lay Out the Pieces
- Arrange the Squares: With all your squares and HSTs ready, lay them out according to the pattern in the diagram. The placement is crucial for creating the strawberry shape, so follow the pattern carefully. Start by placing the pink or red squares to form the berry, and position the green squares and HSTs to represent the leaves and stem.
Step 3: Assemble the Block
- Sew Rows Together: Once your squares and HSTs are correctly arranged, begin sewing the pieces together row by row. Use a quarter-inch seam allowance for each seam. Press the seams of each row as you go, preferably pressing them open to reduce bulk.
- Join the Rows: After all the rows are sewn, it’s time to join them together. Carefully match the seams between each row to ensure the design lines up perfectly. Pin the rows together if necessary to keep everything in place.
- Final Pressing: Once all rows are joined and your block is complete, give it a final press. Make sure all seams are flat, and the block is smooth and even.
Step 4: Finishing Touches
- Check the Block Size: Your Strawberry Block should measure 7.5 inches by 10.5 inches when finished. If it’s slightly off, you can trim the edges carefully to bring it to size, but be cautious not to trim too much.
- Add to Your Project: Now that your Strawberry Block is complete, you can incorporate it into a larger project, like a cushion, quilt, or wall hanging. The block can be used on its own or repeated with other blocks to create a charming, strawberry-themed design.
Additional Tips: Making Your Strawberry Block Shine
- Fabric Selection: Don’t be afraid to mix and match your fabrics. The more variety you have in your pinks, reds, and greens, the more interesting and dynamic your strawberry will look.
- Perfecting Seams: Consistent seam allowances are key to a successful quilt block. If your seams are slightly off, it might throw off the alignment of the block, so take your time and sew carefully.
- Pressing Matters: Pressing seams open can help reduce bulk and make it easier to join rows together. However, if you prefer to press seams to one side, just be mindful of where the seams will intersect.
- Customization: Feel free to play with the size of the block by adjusting the measurements of your squares. You can create a smaller or larger strawberry by scaling down or up.
Completing your Strawberry Block is not just about finishing a project; it’s about celebrating the creativity and care you’ve put into each step. This block, with its charming design and scrappy origins, embodies the spirit of quilting—transforming small pieces into something beautiful and meaningful.
Whether you make one block or a dozen, each one is a testament to your skill and creativity. Display your finished block proudly, or gift it to someone special, knowing that you’ve created something truly unique and delightful.