
Full Pattern: Click Here
These materials are from the Sew Heavenly collection designed by Dan Morris for RJR Fabrics, known for their high quality and beautiful designs.
Preparing to Quilt: Initial Considerations and Tips
Before diving into the project, take some time to prepare your materials and workspace. Ensure that your fabrics are pre-washed and pressed to avoid any shrinkage or color bleeding later on.
Organize your fabrics by color and pattern to make the cutting and assembly process smoother. It’s also helpful to read through all the instructions first, so you have a clear understanding of each step.
Additionally, make sure your sewing machine is in good working order, with a fresh needle and the appropriate thread. A rotary cutter, cutting mat, and clear ruler are essential tools for accurate cutting. Patience and precision are key in quilting, so take your time and enjoy the process.
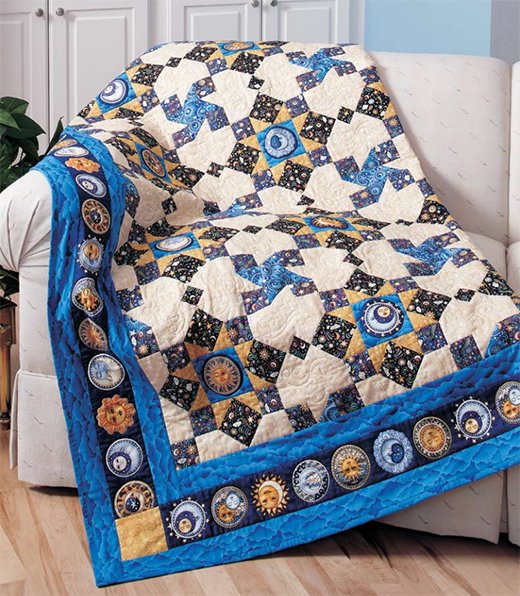
The Art of Pieced Sashing
Pieced sashing is an essential element in the “Star Light Star Bright” quilt, providing a unique way to join the blocks while adding to the overall aesthetic. This technique not only enhances the visual appeal of “Star Light Star Bright” but also strengthens the quilt’s structure.
Each sash is carefully crafted to match the intricate patterns of the blocks in “Star Light Star Bright,” ensuring a seamless and beautiful finish. Understanding the nuances of pieced sashing in the “Star Light Star Bright” quilt will elevate your quilting skills and add a professional touch to your projects.
Step-by-Step Instructions
Block Assembly
- Square-in-a-Square Units:
- Place one cream print B square atop one black print A square, right sides facing. Stitch diagonally from corner to corner. Trim ¼” beyond the stitching and press open to reveal the triangle. Repeat for the remaining corners using one cream print B square and two yellow print B squares to complete one Square-in-a-Square Unit. Make 48 Square-in-a-Square Units.
- Strip Sets:
- Join one dark blue print strip and one cream print strip as shown in the Strip Set Diagram. Make six strip sets. From the strip sets, cut 96 (2½”-wide) segments.
- Four Patch Units:
- Join two segments as shown in the Four Patch Unit Diagrams. Make 48 Four Patch Units.
- Center Units:
- Position one circle atop one medium blue print A square as shown in the Center Unit Diagram. Fuse in place and machine applique using matching thread. Make 12 Center Units.
- Block Layout:
- Lay out four Four Patch Units, four Square-in-a-Square Units, and one Center Unit as shown in the Block Assembly Diagram. Join into rows, then join the rows to complete one block. Make 12 blocks in total.
Sashing Unit Assembly
- Square-in-a-Square Units:
- Place one cream print C square atop one black print B square, right sides facing. Stitch diagonally from corner to corner. Trim ¼” beyond the stitching and press open to reveal the triangle. Make 17 Square-in-a-Square Units.
- Diagonal Seams Units:
- Place one light blue print B square atop one cream print D rectangle, right sides facing. Stitch diagonally from corner to corner. Trim ¼” beyond the stitching and press open to reveal the triangle. Make 34 Diagonal Seams Units.
- Sashing Units:
- Join two Diagonal Seams Units and one Square-in-a-Square Unit as shown in the Sashing Unit Diagrams. Make 17 Sashing Units.
Quilt Assembly
- Quilt Top Layout:
- Lay out blocks, Sashing Units, and light blue print B squares as shown in the Quilt Top Assembly Diagram. Join into rows, then join the rows to complete the quilt center.
- Borders:
- Add medium blue print side inner borders to the quilt center, followed by the top and bottom inner borders. Next, add the blue stripe side middle borders, and attach one yellow print E square to each end of the blue stripe top and bottom middle borders before adding them to the quilt. Finally, add the medium blue print side outer borders, and then the top and bottom outer borders.
Finishing
- Backing and Basting:
- Divide the backing into two (1¾-yard) lengths and join the panels lengthwise. The seam will run horizontally. Layer the backing, batting, and quilt top, then baste.
- Quilting:
- Quilt as desired. The quilt shown was quilted with in-the-ditch stitching, outlining circles, and a feather design in the cream background areas.
- Binding:
- Join 2¼”-wide medium blue print strips into one continuous piece for straight-grain French-fold binding. Add binding to the quilt.
Additional Tips
- When cutting your fabric, always double-check measurements to ensure accuracy.
- Use a design wall to lay out your blocks and sashing units. This helps visualize the final arrangement and makes it easier to spot any errors.
- Press your seams carefully, as this will affect the overall appearance and accuracy of your quilt.
- If you’re new to machine applique, practice on a scrap piece of fabric first to get comfortable with the technique.
Creating the “Star Light Star Bright” quilt is a rewarding experience that combines traditional quilting techniques with modern design elements. As you complete each step, you’ll see the intricate patterns and beautiful colors come together to form a stunning quilt that is sure to become a treasured heirloom. Take pride in your craftsmanship and enjoy the process, knowing that you are continuing a rich tradition of quilting artistry.