
Hey there, quilt enthusiasts!
I’m Anna, and today I’m so excited to share my latest adventure with the charming Stripes & Herringbone quilt pattern.
You know, there’s something magical about diving headfirst into a project that challenges you just the right amount.
When I first stumbled upon this pattern, I was immediately drawn to its delightful blend of curves and sharp lines.
Who wouldn’t want to cuddle under a quilt that is both simple and sophisticated?
Okay, so let me rewind a little.
I’ve been quilting for a while now, but I was looking to level up my game.
I knew the basics of block construction and wanted something new to spark my creativity.
That’s when Stripes & Herringbone caught my eye!
The vibrant colors and unique design just spoke to me.
I could already envision the cozy evenings ahead, wrapped in my handmade creation, and I couldn’t wait to get started!
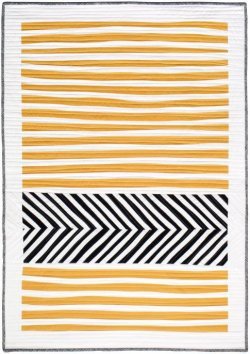
Quilt Construction: Why the Herringbone?
Now, let’s talk about what makes the Stripes & Herringbone pattern special.
The combination of straight strips with a herringbone panel creates a stunning visual contrast that really makes the quilt pop!
I loved how the design incorporates both techniques: piecing and curving, making it a perfect project for confident beginners like myself, who are ready to learn some new tricks along the way.
This pattern isn’t just about looking good; it’s about embracing the process.
With every stitch, you’ll gain confidence, learn the rhythm of sewing curves, and discover new tips and tricks.
And let’s not forget, working with Kona Cotton solids makes this quilt even more delightful.
The fabric’s quality is top-notch and offers a fantastic palette to play with!
What’s in My Quilting Toolkit?
- 1 yard Kona Curry
- 1 yard Kona White
- 3/4 yard Black Stripe (ADE-10792-2)
- 1/4 yard Binding fabric
- 1 1/4 yard Backing fabric
- Craft size batting
Feeling pumped?
Great!
These materials are all you need to create your very own Stripes & Herringbone quilt.
Make sure to choose your colors wisely; think about the vibe you want your quilt to give off.
I went for a bold curry against a crisp white to add some sunshine to my living room.
It’s also super important to have a comfortable and well-lit workspace.
Gather all your materials before starting.
Trust me on this one—the fewer interruptions, the better!
It’ll keep the creative juices flowing.
Preparation is Key!
Before we jump into sewing, let’s take a moment to prep.
Read through all the instructions thoroughly; understanding the flow of the Stripes & Herringbone quilt pattern will help you avoid any hiccups while sewing.
I always find it helpful to envision the entire process before tackling a project, allowing myself to mentally prepare for each step.
And here’s a golden nugget of advice: remember to measure twice and cut once!
There’s nothing worse than realizing you’ve cut your fabric wrong after using your precious Kona Cotton.
Take your time, and you’ll save yourself quite a bit of frustration later.
Step-by-Step Instructions:
Alright, my fellow quilters, let’s dive into the nitty-gritty!
Below, I’ll outline the step-by-step instructions for the Stripes & Herringbone quilt pattern.
Make sure to keep an eye out for the image and the full pattern link at the end of this section; it’s going to be a game-changer!
Full Pattern: Click Here
Additional Tips for Success
When sewing your quilt top, take your time while piecing the panels together.
I found that doing a little bit at a time allowed me to maintain accuracy.
Ensure that your seams are consistent by using a reliable quarter-inch foot on your sewing machine—it makes a world of difference!
After assembling your panels, don’t forget to square them up regularly to prevent any issues down the road.
Maintaining that crisp, sharp look is key to a professional finish.
It’s all about embracing that precision and making your quilt top look fantastic!
Exploring Techniques and Design Choices
As you’re working with the Stripes & Herringbone pattern, consider experimenting with different orientations of the stripes and herringbone panels.
The beauty of this pattern lies in its versatility!
You can create a variety of looks and color arrangements, which can significantly change the vibe of your finished quilt.
Also, if you’re feeling adventurous, think about incorporating embellishments with your fabrics or use different prints in the herringbone section.
It can add a joyfully unexpected twist to your project and make it uniquely yours!
Celebrate Your Quilting Journey!
Quilting is not just about the end result, but also celebrating every little step of the way.
As you stitch, always remind yourself of the joy, creativity, and craftsmanship that went into creating your Stripes & Herringbone quilt.
I felt such pride when I finished mine, and I just know you’ll feel the same when you wrap yourself in the warmth of your creation!
Now, if you loved this adventure, I invite you to cruise on over to explore other articles as well.
There’s a treasure trove of amazing tips, patterns, and stories in my blog.
I’ve even prepared an incredible piece you can check out by clicking here.
Happy quilting, and remember, each stitch is a step toward your next masterpiece!
In conclusion, you are on a fabulous journey with the Stripes & Herringbone quilt pattern.
By embracing the creative process, preparing well, and sewing with joy, your quilt dreams will soon become reality.
I can’t wait to see how your creations turn out!