
Quilting has always been a way for me to bring creativity into my everyday life.
I remember the first time I made a quilt, sitting on the floor of my small apartment, fabric scraps all around me, trying to piece together something beautiful from the chaos.
The process was slow, and I made plenty of mistakes, but the sense of accomplishment I felt when I finally finished was unmatched. That feeling is what keeps me quilting, and it’s why I’m so excited to share the “Windy Days Quilt” with you today.
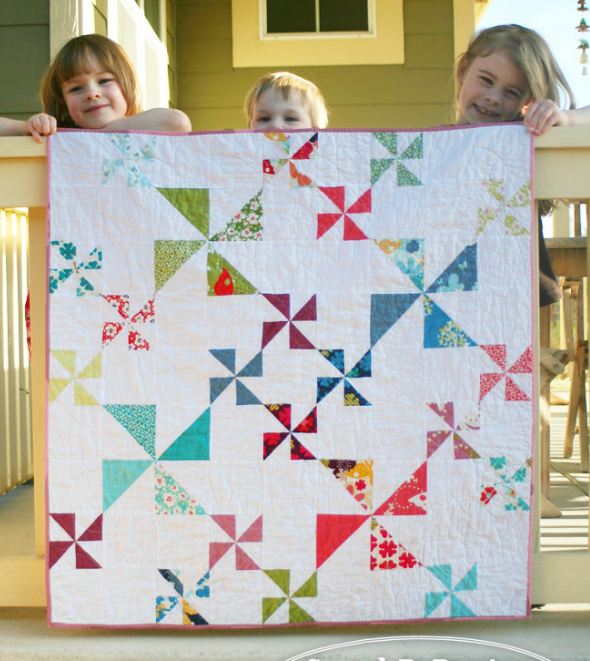
This project takes the classic pinwheel pattern, a favorite of many quilters, and adds a fun twist by incorporating both large and small pinwheels in a dynamic, tilted design. The result is a quilt that feels like it’s full of motion, perfect for brightening up any space. Whether you’re making this as a baby quilt, a lap quilt, or just for the joy of quilting, I hope you’ll find as much joy in creating it as I did.
Spinning in Style: A Fresh Take on the Classic Pinwheel Quilt
The “Windy Days Quilt” isn’t just another pinwheel quilt—it’s a celebration of movement and creativity. The way the small and large pinwheels interact across the quilt top creates a sense of energy and flow that’s both playful and sophisticated.
This quilt is perfect for experimenting with color and pattern, as it allows for a lot of flexibility in fabric choices. Whether you prefer a scrappy, eclectic look or a more uniform design, the “Windy Days Quilt” offers endless possibilities to let your creativity shine.
Full Pattern: Click Here
Preparing for the “Windy Days Quilt”
Materials You’ll Need
Before diving into the quilting process, let’s gather everything you’ll need to create your “Windy Days Quilt”:
- 1 charm pack of your chosen fabric line (I used “Just Wing It!” by MoMo for this project).
- 2 Bella Solids charm packs in a coordinating color (I used white for a crisp, clean background).
- 1¼ yards of coordinating print fabric for the backing (or 1½ yards if you decide to add a border).
- ½ yard of coordinating fabric for the binding.
- Rotary cutter, ruler, and cutting mat for precise cutting.
- Fabric pencil or a similar temporary fabric marker for marking your fabric.
Optional: If you decide to add a border to your quilt, you’ll need an additional ½ yard of coordinating fabric.
Step-by-Step Instructions for the “Windy Days Quilt”
Creating the Large Pinwheels
- Marking Your Fabrics: Start by taking your large pinwheel fabric pairs (16 solid-print pairs for a scrappy look) and marking a diagonal line from one corner to the opposite corner on the wrong side of the fabric. Place your ruler approximately 1/16” from the diagonal line to allow room for your pencil or marker and ensure an accurate line.
- Sewing the Pairs: With the right side of your printed charm square facing the solid, sew ¼” on both sides of your marked line. Chain piecing—sewing one seam after another without cutting the thread in between—can speed up this process.
- Cutting and Pressing: After sewing, cut along your marked line to create two separate triangle units. Press each unit open and then square them up to 4½”, ensuring the diagonal seam runs perfectly from corner to corner.
- Assembly Note: Resist the urge to assemble the large pinwheels just yet. Keeping the triangle units separate will make the quilt top construction easier later on.
Crafting the Small Pinwheels
- Sewing the Squares: Place a solid and a printed charm square right sides together. Sew around all four sides with a ¼” seam allowance. For efficiency, you can chain piece these as well.
- Cutting the Squares: After sewing, make two diagonal cuts across each square, creating four small triangle units. Press these triangles open and square them up to 2½”, making sure the diagonal seams are straight.
- Assembling the Pinwheels: Arrange the small triangle units into pinwheels, ensuring that each pinwheel has the same background and print placement. Sew the triangle units together in pairs, press the seams, and then sew the pairs together to complete the small pinwheel blocks.
- Pressing for Precision: Press the small pinwheel blocks open. To ensure a flat finish, you can unpick 1 or 2 stitches on the back of the block, which allows for a mini-pinwheel to form at the seam intersection.
Piecing the Quilt Top
- Trimming Background Blocks: Trim the solid charm squares that you’ve set aside to 4½” square. You can either trim ½” from two adjacent sides or remove all the pinked edges for a cleaner look.
- Arranging the Blocks: Using the photo you took earlier as a guide, arrange your small pinwheel blocks, large pinwheel triangle units, and trimmed background blocks on your design wall or flat surface.
- Sewing Vertical Columns: Start by sewing the blocks together in vertical columns. Chain piece each column set without clipping the threads between blocks. This keeps the blocks in order as you work.
- Joining the Columns: Sew the columns together, alternating the direction you press the seams to ensure they lock together nicely. Once all columns are stitched, join them to complete the quilt top.
- Adding a Border (Optional): If you want to add a border, cut four 3½” strips from your coordinating fabric and sew them around the quilt top.
Finishing the Quilt
- Quilt Back: If you’re not sending the quilt to a professional, you can use a single length of fabric for the backing. Alternatively, piece together leftover fabric scraps and triangle units to create a unique quilt back design.
- Layering and Quilting: Layer your quilt top, batting, and quilt back. Quilt as desired. If you’re not confident in your quilting skills, consider sending your quilt to a professional longarm quilter.
- Binding: Finish your quilt with binding. For a polished look, especially with striped fabric, consider cutting the binding on the bias.
The Joy of a Finished “Windy Days Quilt”
Completing the “Windy Days Quilt” is more than just finishing another project—it’s a journey through creativity, precision, and patience. As you lay your finished quilt out, take a moment to admire the intricate pinwheels, the careful alignment of seams, and the way the fabrics come together to create something truly unique. Whether you gift this quilt to a loved one or keep it for yourself, know that the joy you felt in making it will continue to radiate through every stitch. Happy quilting!