
When I think back to some of my favorite winter memories, one that always stands out is the quiet beauty of a snow-covered landscape.
Growing up, winter was a time of calm reflection, a time to admire the intricate patterns that frost would etch onto windows.
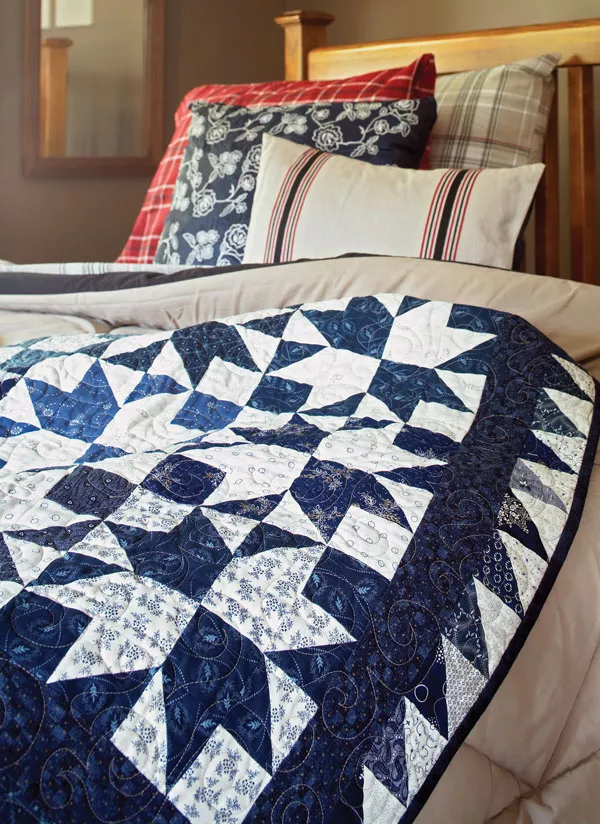
The crystalline shapes, sharp and delicate, left a lasting impression on me, inspiring my love for patterns in quilting. These memories came rushing back as I worked on the Cold Snap quilt—a project that perfectly captures the essence of those icy winter days.
The Cold Snap quilt is more than just a nod to those frozen moments; it’s a celebration of the stark contrast between cool blues and crisp whites, reminiscent of the peaceful yet striking beauty of a winter’s day.
This quilt is a classic blue-and-white design, but it’s the sharp, intricate points that truly bring this icy-crystal delight to life. Let me guide you through this process, where chain piecing makes easy work of these sharp points, creating a quilt that is both timeless and evocative.
Chained in Ice: The Beauty of Precision Piecing
The Cold Snap quilt is not only visually striking but also a testament to the importance of precision in quilting. Each star block, with its sharp points and crisp lines, requires careful attention to detail, and that’s where the technique of chain piecing becomes invaluable.
This method allows for both efficiency and accuracy, making the construction of these complex blocks a more manageable task. In this project, you’ll see how the repetition of simple steps can lead to a masterpiece that looks far more intricate than the effort it requires.
The Art of Fabric Selection: Crafting a Wintry Palette
Choosing the right fabrics is essential in bringing out the frosty charm of the Cold Snap quilt. For this project, I opted for a range of blue and white prints that mimic the hues of a snowy day—icy blues for the cold, clear skies and deep navies for the long winter nights.
The whites represent the fresh, untouched snow, adding a brightness that contrasts beautifully with the darker tones. Selecting prints with subtle patterns helps maintain the quilt’s crisp, clean lines while adding just a hint of texture.
Full Pattern: Click Here
Materials
To create the Cold Snap quilt, you will need the following materials:
- 2-5⁄8 yards total assorted white prints (for blocks and outer border)
- 2-5⁄8 yards total assorted blue prints (for blocks and outer border)
- 1 yard dark blue print (for inner border and binding)
- 3-1⁄2 yards backing fabric
- 63×71″ batting
- Finished quilt: 56-1⁄2×64-1⁄2″
- Finished block: 8″ square
All fabrics should be 44⁄45″-wide, 100% cotton. Remember, all measurements include a 1⁄4″ seam allowance. Always sew with right sides together unless otherwise specified.
Preparing for Precision: Cutting and Organizing
Before diving into the assembly, take the time to carefully cut and organize your fabric pieces. Cutting with precision ensures that your blocks will align perfectly, which is crucial for maintaining the sharp points of the star blocks. To avoid any stretching or distortion while drawing diagonal lines, use a piece of 220-grit sandpaper underneath your fabric squares. This simple tip will make a world of difference in keeping your fabric steady as you work.
Step-by-Step Instructions: Creating Your Cold Snap Quilt
Now that we have our materials ready and fabric pieces neatly organized, it’s time to dive into the creation of the Cold Snap quilt. Follow these detailed steps to assemble your quilt, from constructing the star blocks to adding the borders.
Step 1: Assemble the Triangle-Squares
- Gather Your Pieces: Start by gathering one set of white print pieces (four 2-7⁄8″ squares and four 2-1⁄2″ squares) and one set of blue print pieces (four 2-7⁄8″ squares and four 2-1⁄2″ squares).
- Mark the White Squares: Using a pencil, draw a diagonal line on the wrong side of each white 2-7⁄8″ square. To prevent fabric stretching as you draw, place a piece of 220-grit sandpaper underneath each square.
- Pair and Sew: Layer each marked white square on top of a blue 2-7⁄8″ square, right sides together. Sew two seams, each 1⁄4″ away from the drawn line (on either side).
- Cut and Press: Cut along the drawn line to create two triangle units from each pair. Press each triangle unit open, with the seam allowance pressed toward the blue fabric. You should now have eight triangle-squares, each measuring 2-1⁄2″ square, including seam allowances.
Step 2: Construct the Star Blocks
- Create Unit A: Refer to Diagram 3 for guidance. Sew together two triangle-squares, one blue 2-1⁄2″ square, and one white 2-1⁄2″ square to form a pair. Press the seams toward the solid squares. Join the pairs to create Unit A, which should be 4-1⁄2″ square. Make two Unit As.
- Create Unit B: Using the same pieces in a different arrangement (see Diagram 4), repeat the process to create two Unit Bs.
- Assemble the Star Block: Following Diagram 5, sew the A and B units together in pairs, pressing seams toward Unit B. Join the pairs to complete the star block, ensuring that all points align perfectly. The finished block should measure 8-1⁄2″ square.
- Repeat: Continue this process to create a total of 42 star blocks.
Step 3: Assemble the Quilt Center
- Layout the Blocks: Arrange your 42 star blocks into seven horizontal rows of six blocks each. Take care to alternate the direction of the star points to add visual interest.
- Sew the Rows: Sew the blocks together in each row, pressing the seams in one direction. Alternate the pressing direction with each row to help your seams nest neatly when joining the rows.
- Join the Rows: Sew the rows together to complete the quilt center, pressing seams in one direction. Your quilt center should now measure 48-1⁄2″ x 56-1⁄2″.
Step 4: Add the Borders
- Inner Border: Cut and piece the dark blue 2-1⁄2″x42″ strips to create two 2-1⁄2″x56-1⁄2″ strips for the long sides and two 2-1⁄2″x52-1⁄2″ strips for the short sides. Sew these strips to the corresponding edges of your quilt center, pressing the seams toward the inner border.
- Outer Border: Using the remaining triangle-squares, create the outer border strips. Sew 30 triangle-squares together to make each of the long border strips (2-1⁄2″x60-1⁄2″) and 26 triangle-squares plus two white 2-1⁄2″ squares for each of the short border strips (2-1⁄2″x56-1⁄2″). Attach these strips to the quilt center, pressing seams toward the inner border.
Step 5: Finish the Quilt
- Layering: Place your quilt top, batting, and backing fabric together, making sure everything is smooth and aligned. Baste the layers to keep them in place for quilting.
- Quilting: Quilt as desired. The featured quilt uses beige thread in an allover curlicue design, but feel free to choose a quilting pattern that resonates with you.
- Binding: Finally, use the remaining dark blue 2-1⁄2″x42″ strips to bind the edges of the quilt. This final step will neatly finish the quilt and add durability to the edges.
Additional Tips for a Flawless Finish
- Chain Piecing: To save time and ensure consistency, consider chain piecing your blocks. This method involves sewing multiple pieces together in a continuous sequence without stopping to cut the thread between each pair, allowing for faster and more uniform assembly.
- Pressing Matters: Take your time when pressing seams. Pressing seams to the side or open as instructed will help your blocks lie flat and your points to match up perfectly.
- Quilting Design: The quilting pattern you choose can enhance the overall look of your Cold Snap quilt. If you’re new to free-motion quilting, practice on a scrap piece before moving to your quilt. Alternatively, straight-line quilting can create a modern, clean look.
Wrapping Up Your Winter Wonderland
Completing the Cold Snap quilt is like capturing a piece of winter to hold in your hands. The contrast between the sharp blue points and the crisp white background creates a visual representation of the cold snap that inspired this project.
As you finish the last stitch, take a moment to appreciate the meticulous work and creativity that went into each block. Quilting, after all, is as much about the journey as it is about the finished product. This quilt is not just a beautiful addition to your home; it’s a reminder of the beauty that can be found in even the coldest of seasons.