Oh, how I love diving into a new quilting project!
Nothing compares to the rush of creativity when you gather up your fabric and tools, ready to stitch something truly special.
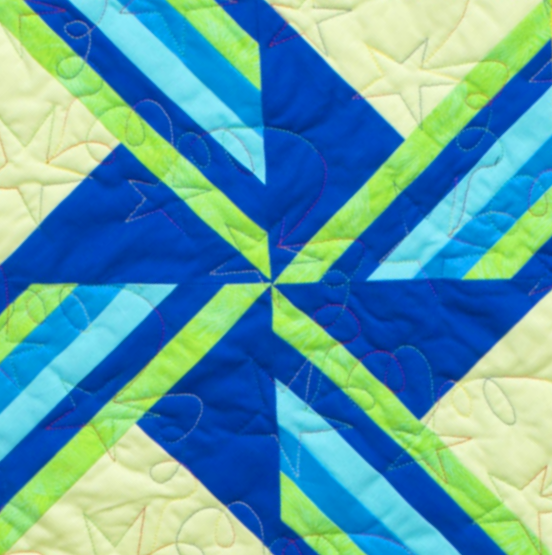
Recently, I found myself completely enamored with the Milky Way Wall Hanging – Block 2 pattern.
The mix of colors, the unique design, and the sense of achievement you get with each piece makes every stitch incredibly rewarding.
Each time I work on the Milky Way Wall Hanging – Block 2, it’s like I embark on a mini-adventure.
This pattern not only offers a challenge but also gives me a wonderful way to express my creative side.
After all, who wouldn’t want to create a little piece of the cosmos in their home?
Just imagine the stunning beauty of a completed quilt hanging on your wall.
Let’s get started!
Exploring the Art of Paper Piecing
One of the most captivating aspects of the Milky Way Wall Hanging – Block 2 is the technique behind it—paper piecing!
This method allows for precision and sharp points, something that all quilters, both beginner and advanced, can appreciate.
Paper piecing is fantastic especially for intricate patterns like our Milky Way design.
It gives you the freedom to play with different fabrics while ensuring your pieces align beautifully.
But let me tell you, paper piecing has a bit of a learning curve.
Don’t worry if you feel a bit lost at first.
The satisfaction of finishing your block far outweighs the initial confusion.
Just follow each step carefully, and you’ll end up with a stunning block that you can proudly use in your quilt!
Color Combinations and Inspirations
When I first laid eyes on the Milky Way Wall Hanging – Block 2, I was drawn in by the stunning color palette.
The bright hues of apple green, royal blue, and bahama blue invite fun and excitement into your quilting project.
Choosing the right colors can inspire you throughout the entire process, and let me tell you, the colors in this quilt will definitely spark joy!
The beauty of the Milky Way Wall Hanging – Block 2 pattern is that you can customize it to fit your style!
You can go for bold contrasts or soothing pastels, depending on your personal taste.
Let your creativity shine through!
Your choices will reflect your unique aesthetic, making the finished block even more special.
Materials
- Coats Dual Duty XP® Paper Piecing thread
- Citron – CSFSESS.CITRO
- Apple Green – CBFS002.APPLE
- Royal Blue – CSFSESS.ROYAL
- Blue – CSFSESS.BLUEX
- Bahama Blue – CSFSESS.BAHAM
- 4 copies of Block 2 foundation (Pages 3)
- Sewing Machine
- Basic Sewing Supplies
- Printer
Preparation Tips for Success
Before diving into the Milky Way Wall Hanging – Block 2, take a moment to gather all your materials.
This little step can save you a world of frustration later on!
Organizing your threads and fabric not only gives you a clear workspace but invites your creativity to flow freely while you craft.
Another smart tip is to print the foundation pieces on sturdy paper.
Trust me; it makes cutting and piecing so much easier!
Plus, if you make a mistake, you won’t have wasted a ton of fabric.
Also, consider prepping your fabric by starching it before you start cutting.
This helps keep everything crisp and easy to work with throughout the project.
Step-by-Step Instructions:
Now, I’m excited to get into the nitty-gritty!
Below are the detailed instructions for the Milky Way Wall Hanging – Block 2.
Remember to grab all the materials and get your sewing space comfy before you start.
For the complete pattern, though, check out the link below:
Full Pattern: Click Here
Additional Tips for Quilting Success
As you create the Milky Way Wall Hanging – Block 2, don’t rush through your stitches!
It’s tempting to zoom through, but trust me—each stitch counts.
Take your time, ensuring everything aligns perfectly to avoid any block distress later on.
Cutting accurately is crucial, so don’t skip any of the cutting steps.
Also, don’t be afraid to make adjustments!
If you notice something doesn’t line up, remember that you’re the artist here.
Quilting is a creative process, and sometimes, that means making it your own.
The little quirks you add will make the Milky Way Wall Hanging – Block 2 even more delightful!
Exploring Advanced Techniques
Once you’re comfortable with the basics, consider diving into some advanced techniques for the Milky Way Wall Hanging – Block 2.
You can experiment with adding borders, or applying different finishing techniques to enhance the beauty of your block.
Think of it as the cherry on top of your cosmic sundae!
Adding a quilted touch, like stippling or echo quilting, can create a beautiful texture that contrasts the flatness of the piecing.
So dare to be bold in your design choices!
This can take your Milky Way Wall Hanging – Block 2 from beautiful to absolutely stunning.
Celebrate Your Quilting Journey!
As you finish up your masterpiece, take a moment to enjoy what you’ve created.
Each stitch in the Milky Way Wall Hanging – Block 2 is a step in your creative journey, and it deserves to be celebrated!
Pat yourself on the back and take a moment to appreciate the beauty and effort you’ve woven into your piece.
Trust me; the satisfaction is immense.
If you’re hungry for more creative inspiration, don’t forget to explore other articles on this blog!
We have a treasure trove of fun and exciting content.
I’m sure you’ll find something magical waiting for you—just like the Milky Way Wall Hanging – Block 2.
Want a sneak peek?
I’ve prepared an incredible piece you can check out by clicking here!

