
My journey into the world of quilting began in my grandmother’s cozy living room, surrounded by scraps of fabric that told stories of generations past.
Each piece, with its unique pattern and texture, seemed to whisper secrets of comfort and creativity. It was there, amidst the hum of the sewing machine and the warmth of the afternoon sun, that I fell in love with the art of quilting.
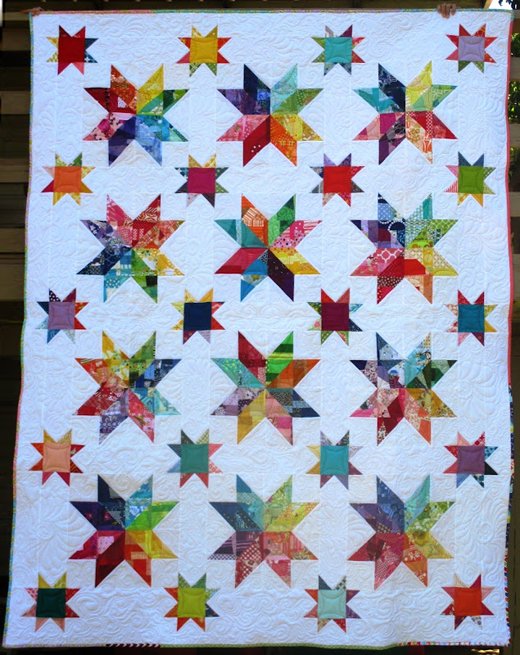
A Spectrum of Creativity: The Scrappy Rainbow Star Quilt
This passion has stayed with me, evolving with every stitch and seam. Today, I want to share a special project that marries the traditional art of quilting with a vibrant palette of colors – the Scrappy Rainbow Star Quilt. This project is not just a testament to my love for quilting but also a delightful challenge that combines the simplicity of scrap quilting with the intricate beauty of a star pattern.
The Scrappy Rainbow Star Quilt is a vibrant and joyful project that breathes new life into fabric scraps. This quilt block, with its radiant colors and dynamic design, symbolizes the unity and diversity of our experiences, much like a rainbow after a storm. It’s a celebration of color, creativity, and the resourcefulness of quilters who see the potential in every small piece of fabric. This project is particularly close to my heart, as it echoes my early days of quilting with my grandmother, where every scrap told a story, and every quilt narrated a novel.
Unveiling the Rainbow: Materials and Preparation
Materials:
- White yardage for the background
- Fabric scraps sorted by color: red, pink, purple, blue, aqua, green, yellow, and orange
- Cutting mat, ruler, and rotary cutter
- Sewing machine with a ¼” foot
- Iron and ironing board
- Basic sewing supplies (thread, scissors, pins)
Setting the Stage: Crafting Your Blocks
Before diving into the vibrant world of the Scrappy Rainbow Star, it’s important to approach this project with a mindset of flexibility and creativity. The beauty of working with scraps is that each piece is unique, offering a myriad of possibilities. As you prepare your materials, think of each scrap as a brushstroke in a larger masterpiece. This is your canvas to explore the interplay of colors and textures, creating a quilt block that is as unique as it is beautiful.
Full Pattern: Click Here
Step-by-Step Instructions: Creating Your Masterpiece
- Cutting Your Squares:
- From the white yardage, cut (4) 4 ½” x 4 ½” squares and (4) 5 ½” x 5 ½” squares. Adjust the size if you desire a larger or smaller block.
- Building the Scrappy Blocks:
- Start with two scraps of the same color, ensuring they have at least two straight edges. Sew them together with a ¼” seam, pressing the seam to one side.
- Continue adding scraps, creating straight lines with your ruler at various angles. Press towards the newly added piece each time.
- Forming the Squares:
- Keep adding and pressing until your piece measures at least 5 ½” x 5 ½”. Cut it down to size.
- Creating Triangles:
- Repeat the process for each color to make a total of (8) 5 ½” x 5 ½” squares.
- Cut all colored and white 5 ½” squares diagonally to form two triangles.
- Sewing Triangles:
- Pair one white triangle with a colored triangle, and sew a ¼” seam along the long side. Press towards the white.
- Trimming and Assembling:
- Trim the sewn squares to 4 ½” x 4 ½”, using the diagonal seam as a guide.
- Lay out your squares according to the pattern, and sew them into pairs, then quadrants, and finally into two rows.
- Completing the Block:
- Sew the two rows together, taking care to align seams and points for a sharp finish.
Additional Tips for Success
- Don’t rush the pressing; it sets the foundation for precise piecing.
- Embrace the uniqueness of each scrap, allowing for a truly personalized quilt block.
- Consider using a design wall or floor space to lay out your pieces before sewing, ensuring the color distribution is balanced and pleasing to the eye.
Layout Considerations: Designing Your Quilt
When it comes to assembling your quilt, the layout is where your creativity can truly shine. Here are a few ideas to get you started:
- Traditional Grid: Arrange your Scrappy Rainbow Star blocks in a simple grid pattern. This classic layout allows the intricate design of each block to stand out, creating a dazzling rainbow effect across your quilt.
- On Point: Setting your blocks on point (diagonally) can add an interesting twist to your quilt, giving the illusion of movement and adding visual interest.
- Sashing: Adding sashing between your blocks can help frame each star, making the colors pop and providing a crisp, clean look. Consider using a neutral color for the sashing to let the rainbow colors truly shine.
Quilting Techniques: Bringing Texture to Life
Quilting is where you breathe life into your quilt, adding texture and depth. Whether you opt for hand quilting, machine quilting, or even tie quilting, each method adds its own unique touch:
- Hand Quilting: Offers a traditional and personal touch to your quilt. Consider using variegated thread to complement the scrappy, colorful nature of your blocks.
- Machine Quilting: For a quicker finish, machine quilting can be just as creative. Simple straight-line quilting can emphasize the geometric patterns of the stars, or free-motion quilting can add a whimsical touch.
- Tie Quilting: For a cozy, rustic look, tie quilting can be a charming option. This method is particularly appealing if you’re looking for a quick finish that still adds character.
As you press the final seam and step back to admire your Scrappy Rainbow Star Quilt Block, take a moment to appreciate the journey. This block, with its vibrant colors and intricate patterns, is more than just a piece of fabric; it’s a testament to creativity, patience, and the joy of quilting. Whether you’re making a single block as a statement piece or combining several for a full quilt, each Scrappy Rainbow Star carries with it a story of transformation – from simple scraps to a stunning masterpiece.
Now, it’s your turn to share your story. I’d love to see your version of the Scrappy Rainbow Star Quilt Block. Share your creations and join a community of quilters who celebrate each stitch and seam. Happy quilting!