
Hello, fellow sewing enthusiasts! My name is Julie, and I’m thrilled to share this quilting journey with you. Growing up, my mother taught me the beautiful art of quilt making.
It was during those cherished moments that I discovered my passion for creating intricate designs with fabric.
About fifteen years ago, I decided to delve deeper into this craft, taking numerous classes to hone my skills. Today, I’m excited to bring you a project that combines tradition with modern techniques: the Churn-Dash Quilt.
Embracing Tradition with a Modern Twist
The Churn-Dash Quilt block is a timeless design that holds a special place in the quilting community. Its origins date back to the 1800s, where it symbolized the churn, an essential tool in butter making.
This classic block offers endless possibilities for creativity through fabric choices and color combinations. In this project, we’ll explore shortcuts and techniques to create a beautiful Churn-Dash Quilt with minimal fabric waste, ensuring an efficient and enjoyable quilting experience.
Choosing Your Fabrics: A Palette of Possibilities
Selecting the Perfect Fabrics
The beauty of the Churn-Dash Quilt lies in its versatility. This design thrives on the contrast between two sets of fabrics. For a traditional look, consider high-contrast combinations such as red and white shirtings.
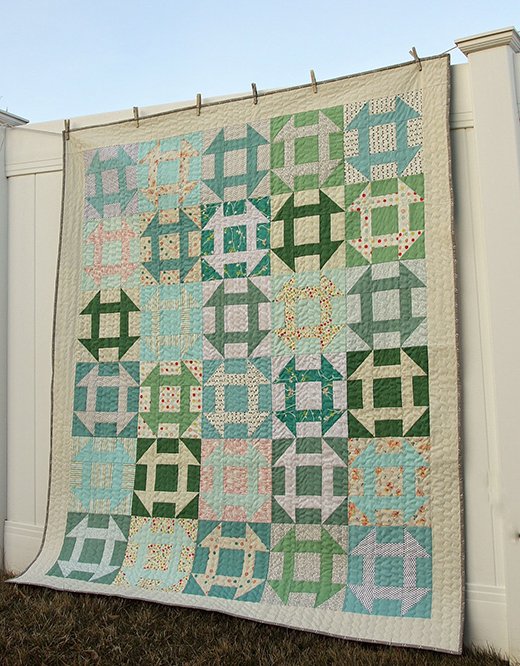
If you lean towards a contemporary style, opt for modern prints in aquas and greens against a solid white background. In this project, I chose a subtle, low-volume palette inspired by the serene colors of spring, blending solids with delicate prints for a soft, washed-out effect.
Materials You’ll Need
Here is a comprehensive list of materials for this Churn-Dash Quilt project:
- 15 “light” eighth of yards (4-1/2″ x 44″) or Fat Eighths (9″ x 22″)
- 15 “dark” eighth of yards (4-1/2″ x 44″) or Fat Eighths (9″ x 22″)
- 5/8 yard border fabric
- 1/2 yard binding fabric
- 3-1/2 yards backing fabric
- Basic quilting tools: rotary cutter, ruler, cutting mat, sewing machine, thread, pins
For those preferring a twin-size quilt (70″ x 91″), the fabric requirements are as follows:
- 24 “light” eighth of yards (4-1/2″ x 44″) or Fat Eighths (9″ x 22″)
- 24 “dark” eighth of yards (4-1/2″ x 44″) or Fat Eighths (9″ x 22″)
- 1 yard border fabric
- 5/8 yard binding fabric
- 5-1/2 yards backing fabric
Full Pattern: Click Here
Preparing Your Workspace
Before we begin cutting and piecing, it’s essential to set up a comfortable and organized workspace. Ensure your cutting mat is clean, and your rotary cutter blade is sharp. Arrange your fabrics in pairs of contrasting light and dark sets. This preparation will streamline the cutting process and help maintain an efficient workflow.
Creating the Churn-Dash Blocks
Cutting the Fabric
- Pair Up Fabrics: Start by pairing each “light” eighth yard with a “dark” eighth yard fabric. You should have 15 pairs (or 24 pairs for the twin size).
- Cut Strips: From each pair, cut two sets of strips measuring 4-1/2″ x 21″. Additionally, cut a 4” x 4” square from both the light and dark strips, and set these aside.
- Mark and Sew: On the back of the light fabric strips, mark four 4-1/2″ squares and draw a diagonal line through each. Sew a scant 1/4″ seam along both sides of the diagonal lines.
Creating Half-Square Triangles (HSTs)
- Cut Along Diagonals: Cut along the drawn diagonal lines to create eight HST blocks from each set of strips.
- Press Seams: Press the seams toward the dark fabric on four HST blocks and toward the light fabric on the other four blocks.
- Square Up Blocks: Trim each HST block to measure 4″ x 4″ using a ruler and rotary cutter.
Piecing the Two-Block Units
- Sew Strips Together: Take the remaining light and dark strips and sew them together lengthwise, creating two sets of strip units.
- Cut Units: Cut these strip units into 4″ wide sections to create the two-block pieces needed for the Churn-Dash blocks.
Assembling the Quilt Blocks
- Layout Pieces: Begin with the 4” x 4” center square (dark for one set of blocks, light for the other). Arrange the two-block pieces and HSTs around the center square.
- Sew Rows: Sew the blocks together into three rows. Press the seam allowances as directed (towards the center for the top and bottom rows, away from the center for the middle row).
- Join Rows: Sew the rows together, ensuring seams butt up against each other. Press the final seams towards the center row.
Creating Multiple Blocks
Repeat the block construction process to create 30 Churn-Dash blocks for the quilt (or 48 blocks for the twin size).
Assembling the Quilt Top
Planning the Layout
- Lay Out Blocks: Arrange the quilt blocks on a design wall or the floor, alternating light and dark backgrounds for contrast. For a 58-1/2″ x 69″ quilt, lay out 5 blocks across and 6 blocks down. For a twin size, lay out 6 blocks across and 8 blocks down.
- Adjust and Balance: Adjust the arrangement until you are satisfied with the balance of colors and prints.
Sewing Rows Together
- Stack and Label: Stack each row of blocks and label them to keep track.
- Sew Blocks: Sew the blocks in each row together, pressing the seams towards the dark blocks.
- Join Rows: Sew the rows together, ensuring seams nest to eliminate bulk. Press row seams in one direction.
Adding Borders
- Cut Border Strips: Cut six strips of border fabric, each 4″ x 44″ (or eight strips for the twin size).
- Measure and Attach: Measure the quilt’s vertical center and cut two border strips to this length. Pin and sew these to the sides of the quilt. Repeat for the top and bottom borders.
- Press Seams: Press the seam allowances towards the borders.
Finishing the Quilt
Basting the Layers in Churn-Dash
- Prepare the Quilt Back: Cut the backing fabric 3″ larger than the quilt top on all sides. Lay it flat, right side down, and tape it tautly to the floor.
- Layer and Smooth: Lay the batting on the backing and smooth out wrinkles. Place the quilt top on the batting, ensuring it’s centered and smooth.
- Baste Layers: Use basting spray or safety pins to secure the layers together, starting from the center and working outwards.
Quilting the Layers in Churn-Dash
- Set Up Machine: Prepare your sewing machine with a walking foot and coordinating thread.
- Quilt: Begin quilting from the center, using a running stitch or your preferred quilting pattern. Alternate directions to prevent fabric distortion.
- Trim Edges: Once quilting is complete, trim the excess batting and backing fabric to align with the quilt top edges.
Binding the Churn-Dash Quilt
- Prepare Binding: Cut seven strips of binding fabric, each 2-1/2″ x 44″ (or nine strips for the twin size). Sew the strips together end-to-end and press seams open. Fold the strip in half lengthwise and press.
- Attach Binding: Pin the binding to the quilt front, matching raw edges. Miter the corners as you go. Sew the binding with a 1/4″ seam allowance.
- Finish Binding: Fold the binding to the back of the quilt and hand-sew it in place with a blind stitch.
Congratulations on completing your Churn-Dash Quilt! This timeless yet versatile design not only highlights your quilting skills but also offers a beautiful, cozy addition to any home. Reflect on the journey from selecting fabrics to the final stitches, and appreciate the artistry and effort involved in creating your masterpiece. Happy quilting, and may your Churn-Dash Quilt bring warmth and joy for years to come!