
There is something truly magical about the way quilts can evoke emotion, tell a story, or even take us on an adventure through color and design.
The Interstellar Quilt, designed by Barbara Hollinger, captures that magic beautifully, drawing inspiration from the vast cosmos and the interplay of geometric shapes.
This quilt isn’t just a piece of art; it’s a journey through stars and galaxies, with its intricate patterns, glowing color effects, and meticulously pieced blocks.
When I first started working on the Interstellar Quilt, I was drawn to its complexity and the precision required for each block.
But as with many quilting projects, the challenge was balanced by the joy of seeing the design come together—each star forming, each block aligning perfectly.
Whether you’re an experienced quilter looking for a new project or an adventurous intermediate ready to explore new techniques, the Interstellar Quilt is a rewarding journey.
A Journey Through the Stars: The Beauty of Interstellar Design
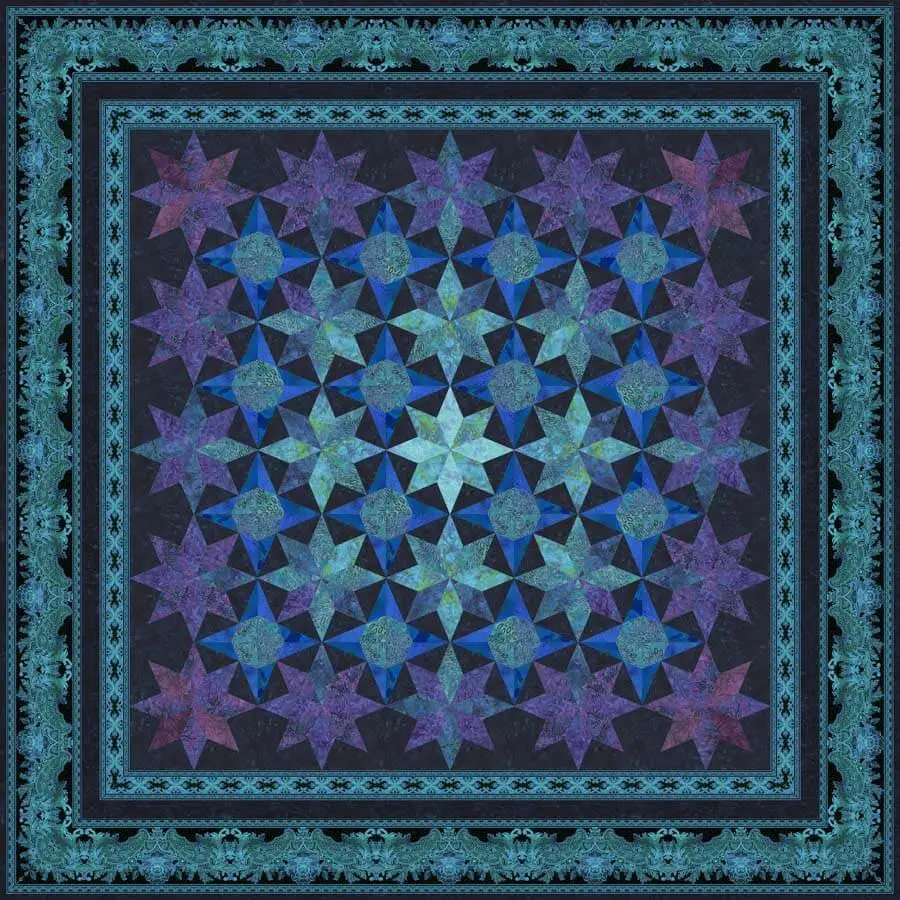
The design of the Interstellar Quilt features three unique blocks, each offering variations that add depth and dimension to the finished piece.
This quilt glows with secondary stars, which emerge through careful placement and block rotation. Its precise cutting, sewing, and thoughtful use of color create a visual effect that seems to shimmer and move, much like the galaxies that inspired its name.
With the right preparation and attention to detail, you’ll create a quilt that feels both timeless and otherworldly.
Materials: Preparing for Your Interstellar Journey
Before you begin piecing together the Interstellar Quilt, gather all the necessary materials and ensure you have the required fabrics. Below is the fabric breakdown for this quilt.
Be sure to follow the fabric requirements carefully to get the correct amounts.
Fabric Requirements:
- Fabric 1: ⅛ yard (for small accent diamonds)
- Fabric 2: ⅓ yard (for accent diamonds)
- Fabric 3: ⅔ yard (diamonds and small star pieces)
- Fabric 4: ⅓ yard (diamonds)
- Fabric 5: ½ yard (diamonds)
- Fabric 6: ½ yard (diamonds)
- Fabric 7: ⅛ yard (for small accent diamonds)
- Fabric 8: ⅛ yard (for small accent diamonds)
- Fabric 9: 2⅞ yards (includes fabric for background, border 2, and binding)
- Fabric 10: ½ yard (reversed star points)
- Fabric 11: ½ yard (regular star points)
- Fabric 12: 2½ yards (border stripes)
Additionally, you will need 4½ yards of backing fabric—consider using Fabric 2 for this to complement the design. The cutting instructions will guide you on how to cut these fabrics, ensuring that each block comes together seamlessly.
Full Pattern: Click Here
Precision and Preparation: Cutting and Organizing Fabrics
Cutting is a critical part of the Interstellar Quilt, and careful attention to detail will ensure each piece fits perfectly. Start by making the templates provided in the pattern, and use these to cut diamonds, triangles, and other shapes from your fabric. Be sure to label each piece to keep track of the fabric placements.
Key Cutting Steps:
- Use Template E to cut diamonds from Fabrics 1–8. These diamonds will be pieced together to form the star points in various blocks.
- Use Template C to cut 128 triangles from Fabric 9 (or cut 32 squares measuring 5¼”, then cut each twice on the diagonal to make the triangles).
- Use Template A/Ar and D/Dr to cut regular and reversed star point pieces from Fabrics 10 and 11.
Proper organization at this stage will make assembling the blocks much smoother, so be sure to lay out all the pieces in advance.
Step-by-Step Instructions: Creating the Interstellar Quilt
Now that your fabrics are cut and organized, it’s time to begin sewing the blocks that form the heart of the Interstellar Quilt.
There are three different block types in this pattern, each with its own variations. Take your time with each block, ensuring that all seams are precise and that each piece aligns correctly.
Step 1: Assemble Block 1
Block 1 has three variations—1A, 1B, and 1C. Follow these steps for each variation:
- Sew the Diamonds: Using Template E, sew diamonds into pairs, starting and stopping at the seam intersection dots. Press and repeat until you have sewn all pairs together into a complete star unit.
- Add the Triangles: Sew Fabric 9 triangles to the star using inset seams (also known as Y-seams). This will create a smooth, sharp star with clean points.
- Add the Star Points: Attach the Template A/Ar pieces to the corners of the star. Be sure to check the block guide for the correct placement of fabrics to achieve the glowing effect of the stars.
Repeat this process for all variations of Block 1.
Step 2: Assemble Block 2
Block 2 has two variations—2A and 2B:
- Sew the Diamonds: As with Block 1, sew the diamonds together, stopping at the seam intersections.
- Add Star Points: Attach the Template D/Dr pieces to the block, following the color placement from the block guide.
Once all the star points and triangles are added, press the seams carefully to keep the block flat.
Step 3: Assemble Block 3
For Block 3, you’ll follow a similar process as the other blocks, with some minor variations in fabric placement:
- Create the Star Unit: Piece the diamonds together to form the central star.
- Add the Corner Pieces: Using Fabric 9 triangles and Template D/Dr pieces, sew the star points and corners to complete the block.
Step 4: Assembling the Quilt Top
Once all the blocks are completed, lay them out according to the assembly guide. The key to achieving the secondary star effect is proper block rotation:
- Block 3 in the upper left should not be rotated, while in the upper right, it should be rotated 90° to the right. Continue rotating blocks as needed to achieve the desired effect.
Sew the blocks together into five rows, taking care to match star points. Then, sew the rows together to complete the quilt center.
Step 5: Adding Borders
Trim and add the borders following Jinny Beyer’s method for mitered borders. Use Fabric 12 to cut wide and narrow stripes for the borders. If needed, refer to the Jinny Beyer website for a video demonstration of her no-math mitering technique.
Step 6: Quilting and Binding
Layer the quilt top with batting and backing, and baste the layers together. Quilt as desired—this can range from simple echo quilting to intricate free-motion designs that complement the stars. Once quilted, trim the excess batting and backing, and bind the quilt using the reserved strips from Fabric 9.
The Interstellar Quilt is a project that shines both in complexity and beauty. The combination of inset seams, rotating blocks, and glowing secondary stars creates a quilt that feels like a journey through the cosmos. As you piece together each block and see the quilt top emerge, you’ll appreciate the careful design and the satisfaction that comes from creating something truly unique.
This quilt is more than just a finished product; it’s a journey of precision, creativity, and cosmic beauty. Enjoy the process, and let your quilt take you beyond the stars!