
So, the moment I decided to create a collection of adorable gifts for my friend’s new baby girl, I got all nostalgic about my favorite childhood toy—a soft bunny!
I remember cuddling with it every night, and it’s those sweet memories that inspired me to bring back that joy for the next generation.
When I saw my friend’s glowing smile at the prospect of receiving hand-made gifts, I couldn’t help but feel excited.
I mean, who wouldn’t want to give the ultimate gift of comfort and love?
This led me right into embarking on the journey of creating my very own Softie Bunny!
As I gathered my materials, I realized how therapeutic it was to stitch away, reminiscing about all those cherished moments.
It wasn’t just about making a gift; it was about weaving love and comfort into fabric.
Today, I want to share with you all the details about this delightful project—the Softie Bunny!
Together, we can create something that will carry the same warmth and joy to the little one’s heart that my bunny did for me.
Patterning Joy: The Significance of Crafting Memories with the Softie Bunny
The Softie Bunny pattern is not just a piece of artwork; it’s a canvas of memories wrapped in fabric!
It resonates with the love and nostalgia that comes with making handmade gifts.
Crafting this bunny isn’t merely a task; it’s layering affection, shaping memories, and connecting generations!
When you hold the Softie Bunny in your hands, you’ll feel the spirit of comfort it embodies, ready to offer its cuddly warmth to a new little friend.
What makes this Softie Bunny even more enchanting is how customizable it is.
You could paint it with vibrant colors for some fun or stick to soft pastels for a gentle touch.
Whichever way you choose, every detail reflects personalization—special touches that will make a lasting imprint on the heart of your loved ones.
So let’s dive into the magic of this lovable Softie Bunny!
The Cute Essentials: Materials You’ll Need for Your Softie Bunny
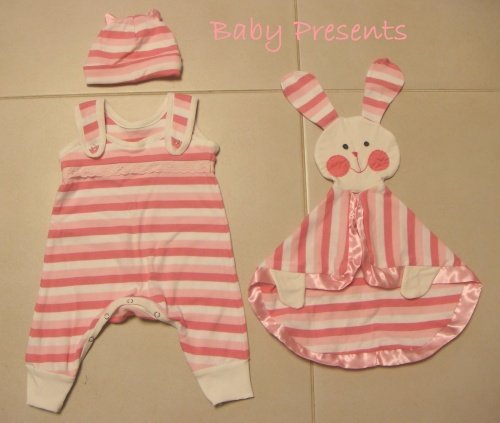
- Bunny pattern template
- 1/4 yard soft fabric (white/beige/light pink) for head and hands
- 1/2 yard soft knit printed fabric for the bunny’s body
- A very long strip of matching satin or satin ribbon (2.5 inches wide)
Gathering the right materials makes the journey of creating the Softie Bunny enjoyable!
I often find myself daydreaming about vibrant fabric patterns and textures at the store as if I’m curating the perfect recipe!
Ensure you choose soft fabrics that feel cozy against a baby’s delicate skin.
A well-crafted Softie Bunny should not only look adorable but also offer the comfort every little one deserves.
Don’t forget to let your personality shine through your fabric choices!
You might find fun prints or soft colors that resonate with you and the gift’s future recipient.
The joy of crafting the Softie Bunny comes from finding materials that inspire you, so don’t hold back your imagination!
Prepping Your Crafting Space: Tips to Kickstart the Softie Bunny Project
Before diving into stitching, ensuring that your workspace is organized is key to a smooth project!
I find it helps so much to lay everything out ahead of time.
That means your fabrics, scissors, pins, and sewing machine should all be within reach for a seamless flow.
Plus, throwing on some of your favorite tunes can elevate your crafting vibe to a whole new level—trust me!
Make sure to cut your fabric pieces carefully, as precision is important for the Softie Bunny’s stitching process.
Consider watching a fun tutorial video about fabric cutting to get those angles just right.
A little bit of prep with methodical cutting and a clean workspace can save you from fabric fraying and stitching delays later.
Happy prepping!
Step-by-Step Instructions for Crafting the Softie Bunny
Now, let’s dive into the nitty-gritty of making the Softie Bunny!
Below, you’ll find step-by-step instructions, but don’t forget you can access the full pattern linked below the image!
Full Pattern: Click Here
Creative Hints and Tips to Nail Your Softie Bunny
When making the Softie Bunny, be cautious when sewing around those beautiful curves!
The corners can be tricky!
I find it really helpful to take the extra time in carefully sewing those parts and, if necessary, shirt those curves.
A little patience can avoid unravelling and misaligned seams.
Also, don’t hesitate to play with the embroidery on the bunny’s face.
Depending on your skills, you can go simple with fabric markers or call upon all your sewing magic to hand-embroider a whimsical expression.
This finishing touch adds personality and uniqueness to your Softie Bunny!
Fun with Design: Personalizing Your Softie Bunny’s Look
As you craft your Softie Bunny, thought about design options!
Incorporate your creativity by adding fun embellishments or details that reflect your personality or the lucky recipient’s interests.
Do you have a favorite character or theme in mind?
Let that inspire your choices!
For example, you can adjust the ear length or fabric prints for a distinct touch.
Mix and match fabrics to personalize your Softie Bunny further!
It’s extraordinary how small additions can create a stunning look and make your creation truly one-of-a-kind.
Celebrate Your Journey: The Softie Bunny Reflection
As you finally cuddle up with your newly crafted Softie Bunny, take a moment to bask in that sense of accomplishment!
Completing this project is beyond rewarding; it’s about creating something that spread warmth and joy while crafting those special memories.
Your Softie Bunny will be more than just a toy to a little one; it’s bound to become a security blanket filled with love.
Feeling inspired?
I’ve got a ton of wonderfully engaging projects waiting for you on the blog!
They’re all unique and will spark your creativity just like the Softie Bunny did.
Don’t miss out on exploring all that inspiration; check out this incredible piece by discovering more— trust me, you won’t want to stop creating!
Let’s make those memories together!