
Quilting has always been a way for me to find peace amidst the chaos of life. I remember a time when I felt overwhelmed by stress, and all I wanted was to escape into something that felt creative yet simple.
That’s when I found myself working on the My Blue Heaven quilt, and it became my haven. The soothing blues, the repetitive motion of cutting and piecing allowed me to find clarity, one stitch at a time.
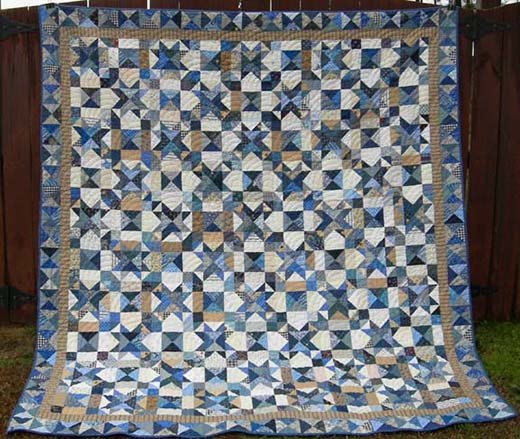
Creating Calm Through the My Blue Heaven Quilt
This quilt is a true celebration of scrap quilting, using simple techniques like half-square triangles and hourglass units to form beautiful stars and intricate “Puss in the Corner” blocks.
Its beauty lies not just in its design but in how it can be adapted to your scraps and colors, making each version unique to the creator. While it was my way to focus during a difficult time, it could also be your creative retreat through the serenity of My Blue Heaven.
Material Preparation
One of the most important steps in starting the My Blue Heaven quilt is selecting the right materials. While this quilt thrives on variety, particularly with the blues and neutrals, here’s a breakdown of what you need:
Materials:
- 2.5” strips of various blues (light to dark shades)
- 2.5” neutral strips for contrast
- Optional: Fat-quarters or yardage for additional variety
- Easy Angle and Companion Angle rulers (6.5” recommended)
- Rotary cutter and cutting mat
- Basic quilting tools: sewing machine, needles, thread
Full Pattern: Click Here
Setting Up for Success: Cutting and Power Sewing
Before diving into the sewing, it’s essential to prep your fabrics and tools. Organize your blues and neutrals into stacks, and cut them into 2.5” strips, which will serve as the foundation of your blocks for My Blue Heaven.
You can cut the pieces as you go, but I found that power sewing in chunks made the process quicker and more enjoyable. Always take a moment to test your seam allowances to ensure accuracy before mass cutting or sewing, as precision is key to bringing out the beauty in your Blue Heaven quilt.
Step-by-Step Instructions
Step 1: Constructing Hourglass Units
- Cut your triangles: Start by cutting 2.5” blue and neutral strips using the Companion Angle ruler. You’ll need to cut quarter-square triangles from both blue and neutral fabrics for My Blue Heaven.
- Sew the pairs: Take one blue triangle and one neutral triangle, and place them right sides together. Sew along the diagonal edge. After sewing, press the seam towards the darker fabric.
- Create hourglass units: Join two pairs of sewn triangles together, ensuring the seams align perfectly. Sew them together to create an hourglass unit, where alternating blue and neutral triangles form a pinwheel effect. Repeat this step until you have a total of 174 hourglass units.
- Square the blocks: Trim each hourglass unit to ensure it measures 4.5” square. Accurate trimming is essential to maintain uniformity, ensuring your Blue Heaven quilt comes together seamlessly.
Step 2: Building Puss in the Corner Blocks
- Cut neutral rectangles: From your neutral fabrics, cut 180 rectangles, each measuring 2.5” x 4.5”.
- Join with hourglass units: Take an hourglass unit and sew a neutral rectangle on either side. Press the seams toward the rectangles.
- Add blue squares: Cut 180 blue squares, each 2.5” x 2.5”. Sew these squares to the ends of the remaining neutral rectangles.
- Complete the block: Attach the square-rectangle units to the top and bottom of your hourglass center block, creating a framed hourglass. This will result in a total of 45 Puss in the Corner blocks, which are central to the rhythm of My Blue Heaven.
Step 3: Constructing Star Blocks
- Create flying geese units: Using your Easy Angle and Companion Angle rulers, cut blue and neutral triangles to create flying geese units. You will need 180 flying geese units for this quilt.
- Sew two smaller neutral triangles to opposite sides of a larger blue triangle to form each flying goose.
- Trim to 2.5” x 4.5” after sewing to maintain precision.
- Assemble star centers: Take an hourglass unit and sew a flying geese unit on opposite sides. Make sure the “geese” point inward toward the center of the block, creating a dynamic starburst effect in My Blue Heaven.
- Add star points: Attach triangle-square units to the remaining sides of the block to form the four star points. Complete this process to create a total of 45 star blocks.
Step 4: Assembling the Quilt Top
- Lay out the blocks: Arrange the 45 star blocks and 45 Puss in the Corner blocks into a 9×10 grid. Alternate between the two block styles for a balanced and visually appealing look.
- Sew the rows: Begin by sewing each row together, ensuring your blocks stay aligned. Press seams in alternating directions between rows to reduce bulk and achieve a smooth, flat quilt top for My Blue Heaven.
- Join the rows: After each row is complete, sew the rows together. Press the quilt top flat, and check that all seams align properly, creating a beautifully cohesive pattern.
Step 5: Adding the Border
- Create a pieced border: If you have any leftover hourglass units, use them to create a pieced border. These add a dynamic, scrappy feel to the edges of your Blue Heaven quilt.
- Add a solid border: Cut strips from your neutral fabric to add a final 2.5” inner border around the quilt top. This border frames the design, giving My Blue Heaven a polished, finished look.
Additional Tips
- Chain Piecing: If you’re working on a large quilt like My Blue Heaven, try chain piecing—sewing multiple pieces together in a continuous line without cutting the thread between them. This not only saves time but also keeps your project organized.
- Pressing Matters: Always press your seams as you go. This will make assembling the blocks easier and ensures a more polished finished product for My Blue Heaven.
- Test Your ¼” Seam: Throughout the process, check your ¼” seam allowance to guarantee accuracy. Even small deviations can add up across a large quilt, and consistency is crucial to bring out the best in My Blue Heaven.
Making the My Blue Heaven quilt taught me not just quilting techniques but also the power of perseverance and creativity. The repetitive nature of the pattern helped calm my mind, and watching the blocks come together reminded me that even small, consistent steps lead to something beautiful.
As you finish your Blue Heaven quilt, take a moment to appreciate the journey that each stitch represents, knowing that this quilt can serve as your personal retreat, just as it did for me.