
Quilting has always been my creative escape, a way to stitch memories and meaning into every square of fabric.
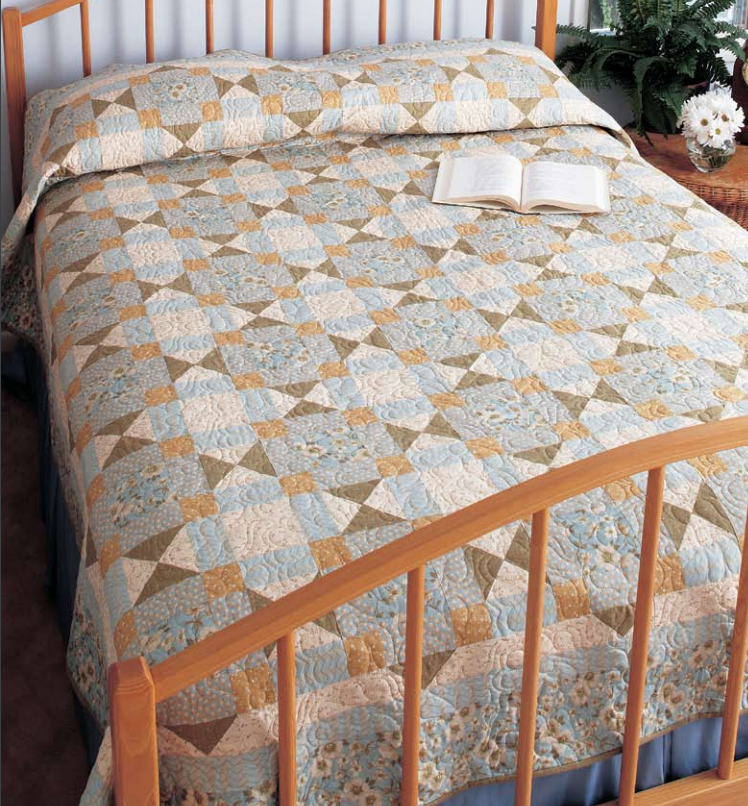
When I first started quilting, I was drawn to the intricate patterns and vibrant colors that seemed to tell a story with every stitch. One of the quilts that truly captivated me was the “Blossom Lane” quilt designed by Gail Kessler.
The delicate floral prints and the harmony of colors in this quilt reminded me of springtime walks down tree-lined streets, where blossoms seemed to float on the breeze like confetti. It was this blend of nostalgia and beauty that made “Blossom Lane” a project I couldn’t resist.
Discovering the Magic of Hourglass Units
One of the standout features of the “Blossom Lane” quilt is the use of hourglass units, which add a dynamic and classic touch to the design.
These units are not only visually appealing but also a joy to create, especially with the quick and easy method that I’ll be sharing with you. Whether you’re a seasoned quilter or just starting out, mastering these hourglass units will open up a world of possibilities in your quilting projects.
Gathering Inspiration from Nature
The “Blossom Lane” quilt is a celebration of nature, with its floral prints and soft color palette evoking the serenity of a garden in full bloom. Each fabric choice in this quilt plays a crucial role in bringing the design to life, from the large floral prints that form the outer borders to the subtle greens and creams that create a harmonious balance.
The selection of fabrics not only contributes to the visual appeal of the quilt but also connects us to the natural world, making each stitch a reminder of the beauty that surrounds us.
Full Pattern: Click Here
Materials You Will Need
To create your own “Blossom Lane” quilt, you’ll need the following materials:
- Blue large floral print: 2½ yards for borders (cut 9 strips of 6″ wide, piece to create 2 side borders and 2 top/bottom borders)
- Blue small floral print: 1¾ yards for strip sets (cut 6 strips of 4½” wide and 12 strips of 2½” wide)
- Blue print: 2 yards for blocks and borders (cut 9 strips of 4½” wide for blocks and 9 strips of 2½” wide for middle borders)
- Cream print: 2¼ yards for blocks and sashing (cut 6 strips of 5¼” wide for squares, 4 strips of 4½” wide, and 10 strips of 2½” wide)
- Gold print: 1 yard for strip sets (cut 12 strips of 2½” wide)
- Green print: 2 yards for blocks and borders (cut 6 strips of 5¼” wide)
- Backing fabric: 7⅞ yards
- Quilt batting: Queen-size
- Optional: Fons & Porter Quarter Inch Seam Marker for precise seam marking
Setting the Stage for Success
Before you dive into creating your “Blossom Lane” quilt, there are a few tips and considerations that will help ensure your success. First, take the time to press your fabric thoroughly before cutting. This will not only make your cuts more accurate but also help your pieces fit together more smoothly.
Additionally, while the quilt pattern is rated as “easy,” don’t rush the process—enjoy each step and allow yourself to find joy in the details. Finally, consider using the Fons & Porter Quarter Inch Seam Marker, which can be a game-changer when it comes to achieving precise seams, especially in the hourglass units.
Step-by-Step Instructions
1. Creating the Strip Sets
- Start by making Strip Set #1: Join one 4½”-wide blue large floral print strip with two 2½”-wide blue small floral print strips on either side. Make six strip sets in total.
- For Strip Set #2: Join one 4½”-wide blue small floral print strip with two 2½”-wide gold print strips on either side. Make six strip sets in total.
- Once your strip sets are sewn together, cut them into segments—42 segments from Strip Set #1 and 84 segments from Strip Set #2.
2. Block Assembly
- Lay out one segment from Strip Set #1 and two segments from Strip Set #2 as shown in the Block Assembly Diagram. Join these segments together to complete one “Puss in the Corner” block. Repeat this process to make a total of 42 blocks.
3. Creating Hourglass Units
- To make the hourglass units, cut 5¼” squares from your cream and green prints. Pair one cream square with one green square, right sides together, and mark the diagonal seam line using the Fons & Porter Quarter Inch Seam Marker or by drawing a line from corner to corner.
- Stitch ¼” away from the marked line on both sides, then cut along the marked line to create two triangle squares. Pair these triangle squares together with opposite fabrics facing, and repeat the stitching and cutting process to create the hourglass units. You’ll need 71 of these units.
4. Sashing Assembly
- Join one hourglass unit with two blue print B rectangles to create a sashing unit. Repeat this step to make 71 sashing units in total.
5. Assembling the Quilt Top
- Lay out your completed blocks, sashing units, and cream print E squares according to the Quilt Top Assembly Diagram. Assemble the quilt center by joining the blocks and sashing units into rows, then join the rows together.
- Add the inner borders, middle borders, and outer borders in that order to complete the quilt top.
6. Finishing
- Prepare the backing fabric by joining three panels lengthwise, and layer it with the batting and quilt top. Baste the layers together, and quilt as desired—an allover flower design works beautifully for this project.
- Finally, join the 2¼”-wide green print strips to create a continuous binding, and bind the quilt to finish.
Reflecting on Your Creation
Completing the “Blossom Lane” quilt is more than just finishing a project—it’s a journey through creativity and craftsmanship. Each stitch you make connects you to a tradition that spans generations, while also allowing you to express your unique style.
As you admire your finished quilt, take a moment to appreciate not only the beauty of the final product but also the joy and satisfaction that comes from creating something with your own hands.