
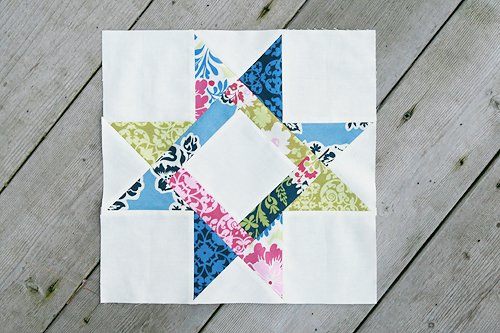
When I embarked on the journey of creating the “Another Star” block for week 3 of our Solstice Stars Series, I expected a straightforward experience.
After all, the name itself suggested simplicity. I imagined a relaxing weekend with an easy project. But as is often the case with quilting, things are not always as they seem.
As I delved deeper into the pattern, I realized this block had a few surprises up its sleeve. Those seemingly innocuous pieces around the center, all of equal length, presented a bit of a challenge. Was it a Y-seam situation? Should I attempt it the traditional way or find a workaround?
Quilting has a way of teaching patience and persistence, and this block was no different. My first attempt resulted in a block that was 1/4″ to 1/2″ too small, which led me back to the drawing board. It was then that I realized I would need to embrace my old “friend,” the 1/8th-inch mark on the ruler.
Normally, such precise measurements make me daydream about less meticulous activities—like binge-watching “Downton Abbey”—but this time, I decided to face it head-on. With a few adjustments and some careful attention to those tiny increments, my block finally came out perfect, measuring exactly 12.5”. And now, I’m excited to guide you through the steps to make your own “Another Star” block.
Embracing Precision: Mastering the “Another Star” Block
The “Another Star” block is deceptively simple at first glance. However, its precise construction and unique layout make it a fantastic project for quilters looking to refine their skills. Unlike some quilt blocks where you can eyeball measurements, this one requires attention to detail, especially when dealing with those 1/8″ increments.
But don’t let that deter you! With a bit of patience and careful measuring, you’ll find that this block comes together beautifully, adding a unique starburst pattern to your quilt. Let’s gather our materials and prepare to stitch this stunning block!
Preparing for the Precision of “Another Star”
Understanding the Essentials: Materials, Tools, and Tips
Before diving into the “Another Star” block, it’s essential to prepare both your materials and your mindset. This block will test your ability to work with precise measurements, particularly with 1/8″ increments, which can be tricky if you’re not used to them. But don’t worry, I’ll guide you through each step, ensuring a smooth and enjoyable quilting experience.
Materials Needed
To complete the “Another Star” block, gather the following materials:
- Fabric:
- Center:
- Cut 1 piece, 4-1/8” x 4-1/8” from Background/White fabric.
- Strips:
- Cut 3 pieces, 5-1/8″ x 1-1/2” from Print/Color fabric.
- Short Strip A:
- Cut 1 piece, 4-1/8” x 1-1/2” from Print/Color fabric.
- Short Strip B:
- Cut 1 piece, 1-1/2” x 1-1/2” from the same Print/Color fabric as Short Strip A.
- Block Corners:
- Cut 4 pieces, 4-1/2” x 4-1/2” from Background/White fabric.
- Star Points:
- Cut 4 pieces, 3-5/8” x 3-5/8” from Print/Color fabric.
- HST Background:
- Cut 2 pieces, 3-5/8” x 3-5/8” from Background/White fabric.
- Center:
- Tools:
- Rotary cutter and mat
- Ruler with 1/8” markings
- Sewing machine
- Iron and ironing board
- Pins or clips
- Fabric scissors
Preparing for a Successful Quilt Block
Before we begin piecing together our “Another Star” block, let’s ensure we have a clear plan:
- Cut with Care: Pay close attention to the 1/8” measurements when cutting your fabric. Even a slight deviation can affect the final block size.
- Lay Out Your Pieces: I always find it helpful to lay out all my fabric pieces according to the block layout before I start sewing. This gives me a visual guide and helps prevent mistakes.
- Mind the Seam Allowance: Consistent 1/4” seams are crucial for this block. Double-check your machine settings and consider using a quarter-inch presser foot if you have one.
With everything prepared, let’s dive into the steps to create the “Another Star” block!
Full Pattern: Click Here
Step-by-Step Instructions to Create the “Another Star” Block
Let’s start piecing the “Another Star” block together! Follow these detailed steps to ensure accuracy and precision in every stitch.
Step 1: Cutting Your Fabric
- Prepare Your Fabric Pieces:
- Start by cutting all the fabric pieces according to the measurements provided. For the star points and the HST background, cut the 3-5/8” x 3-5/8” squares diagonally into half-square triangles (HSTs).
Step 2: Creating the Center Unit
- Sew the Strips Around the Center Square:
- Begin by sewing the shorter strip (Short Strip A, 4-1/8” x 1-1/2”) to the bottom of the 4-1/8” x 4-1/8” center square. Press the seam open.
- Next, sew the strips on the left and top sides of the center square, similar to creating a log cabin block. Continue to press each seam open as you go.
- For the final side, sew the 1-1/2″ x 1-1/2″ square (Short Strip B) to the end of the remaining side strip. Then, sew this strip to the right side of the block, aligning the matching fabric seams carefully.
- Check the Size:
- Your center square unit should now measure 6-1/8″ x 6-1/8″. Trim if necessary to ensure accuracy.
Step 3: Laying Out the Block
- Visualize the Layout:
- Lay out the rest of your block pieces around the center unit to visualize the final design. This step will help guide your assembly process.
Step 4: Assembling the Star Points
- Sew the Top Left and Lower Right Points:
- Take a corner square and gently press it in half, both vertically and horizontally, to mark the center. Alternatively, you can use a water-soluble pen to mark the center point.
- Place one of your star point HSTs right side together with the corner square, aligning the point to the center mark. Sew along the long side of the HST. Make sure you’re sewing on the correct side, as this may feel different from traditional HST sewing.
- Repeat for the Opposite Corner:
- Repeat the process for the other HST on the same corner square to complete the star point. Then, repeat for the diagonally opposite corner.
Step 5: Completing the Remaining Corners
- Sew the Top Right and Lower Left Corners:
- Following the same steps, sew the HSTs to the corner squares to form the top right and lower left star points.
- Add the Background HSTs:
- Sew the background HSTs to the sides of the star point sections. This step will form the completed star point units.
Step 6: Final Assembly
- Attach the Corners to the Center:
- Sew the top left and lower right corners to the center unit first. Align your seams carefully and press open.
- Complete the Block:
- Next, sew the remaining top right and lower left star point units to the block. Press your seams open and trim the block to 12.5″ x 12.5″ if needed.
Congratulations! You’ve successfully created the “Another Star” block, mastering the precision needed for those 1/8″ measurements. This block is a testament to the power of perseverance and the joy of achieving a perfect finish.
Take a moment to admire your work and reflect on the skills you’ve honed in the process. Whether you’re adding this block to a larger quilt or letting it shine on its own, it’s sure to be a standout piece. Keep up the great work, and happy quilting!
https://chat.whatsapp.com/HsnLEb5SjGu0PErFs5FGAT