
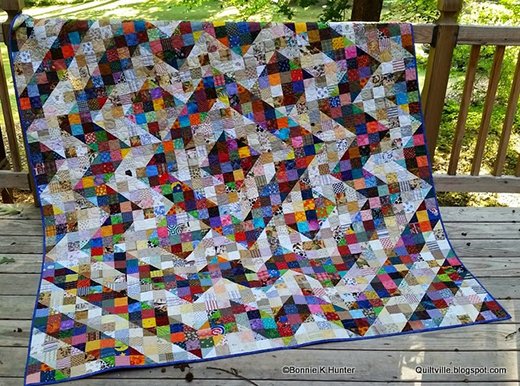
The Split 9 Patch is not just a quilt block; it’s a bridge to the past, connecting us to the quilters of the Perkiomen Valley around 1900. Its beauty lies in its simplicity and the infinite possibilities it offers.
This year, I’m taking on a quilting challenge that harks back to this traditional design but with a twist suited to our modern scrap collections.
The challenge is about embracing our leftovers, turning what could be seen as clutter into a harmoniously designed masterpiece. This approach not only celebrates the historical aspect of quilting but also emphasizes sustainability and creativity in our crafting practices.
Rediscovering the Classics: The Split 9 Patch Challenge
Quilting, for me, has always been about transforming the smallest pieces into something grand. Growing up in a cozy, cluttered apartment, space was a luxury, and creativity a necessity. My mother, a passionate quilter herself, taught me to see potential in every scrap of fabric. We would spend hours at our cramped dining table, piecing together colorful remnants into vibrant designs
This early lesson in resourcefulness has shaped my approach to quilting: every bit matters, no piece too small. It’s with this spirit of ingenuity and affection for the craft that I embrace the Split 9 Patch challenge—a project perfect for quilters like me who find themselves with an abundance of small fabric pieces.
Mastering the Technique: Half-Square Triangles
One of the cornerstones of the Split 9 Patch block is the half-square triangle (HST). Mastering the HST is crucial as it introduces versatility and dynamic patterns into the quilt. The precision in creating these triangles ensures that they fit seamlessly with the 2-1/2” squares, emphasizing the importance of accurate cutting and sewing. The process I follow involves using 2-1/2” strips and an Easy Angle Ruler, a method that offers consistency and efficiency, ideal for this kind of scrappy project.
Full Pattern: Click Here
Assembling Your Toolkit
Before you dive into the Split 9 Patch project, organizing your materials and tools is essential. Here’s what you’ll need:
- Fabric Scraps: Primarily 2-1/2” squares, both in dark and light/neutral shades.
- Basic Sewing Supplies: Thread, needles, and a seam ripper (just in case).
- Cutting Tools: A quality rotary cutter, a cutting mat, and an Easy Angle Ruler for perfect half-square triangles.
- Sewing Machine: Set up with a quarter-inch foot to ensure precise seam allowances.
- Iron and Ironing Board: Critical for pressing your fabrics and completed units for crisp, flat seams.
Ready to Roll: Setting Up for Success
Starting this project is all about mindset and environment. Arrange your workspace so everything is within easy reach, minimizing distractions and maximizing efficiency. Prepare your fabrics by starching and pressing them before cutting; this little step goes a long way in enhancing the accuracy of your piecing.
Also, embrace the Leader & Ender technique to make this a continual, year-long project, integrating the piecing of these blocks with other quilting projects to keep your machine humming and your hands busy.
Step-by-Step Instructions: Crafting the Split 9 Patch Block
Creating the Split 9 Patch block involves precision and patience, but the result is incredibly rewarding. Here’s how you can construct your blocks, one step at a time.
Step 1: Prepare Half-Square Triangles (HSTs)
- Begin by pairing 2-1/2” squares of dark fabric with light or neutral fabric. Use your favorite method to create half-square triangles. Ensure that after sewing and pressing, these HSTs measure exactly 2-1/2” square to match the other squares in the block.
- Tip: Consistency in seam allowance is key. Adjust as necessary to make sure your HSTs don’t require trimming or adjusting later.
Step 2: Layout the Block Components
- Each block will consist of 3 dark 2-1/2” squares, 3 light/neutral 2-1/2” squares, and 3 half-square triangles. Lay them out to form a nine-patch grid, alternating the squares and triangles to create a dynamic visual effect.
Step 3: Sew the Components into Rows
- Sew the squares and triangles together in three rows. Press the seams in alternating directions for each row to reduce bulk and ensure the rows nest neatly when sewn together.
- Tip: Pin the rows before sewing to keep everything aligned properly.
Step 4: Join the Rows
- Once all rows are assembled and pressed, sew the rows together to form the complete block. Again, ensure that all seams are aligned and nested for a flat, neat finish.
- Each completed block should measure 6-1/2” square, finishing at 6” in the quilt.
Step 5: Continuous Quilting
- As you produce more blocks, start playing with their layout. The Split 9 Patch allows for various arrangements, creating different patterns and designs. Experiment with different configurations to see what appeals to you the most.
Additional Tips for Quilt Assembly
- Consistency Check: Regularly measure your finished blocks to ensure they all conform to the required dimensions. Inconsistencies can be corrected in future blocks, avoiding cumulative errors.
- Color Play: Have fun with colors and contrasts. The Split 9 Patch is an excellent pattern for using up scraps, but it also offers a canvas for color experimentation.
- Leader & Ender Method: Utilize this method to continuously build your quilt over time without feeling overwhelmed. It allows you to simultaneously work on multiple projects, making the most of your sewing time.
Embarking on the Split 9 Patch challenge is not just about finishing a quilt; it’s about enjoying the process, learning new techniques, and embracing the spontaneity of scrap quilting. As you progress, you’ll find joy in each square and satisfaction in seeing your scrap pile diminish while a beautiful quilt comes to life. Share your progress, challenges, and victories along the way—quilting is, after all, as much about community as it is about creativity.