
My journey with quilting has often mirrored the rhythmic waves of the ocean—constant, soothing, and endlessly captivating.
Growing up along the coastline, I developed a deep affinity for the sea, its vast blues and foamy whites, which now often find expression in my quilt designs.
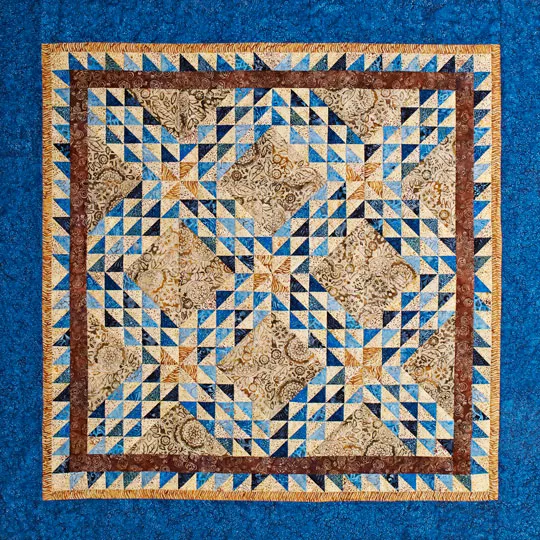
The Batik Ocean Waves quilt particularly resonates with me, as it embodies the serene yet dynamic essence of the ocean.
This project, with its soothing palette of blues, creams, and hints of golden tan, offers a tranquil escape, echoing the calm and beauty of a seaside landscape.
The Allure of Batik: Crafting Ocean Waves
Batiks have a way of telling a story through their rich, hand-dyed colors and intricate patterns, making them ideal for portraying natural themes like ocean waves. The Batik Ocean Waves quilt uses a variety of batik fabrics from the Tonga Coco Berry collection, which perfectly captures the shifting shades of the ocean and the beach.
This quilt not only highlights the unique properties of batik fabrics but also explores the visual impact of contrasting pinwheels formed by golden triangles in each block. This technique brings a dynamic motion to the quilt, reminiscent of waves crashing against the shore.
Full Pattern: Click Here
Exploring Fabric and Color
The Batik Ocean Waves quilt project is a celebration of color and texture, utilizing the distinct visual effects of batik fabric to mimic the ever-changing seascape. Each fabric choice plays a crucial role in the overall aesthetic, from the calming cream to the deep ocean blues, each adding depth and motion to the quilt.
Gathering the Essentials
To embark on this quilting adventure, you’ll need the following materials, inspired by the natural hues and textures of the seaside:
- Cream Batik: 1-1/4 yards for blocks and a border, providing a light base that highlights the vibrant blues.
- Assorted Blue Batiks: 1-1/3 yards total, capturing the various depths and moods of ocean water.
- Golden Tan Batik: 3/8 yard, adding a warm contrast that pops against the cool tones.
- Light Brown Batik: 7/8 yard, grounding the quilt with a sandy texture.
- Dark Brown Batik: 1/2 yard for the initial border, framing the quilt with a darker earth tone.
- Dark Blue Batik: 1-3/4 yards for the outer border and binding, echoing the deeper ocean shades.
- Backing Fabric: 3-7/8 yards to support and complement the front design.
- Batting: 69″ square to provide warmth and structure.
Preparing to Set Sail
Before you start cutting and piecing, organize your workspace and tools. Ensure your rotary cutter is sharp for clean cuts, and your iron is ready for pressing. It’s helpful to lay out your batik fabrics to visualize how the colors and patterns will interact within the quilt. Pre-washing your fabrics can also prevent any color bleeding and ensure the longevity and beauty of your quilt.
Step-by-Step Instructions: Constructing the Batik Ocean Waves Quilt
Crafting the Batik Ocean Waves quilt involves precision and an appreciation for the interplay of colors and shapes. Here’s a detailed guide to creating your quilt, one block at a time.
Step 1: Assemble Triangle-Squares
- Begin by marking a diagonal line on the wrong side of each cream batik 2-7/8″ square.
- Place a marked cream square atop a blue batik 2-7/8″ square. Sew 1/4″ from each side of the marked line. Cut along the line to create two triangle units. Press each unit open, pressing the seam away from the cream batik to make two blue triangle-squares.
- Repeat with the remaining cream and golden tan batik squares to make 20 golden tan triangle-squares. In total, create 276 blue triangle-squares.
Step 2: Assemble Blocks
- For Ocean Waves Block A, layout two golden tan triangle-squares, 11 blue triangle-squares, three cream small triangles, and three assorted blue small triangles in five rows. Sew the pieces in each row together, pressing seams in one direction and alternating with each row. Join the rows to complete the block.
- For Ocean Waves Block B, use a similar layout but adjust the distribution of triangle-squares and triangles accordingly.
- Attach light brown batik large triangles to the long edges of the assembled rows to form the block’s outer triangle frame.
Step 3: Assemble Quilt Center
- Lay out the blocks in four rows, alternating between Blocks A and B, ensuring to rotate them as needed to achieve the desired wave effect.
- Sew together blocks in each row, then join the rows. Press all seams in one direction.
Step 4: Add Borders
- Border No. 1 (Dark Brown Batik): Attach the 2-1/2×42″ strips around the quilt center.
- Border No. 2 (Cream and Blue): Join blue triangle-squares end-to-end, adding cream batik squares at the ends to extend the strips. Attach these strips around the quilt center, pressing seams toward the first border.
- Border No. 3 (Golden Tan Batik): Attach 1-1/2×42″ strips cut and pieced to fit around the quilt center.
- Border No. 4 (Dark Blue Batik): Sew together the 5-1/2×42″ strips and attach around the entire quilt to finish the borders.
Additional Tips for Success
- Precision: Ensure that all pieces are cut precisely and that all seams are an exact quarter inch. This accuracy is crucial for the blocks and the overall quilt to align correctly.
- Pressing: Always press your seams well. This practice not only helps in piecing together the blocks accurately but also contributes to the quilt’s overall flat appearance.
- Enjoy the Process: Remember, quilting is both an art and a meditation. Take your time to enjoy the process of bringing together colors and shapes to create something beautiful.
The Batik Ocean Waves quilt, with its complex interplay of colors and shapes, offers a satisfying challenge for quilters looking to create something truly spectacular. As you complete your quilt, reflect on the journey of each stitch and how, like the ocean waves, it tells a story of movement, rhythm, and the beauty of nature.