
My passion for quilting began in the cozy corners of my family home, surrounded by vibrant scraps of fabric and the hum of the sewing machine. These early memories fuel my current projects, one of which I hold dear—my Scrap Happy Nine Patch quilt.
This quilt represents more than just an assembly of fabrics; it embodies the joy of transforming leftover pieces into a stunning, cohesive piece.
My journey with the Scrap Happy Nine Patch quilt started as a challenge to use up my growing stash of scraps, turning what might seem like insignificant pieces into a quilt full of history and heart.
Last year, I embarked on the creation of this quilt, utilizing an array of colorful fabric scraps that each held a story. The process was a delightful exploration of color and texture, resulting in a quilt that was not only visually appealing but also a testament to sustainable crafting. Now, I am thrilled to share this journey with you, offering a guide to recreate this beautiful quilt, so you too can experience the satisfaction of making something truly special from the seemingly mundane.
Unveiling the Patchwork: The Scrap Happy Nine Patch Journey
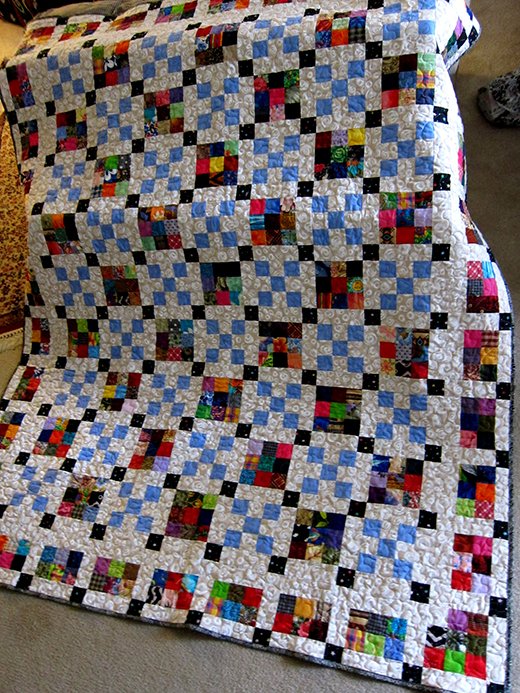
The Scrap Happy Nine Patch quilt is more than just a craft; it’s a labor of love and a creative outlet that turns fabric scraps into a masterpiece. This quilt is characterized by its vibrant nine-patch blocks, each meticulously crafted to bring out the best in contrasting and complementary colors. Through this quilt, I invite you to dive into the world of patchwork, where each piece of fabric adds a unique touch to the overall aesthetic, making every quilt truly one-of-a-kind.
Full Pattern: Click Here
Methodology and Design: Piecing Together Your Memories
This quilt is a beautiful example of how traditional quilting techniques can be adapted for modern quilting adventures. The structure and layout of the Scrap Happy Nine Patch are designed to be both beginner-friendly and satisfying for more experienced quilters. This section will explore the thoughtful process of selecting and assembling the nine-patch blocks, ensuring that each step is a building block to the magnificent final product.
Materials
To start your Scrap Happy Nine Patch quilt, you will need:
- White fabric: 3.5 yards for a clean, bright background that makes the colors pop.
- Blue fabric: ¾ yard to integrate into the blocks for a cool tone contrast.
- Black fabric: 5/8 yard for accentuating and framing the patches.
- Scrappy 2.5” squares: approximately 2 1/8 yards total, derived from various fabrics to add diversity and vibrancy to your quilt.
- Basic sewing supplies: rotary cutter, cutting mat, ruler, sewing machine, iron, and thread.
Preparing for Patchwork: Tips for Success
Before you dive into cutting and sewing, it’s crucial to plan your quilt layout and prepare your materials meticulously. This preparation ensures a smooth quilting process and helps in achieving professional results. I’ll share insights on efficient cutting techniques, the importance of color placement, and how to manage your fabric scraps to maximize their aesthetic impact in the quilt.
Step-by-Step Instructions
Crafting the Scrap Happy Nine Patch quilt involves precision, patience, and a flair for creativity. Here’s a detailed guide to piecing together your quilt, ensuring each step contributes to a beautifully finished product:
Step 1: Cutting Your Fabrics
- White Fabric: Cut 132 squares measuring 2.5″ each and 250 rectangles measuring 6.5″ by 2.5″.
- Blue Fabric: Cut 160 squares measuring 2.5″ each.
- Black Fabric: Cut 120 squares measuring 2.5″ each.
- Scrappy Squares: Prepare 503 scrappy 2.5” squares from your assorted fabric scraps.
Step 2: Assembling the Nine Patch Blocks
- Each block is composed of 9 squares (2.5” each). Arrange them in three rows of three squares each.
- Sew the squares together in each row, then sew the three rows together. This step will form one complete nine-patch block. You will make a total of 98 blocks according to the mix of colors and placement outlined in the tutorial.
Step 3: Layout Design
- Arrange your blocks according to the specified layout. The pattern consists of alternating block types and orientations to create visual interest and balance.
- Top and Bottom Rows: These rows should have blocks arranged in the sequence 4-3-3-3-3-3-3-3-4, with a specific placement for the white square in Block 4.
- Middle Rows: Follow the sequence 3-1-2-1-2-1-2-1-3 for these rows.
- Alternate Middle Rows: These rows will follow the sequence 3-2-1-2-1-2-1-2-3.
Step 4: Sewing Rows and Sashing
- Sashing Strips: Prepare 12 rows of sashing strips using 6.5” by 2.5” white rectangles and 2.5” black squares. Press towards the white rectangles to allow seams to nest properly.
- Sew the prepared blocks and sashing strips together according to the quilt’s layout. The proper pressing as directed helps in nesting the seams, which simplifies sewing the rows together and improves the overall look.
Step 5: Final Assembly
- Once all rows and sashing strips are assembled, sew them together to form the complete quilt top. Make sure to match up seams and press each seam carefully to maintain a flat and neat appearance.
Step 6: Finishing the Quilt
- Layer the completed quilt top with batting and your choice of backing fabric.
- Quilt as desired. This could be simple straight-line quilting, which complements the geometric nature of the Nine Patch, or more elaborate designs if you prefer.
- Bind the edges to finish your quilt.
Additional Tips
- Accuracy is Key: Ensure all your cuts are precise and your seams are consistent (typically ¼ inch). This will help in aligning the blocks and achieving a professional finish.
- Color Choices: While the quilt is designed to be scrappy, maintaining some level of color balance or theme (like warm vs. cool tones) can enhance the overall aesthetic.
- Pressing: Properly pressing your fabric as you go prevents puckering and helps in matching up seams and points. Always press to the side with less resistance, typically towards the darker fabric.
The Scrap Happy Nine Patch quilt is a joyful celebration of quilting, perfect for using up fabric scraps and creating something beautiful and functional. Each step in this project builds upon the last, culminating in a quilt that you can be proud of.
This quilt not only serves as a cozy, artistic addition to your home but also as a testament to the creativity and resourcefulness of quilters. Dive into this project with enthusiasm and watch as your scraps transform into a stunning patchwork of memories.