
I’ve always loved how quilting blends tradition with personal expression.
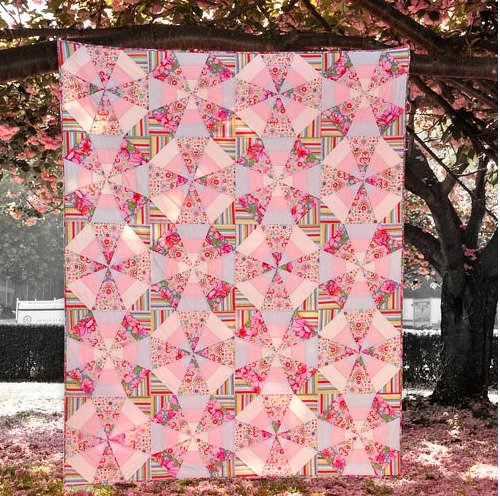
When I first stumbled across the Whirl Kaleidoscope quilt pattern, I was mesmerized by its swirling, hypnotic beauty. It felt as though I was looking into a kaleidoscope, watching the colors shift and blend in perfect harmony.
Creating a quilt like this requires both creativity and precision—two elements that make quilting such a fulfilling journey.
The Whirl Kaleidoscope pattern offers endless opportunities to play with color, fabric placement, and design, resulting in a stunning piece that feels both modern and timeless.
The first time I made this quilt, I was struck by how every tiny decision—whether it was a fussy cut, color choice, or stitch direction—affected the final design. It felt like I was orchestrating a piece of art that told a story with every turn of the fabric.
I hope to share with you not only the steps to create your own Whirl Kaleidoscope quilt but also the joy and satisfaction that come from crafting something so intricate and captivating.
SEE TOO:
Constellation Block Brilliance: Quilt Your Own Night Sky
The Piñata Quilt: A Colorful Journey in Quilting
Constellation Block Brilliance: Quilt Your Own Night Sky
Create with Joy: Harlequin Charm Quilt Mastery
Whirl Kaleidoscope: Spinning Symmetry into Quilt Art
The Whirl Kaleidoscope quilt pattern is a showstopper that demands attention. Its swirling, symmetrical design draws inspiration from the ever-changing, colorful patterns you might see when peering into a real kaleidoscope.
This quilt pattern brings together bold shapes—often triangles and diamonds—in a circular or starburst arrangement, creating the illusion of motion and depth. Each section of the quilt contributes to the overall whirl effect, making it a captivating design that you’ll be proud to showcase.
Preparing to Quilt
The Art of Fussy Cutting: Personalizing Your Whirl Kaleidoscope Quilt
One of the key techniques that sets the Whirl Kaleidoscope quilt apart is fussy cutting—a method that involves carefully selecting specific sections of fabric to highlight unique designs or motifs.
By thoughtfully positioning your cuts, you can create visually striking patterns that add a personalized touch to the overall design. In a quilt like this, fussy cutting allows you to accentuate the swirling effect and introduce a sense of motion and flow.
Whether you’re cutting out florals, geometric shapes, or other bold prints, each piece will help tell the story of your quilt.
Materials
Before diving into the creation of your Whirl Kaleidoscope quilt, gather the following materials:
- Fabric:
- A variety of fabrics in different colors and patterns (for a dynamic whirl effect, choose contrasting colors and complementary patterns).
- Fussy-cut feature fabrics (to enhance the central motif).
- Rotary Cutter and Ruler: Essential for precise cuts, especially for triangles and diamonds.
- Cutting Mat: To protect surfaces and aid in precision cutting.
- Sewing Machine and Thread: Choose thread colors that blend or contrast based on your fabric choices.
- Iron and Pressing Surface: To press seams as you go, ensuring clean, crisp lines.
- Templates (Optional): If you’re using specific shapes (like diamonds), having templates can be useful for ensuring uniformity in your pieces.
Getting Started: Key Considerations for Success
Before cutting into your fabrics, it’s important to spend some time planning your design. Lay out your fabric choices and visualize how they’ll interact in the quilt. Consider placing lighter colors near the center of the quilt to create a bright, eye-catching focal point, with darker or bolder tones radiating outward to enhance the whirl effect. A balanced color palette will help create the illusion of movement and add depth to the final piece.
Take your time during the cutting process. With patterns like the Whirl Kaleidoscope, precision is key. Misaligned shapes can disrupt the symmetry and rhythm of the design, so measure twice and cut once!
Full Pattern: Click Here
Step-by-Step Instructions
- Prepare Your Fabric:
- Start by selecting and cutting your fabric pieces. Depending on your chosen variation of the Whirl Kaleidoscope, you’ll need triangles, diamonds, or other angular shapes.
- Fussy cut any fabrics with specific motifs that you want to showcase, ensuring that the patterns align in a way that enhances the whirl effect.
- Assemble the Central Focal Point:
- Begin with the central motif, where the swirl starts. This section is typically composed of smaller, more intricate pieces that will anchor the larger shapes that follow.
- Carefully piece together your first set of triangles or diamonds, sewing with a ¼-inch seam allowance. Press seams open to reduce bulk and create a smoother finish.
- Build the Starburst or Circular Sections:
- Once the center is complete, move outward by assembling and attaching larger shapes to form the starburst or whirl pattern.
- Ensure that each piece is aligned properly to maintain the symmetry of the design. Double-check the placement of fussy-cut pieces, making sure that patterns flow seamlessly from one shape to the next.
- Create the Whirl Effect:
- As you continue to add layers, focus on enhancing the whirl effect by alternating colors and patterns in a way that mimics the shifting designs of a kaleidoscope.
- Keep pressing seams as you go to avoid unwanted bulk in the final quilt.
- Add Borders (Optional):
- Once the central design is complete, consider adding borders to frame the quilt and enhance the overall visual effect.
- Simple, solid-colored borders can create contrast, while pieced borders using leftover fabric can extend the kaleidoscope pattern beyond the center of the quilt.
- Finishing Touches:
- After the quilt top is complete, layer it with batting and backing fabric.
- Quilt by hand or machine, following the whirl pattern to reinforce the swirling design. You may choose to add embellishments like embroidery or appliqué to further enhance certain sections.
Additional Tips for a Stunning Finish
- Mind the Bias: When cutting shapes like triangles and diamonds, the fabric edges can become stretchy due to the bias. Handle these pieces carefully, and consider starching the fabric before cutting to minimize stretching.
- Press, Press, Press: Pressing your seams as you go will make a big difference in the final appearance of your quilt. Each crisp seam contributes to the overall polish of the design.
- Use a Design Wall: As you arrange your pieces, use a design wall to help visualize the overall pattern. This can prevent mistakes in color or shape placement before you commit to sewing.
The Whirl Kaleidoscope quilt is more than just a quilt—it’s a dance of fabric, color, and creativity. Each piece of fabric you cut and place is part of a larger story that comes to life with every stitch. As you step back to admire your finished work, you’ll find yourself captivated by the intricate interplay of shapes and colors, much like peering into a swirling kaleidoscope.
This project is not only a testament to your quilting skills but also a reflection of your creativity and precision. Whether you display your quilt as a work of art or cozy up with it on a chilly evening, the Whirl Kaleidoscope quilt will always be a reminder of the beauty that comes from thoughtful design and craftsmanship.