
Growing up in a small town where the night sky was always clear and vast, I would often find myself gazing up at the stars. Those twinkling constellations sparked my imagination and, later in life, inspired many of my quilt designs. One design that particularly holds my heart is the “Constellation” block. It reminds me of those quiet moments under the stars, as each piece comes together like a beautiful, celestial puzzle.
The Celestial Charm of the Constellation Block
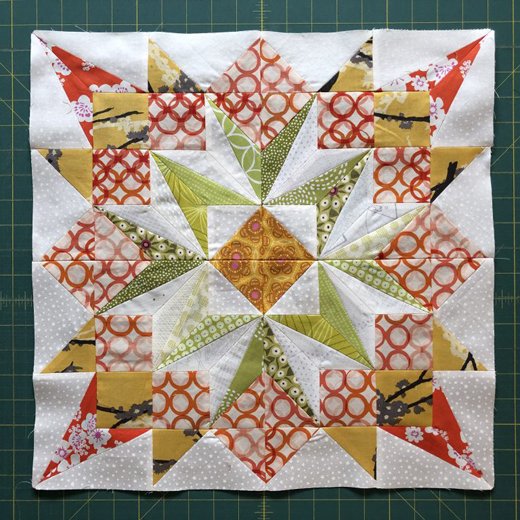
The Constellation quilt block is a classic star pattern that has been cherished by quilters for generations. With its roots in the 1930s, this block captures the brilliance of the night sky and transforms it into a stunning work of art. While it might seem complex with its sharp points and intricate seams, the satisfaction of seeing the star emerge makes all the effort worth it. Whether you’re looking to challenge yourself or add a stunning centerpiece to your quilt, the Constellation block is a project that truly shines.
The Details that Bring the Stars to Life
When working with the Constellation block, one of the key elements to focus on is the precision of your cuts and seams. This block is divided into four identical segments, and achieving perfect alignment between these sections is crucial to maintaining the block’s overall symmetry. The Y-seams, in particular, require patience and practice, but once you get the hang of them, they become an essential tool in your quilting repertoire.
Full Pattern: Click Here
Materials You’ll Need
- Cotton fabric: Choose a variety of contrasting colors for the star and background.
- Cutting tools: A rotary cutter, cutting mat, and patchwork ruler are essential.
- Templates: Printed templates for foundation paper piecing (FPP) or regular piecing.
- Sewing machine: Equipped with a 1/4″ presser foot for precise seams.
- Thread: Neutral color works well.
- Pins and fabric marker: To keep your pieces in place and mark lines as needed.
- Iron: For pressing seams flat after each step.
Laying the Groundwork for Success
Before cutting into your fabric, download the template and print it at “Actual Size.” If you’re using the foundation paper piecing method, carefully trim your templates along the designated lines. This method offers greater accuracy for the intricate design of the Constellation block, especially for beginners. On the other hand, if you prefer traditional piecing, be sure to measure your pieces precisely with a ruler before cutting.
Step-by-Step Instructions for the Constellation Block
- Cut the Fabric Pieces
- Print out your templates and use them to cut the fabric pieces. Each template should be traced onto the fabric and cut with precision. You’ll need diamonds, triangles, and squares to form the star shape. If you’re using the foundation paper piecing method, sew the fabric directly onto the paper following the number sequence provided.
- Assemble the Diamonds
- Start by sewing four diamond-shaped pieces together to create the star’s center. Match the edges carefully and use a 1/4″ seam allowance. Press the seams open to reduce bulk and keep your fabric flat.
- Add the Corner Squares
- Attach the corner squares to the diamond segments, paying close attention to seam alignment. At this stage, it’s essential to leave a small portion of the seam unsewn for the Y-seam construction later. Take your time with these seams to ensure accuracy.
- Incorporating the Y-Seams
- The Y-seam can be tricky, but with patience, it becomes a seamless part of your quilt-making process. When sewing the triangles into place, stop stitching about 1/4″ away from the corner and pivot the fabric to continue sewing the next seam. This method allows the triangles to fit perfectly without puckering.
- Piece the Four Sections Together
- Once your star segments are complete, join the four sections together, carefully matching seams. This is where the accuracy of your earlier work really pays off. Press the seams open after each join.
- Finish with Outer Borders (Optional)
- To complete your block, you can add a final border or additional star pieces depending on your quilt design. This step is optional but can help frame your block beautifully.
Additional Tips for Success
- Master the Y-Seams: Take your time with Y-seams and practice them on scrap fabric before tackling the block. Using pins or clips to hold the fabric in place can help with accuracy.
- Press as You Go: A well-pressed block is the secret to sharp points and crisp seams. Press your seams after every step to keep the fabric flat and smooth.
- Chain Piecing: If you’re making multiple Constellation blocks for a larger quilt, consider chain piecing to save time and ensure consistency across your blocks.
The Constellation block is more than just a beautiful design—it’s a journey through precision, patience, and creativity. As you complete this block, you’ll feel a deep sense of accomplishment, knowing that you’ve mastered one of quilting’s most intricate patterns. Let your imagination soar as you stitch your own starry sky, and remember that each quilt block is a testament to your love for this timeless craft. Keep exploring new patterns, pushing your boundaries, and allowing your creativity to shine through.