
One of my favorite things about quilting is how every project can carry a story, often inspired by the simplest details. I remember walking into a fabric store one afternoon and being immediately drawn to a panel featuring a striking black rosette. The boldness of the design was captivating, and I knew it would be perfect for something special. That was the day the Black Rosette Panel Quilt began to take shape in my mind.
The beauty of working with panels is that they give you an incredible focal point to build upon, and this one did just that. The contrast of the intricate rosette design against the soft colors of the surrounding fabrics offered a wonderful balance between simplicity and sophistication. It felt like a modern twist on a traditional idea—something elegant yet bold.
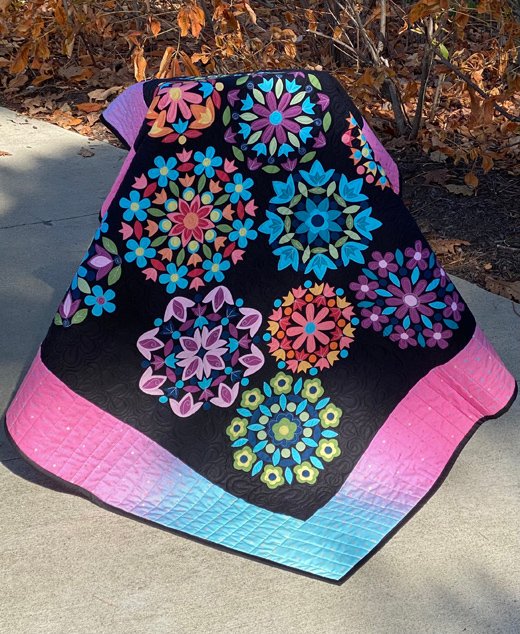
Embracing Bold Elegance: The Black Rosette Panel Quilt
The Black Rosette Panel Quilt brings together a dynamic mix of prints, textures, and contrasts to create a piece that stands out. This design, which showcases a large, centered black rosette, captures attention with its striking simplicity. Quilting this project is like crafting a piece of art with fabric. You don’t just follow the steps—you’re creating something visually powerful that feels personal.
The use of deep black tones framed with brighter, jewel-like fabrics like the “Pretty Flamingo Gem Stones” adds depth and dimension. This balance of light and dark, of modern and traditional, is a reminder of how quilting can be a journey of both technical skill and artistic expression.
Working with Panels: Highlighting the Centerpiece
The beauty of the Black Rosette Panel Quilt lies in its centerpiece—a large black rosette framed perfectly to grab attention. Working with a pre-printed panel is an exciting experience because it allows you to focus on the finer details, like the borders and binding, to enhance the overall look. Panels take away some of the pressure of piecing together intricate blocks, making the process smoother, yet they still provide ample room for creative flair.
Materials for the Black Rosette Panel Quilt
To bring this quilt to life, you’ll need the following materials:
- 1 Black Rosette Panel (P10870 Panel) – This is the star of the show, so choose one that speaks to you!
- 1 Yard Pretty Flamingo Gem Stones (C8350 Flamingo) – This bright and lively fabric will frame the panel beautifully.
- ½ Yard Riley Black Confetti Cottons (C120 Riley Black) – Perfect for adding subtle interest to your binding.
- Binding – Choose a fabric that complements the overall design; Riley Black Confetti Cottons work wonderfully here.
A Few Considerations Before Starting
Before you start cutting and stitching, take a moment to visualize your quilt. Since the panel is the focal point, it’s essential to make sure it’s properly centered and framed. I recommend laying out all your fabrics to see how they interact before committing to cuts. Also, take care to measure twice before making any cuts—especially when working with panels that need to be perfectly aligned.
Now, let’s dive into the steps!
Full Pattern: Click Here
Step-by-Step Instructions for the Black Rosette Panel Quilt
Now that we have our materials ready, it’s time to bring the Black Rosette Panel Quilt to life. Below are the step-by-step instructions to guide you through each stage of the project. Take your time, enjoy the process, and remember that quilting is as much about the journey as it is the final product.
Step 1: Prepare Your Fabrics
- Press and Cut: Begin by pressing all your fabrics. This helps ensure crisp, clean cuts.
- Cut the Black Rosette Panel: Carefully fussy cut the center Black Rosette Panel to measure 36½” x 36½”. Since this is the centerpiece of your quilt, take extra care to center the rosette design before cutting.
Step 2: Cut the Borders
- Cut the Pretty Flamingo Gem Stones Fabric: For the borders, cut five strips that are 6½” wide from the width of fabric (WOF). These will be sewn around the Black Rosette Panel to frame it.
Step 3: Assembling the Borders
- Measure and Attach Side Borders: Start by sewing the side borders to the center panel. Measure your panel carefully to ensure the strips align perfectly with the edges. Once the strips are cut to length (36½” for the sides), sew them to the panel, right sides together. Press the seams toward the borders.
- Add the Top and Bottom Borders: Next, measure and cut the top and bottom border strips to 48½”. Sew these to the top and bottom of the panel, making sure the seams are neat and pressed towards the borders.
Step 4: Prepare the Binding
- Cut the Riley Black Confetti Cotton Fabric: For the binding, cut five strips measuring 2½” wide from the width of fabric. This will be used to bind the edges of the quilt once it’s layered and quilted.
Step 5: Layering the Quilt
- Prepare the Quilt Sandwich: Once the borders are attached, you’re ready to assemble your quilt sandwich. Lay the backing fabric down first (right side facing the floor), then the batting, and finally your quilt top (right side up). Smooth out any wrinkles as you go, and use basting pins or spray to secure all three layers together.
Step 6: Quilting the Layers
- Quilt As Desired: Now comes the fun part—quilting! Whether you prefer free-motion quilting or straight-line stitching, take your time to quilt through all the layers. For this design, consider quilting along the lines of the rosette to accentuate its shape. You can also add simple quilting in the borders to frame the centerpiece.
Step 7: Bind the Quilt
- Attach the Binding: Fold your binding strips in half lengthwise, wrong sides together, and press. Attach the binding to the front of the quilt, aligning the raw edges with the edge of the quilt top. Sew around the perimeter, mitering the corners for a clean finish. Then, fold the binding to the back and hand-stitch it in place for a polished look.
Additional Tips for a Perfect Black Rosette Panel Quilt
- Centering the Panel: One of the key elements of this project is making sure the rosette panel is perfectly centered. Take your time measuring and pinning before making the final cut to ensure your panel looks balanced within the quilt.
- Press Seams Neatly: Pressing the seams toward the borders helps create a clean and crisp look. Pressing as you go ensures your quilt top stays flat and smooth, which is crucial when it’s time to layer and quilt.
- Use a Walking Foot: If you’re quilting straight lines, a walking foot can help prevent fabric layers from shifting. This is especially helpful when quilting larger panels like the Black Rosette.
- Test Quilting Designs: Before you start quilting on the actual quilt, practice your quilting design on a scrap piece of fabric and batting. This will help you get comfortable with the flow of the design and ensure your stitches are even and consistent.
The Black Rosette Panel Quilt is more than just a quilt—it’s a celebration of bold contrasts and elegant simplicity. As you work through each step, you’ll see how the centerpiece rosette, framed by vibrant borders, transforms simple fabrics into something striking and unique.
The beauty of quilting lies not only in the finished product but in the journey of creation. So, as you bind the final edge and take a step back to admire your work, remember that each stitch, each seam, and each decision you made is a reflection of your creativity and craftsmanship.
Now, this quilt is ready to be enjoyed—whether draped across a cozy bed or displayed as a work of art. Enjoy the feeling of accomplishment that comes with finishing a project that is truly one-of-a-kind.