
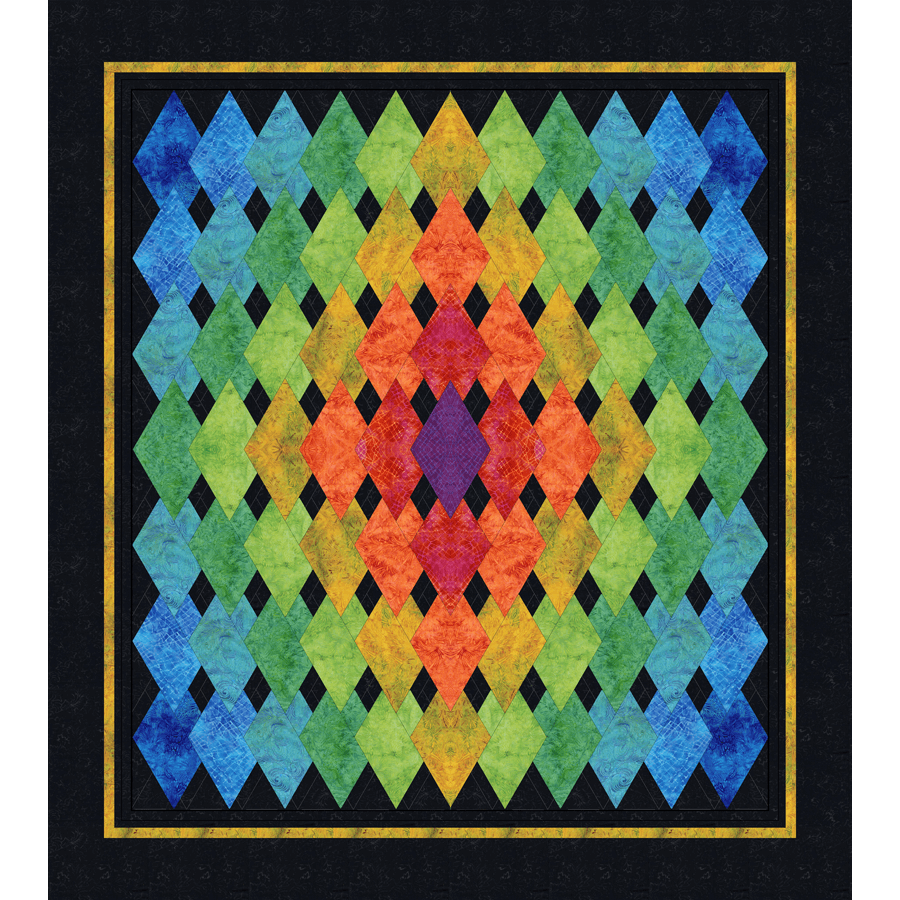
Creating a quilt is like crafting a piece of art, and one of the most striking designs that captures both joy and precision is the Piñata Quilt. With its colorful geometric patterns and precisely cut diamonds, the Piñata Quilt is a visual feast. The quilt’s arrangement of vibrant colors mirrors the fun and energy of a traditional piñata, while its construction demands careful attention to detail.
When I first tackled the Piñata Quilt, I was excited to see how the radiant colors would come together into such a structured design. Each diamond block felt like adding a piece of a puzzle that, once completed, burst into life. For intermediate quilters and above, this project is the perfect combination of challenge and creative fulfillment. Through this step-by-step guide, I’ll walk you through the process of creating your own Piñata Quilt, from preparing your materials to the final stitch.
The Art of Piecing the Piñata Quilt: Mastering Reversed Patches and Mitered Borders
The Piñata Quilt may look complex at first glance, but it becomes manageable when broken down into its key elements: the vibrant diamond-shaped blocks, carefully reversed patches, and Jinny Beyer’s signature mitered borders. Understanding how to efficiently cut and piece your fabrics is essential to mastering this quilt. The Piñata Quilt requires both regular and reversed patches for its striking symmetry, and using batiks can simplify this by eliminating the need to cut reversed patches.
The quilt’s mitered borders are a signature feature that frames the design beautifully, adding an elegant touch to this bold creation. By following Jinny Beyer’s “No-Math Method” for perfect mitered borders, you can achieve professional results without complicated measurements, allowing the quilt’s vibrant center to truly shine.
Full Pattern: Click Here
Materials and Preparation for the Piñata Quilt
Before diving into the assembly, make sure you have all the materials and tools necessary for your Piñata Quilt. Here’s what you will need:
Fabrics:
- Fabric 1: 1/4 yard – Includes Borders 1 & 3 and binding.
- Fabric 2: Dark – 3/8 yard, Light – 2/3 yard (including Border 2).
- Fabric 3: 5/8 yard.
- Fabric 4: Dark – 1 1/8 yard (including Border 2), Light – 3/4 yard.
- Fabric 5, 6, 7: 3/4 yard each.
- Fabric 8: 1/2 yard.
- Fabric 9: 1/3 yard.
- Fabric 10: 3 3/8 yards – for borders, binding, and additional quilt pieces.
- Backing Fabric: 4 1/2 yards suggested (Fabric 8).
Tools:
- Sewing machine with an accurate ¼” seam allowance setting.
- Rotary cutter and acrylic rulers (6″ x 24″ recommended for cutting long strips).
- Fine glass head pins for piecing.
- Templates: Cut from see-through plastic, marked with all seam intersections for accuracy.
Cutting and Organizing: Preparing for the Piñata Quilt
Follow the instructions carefully when cutting the fabrics for your Piñata Quilt. Maximizing fabric yield is crucial, so use the Cutting Notes to ensure you cut efficiently by rotating templates and nesting pieces as needed.
Cutting Fabric:
- Fabric 1: Cut two regular and two reversed pieces using Template D/Dr.
- Fabric 2: From one strip (6 ¾” x WOF), cut two regular and two reversed using Template B/Br. Repeat this for Template C/Cr from a 4 ½” strip.
- Fabric 10: Cut the binding strips, borders, and quilt pieces using Templates D, F, and G, ensuring you follow the instructions to maximize fabric usage.
Once all your fabric is cut, don’t forget to transfer the seam intersection dots from the templates to the wrong side of each fabric piece. This step will save time during assembly and ensure perfect alignment.
Step-by-Step Assembly of the Piñata Quilt
With all your materials prepped and fabric pieces ready, it’s time to begin assembling the Piñata Quilt. Follow these detailed steps to create the vibrant diamond blocks and sew them together into stunning quadrants.
Step 1: Assemble the E/Er Segments
- Prepare the Strip-Sets:
- Match each 2 ½” strip of Fabrics 3, 4, 8, and 9 with a 2 ½” Fabric 10 strip. Sew them together to form one strip-set of each color combination.
- For Fabrics 5, 6, and 7, cut the strips in half to create two 20″ strips per fabric. Sew these to the remaining Fabric 10 strips, offsetting them by ¾” for precise cutting later.
- Cut and Mark the Segments:
- Using Template E/Er, cut two regular and two reversed segments from the Fabrics 3 & 9 strip-set. Repeat the process for Fabrics 4 & 8.
- For the half-strip sets of Fabrics 5, 6, and 7, cut six regular segments from one strip and six reversed segments from the other.
Step 2: Make the Quadrants
The quilt consists of four quadrants: two regular and two reversed.
- Sew the patches together into rows, aligning at the seam intersection dots.
- Sew the rows together to form two regular and two reversed quadrants. This step brings the quilt’s vibrant center to life, as the colors radiate out from the center in a diamond-shaped pattern.
Step 3: Assemble the Piñata Quilt
- Join the Four Quadrants:
- Sew the two regular quadrants together, followed by the two reversed quadrants. Align the seam intersections carefully to maintain the crispness of the diamond pattern.
- Once the quadrants are assembled, join them along the center seam to complete the quilt top.
Step 4: Add the Borders
Borders play a vital role in framing the Piñata Quilt, and they enhance the visual impact of the bright diamond design.
- Fabric 10 – Border 1: Sew the 2″ strips together to create the first border.
- Fabric 10 – Border 3: For the final border, sew the 5″ strips together to frame the quilt.
- Fabric 2 & 4 – Border 2: Sew the 1 ½” strips together and attach them between the two larger borders.
Use Jinny Beyer’s No-Math Method to miter the corners for a seamless, professional finish. This technique will help ensure that your borders are even and your quilt lays flat without puckering.
Tips for Success with the Piñata Quilt
- Maximizing Fabric Yield: Remember to rotate your templates and nest them closely when cutting to make the most of each fabric strip.
- Accuracy Matters: Transferring seam intersection dots to each patch before sewing will significantly improve your accuracy and reduce frustration during assembly.
- Press Carefully: Always press your seams after sewing to keep your pieces flat and to avoid stretching the fabric.
The Piñata Quilt is a joyous celebration of color and precision. By taking your time and following these detailed steps, you can create a quilt that not only captures the playful spirit of a piñata but also showcases your skills as a quilter. Each carefully cut patch and every seam brings you closer to a stunning finish that will undoubtedly brighten any room.
The vibrant colors and geometric design of the Piñata Quilt make it a stand-out piece. Whether you’re making it for yourself or as a gift, this quilt is sure to be cherished for years to come.