
My journey into quilting has always been inspired by the stories each fabric tells and the intricate beauty that emerges from combining these pieces. The Hermitage Rectangle Quilt evokes a sense of elegance that is both timeless and intricate. Using the Hermitage Collection designed by Jinny Beyer, this quilt celebrates the art of traditional quilting while highlighting the beauty of sophisticated prints and thoughtful geometric arrangements.
The first time I worked on the Hermitage Quilt, I was struck by the precision it required and the satisfaction it brought when each piece fell into place. This pattern blends both challenge and beauty, offering quilters a unique opportunity to create a quilt that feels like a work of art. Let’s embark on this journey together as we piece together this beautiful and rewarding project.
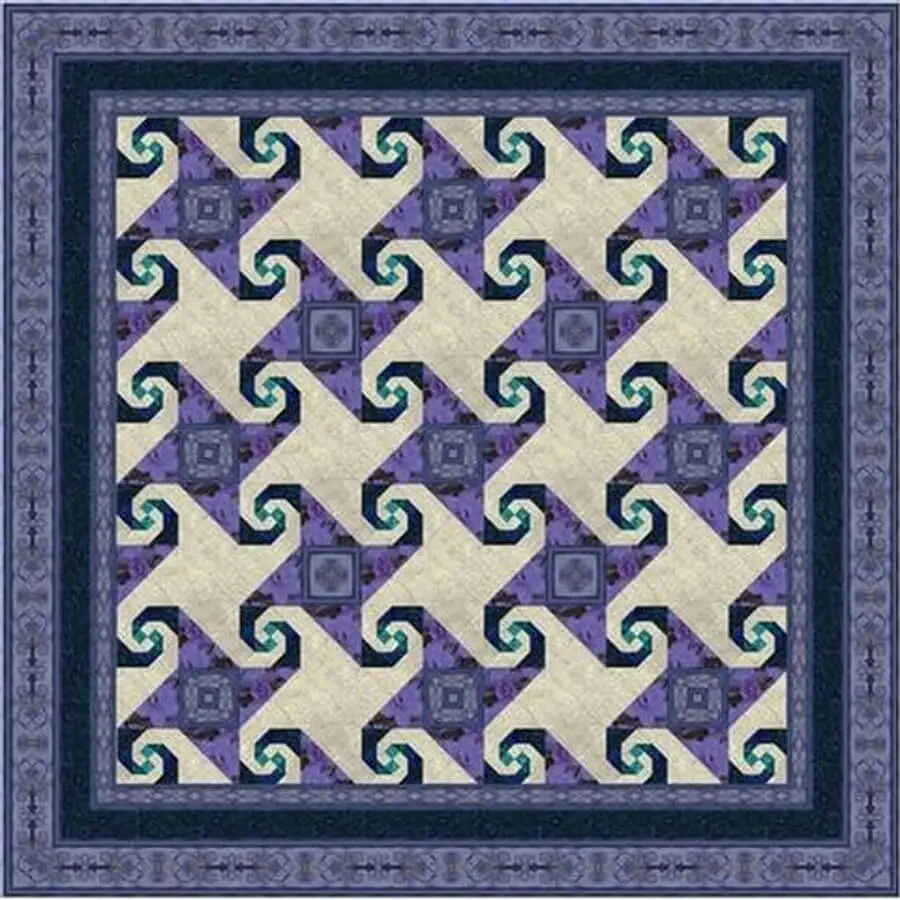
A Symphony of Geometry: The Graceful Hermitage Rectangle Quilt
The Hermitage Rectangle Quilt is a beautiful interplay of carefully arranged blocks and borders that come together to form a quilt that feels both structured and flowing. The repeating four-patch blocks, half-square triangles (HSTs), and Snail Trail blocks provide a dynamic sense of movement throughout the quilt. Each piece, whether a triangle or square, contributes to the overall elegance of the quilt, especially when paired with the stunning motifs of the Hermitage Collection fabrics.
Precision Cutting and Piecing: Building the Foundation of Your Quilt
Before you begin sewing, it’s crucial to have all your fabric pieces cut accurately. The Hermitage Rectangle Quilt relies on sharp, clean cuts to ensure the geometric patterns align perfectly. As you prepare to cut, take your time to label each piece and use a sharp rotary cutter to avoid frayed edges. This quilt uses a mix of standard piecing methods with added tips from Jinny Beyer’s own techniques for mitering borders, ensuring a professional and seamless finish.
Full Pattern: Click Here
Materials
Here’s a list of the materials you’ll need for the Hermitage Rectangle Quilt. Be sure to double-check your fabric cuts before beginning to avoid any mistakes later on:
- Fabric 1 (8734-41) – 2⅝ yards
- Cut:
- (3) 1⅜” x WOF strips and (1) 1⅜” x 18″
- (48) 2⅛” squares, cut once diagonally for B triangles
- (48) 2⅝” squares, cut once diagonally for C triangles
- (48) 3⅜” squares, cut once diagonally for D triangles
- (17) 5½” squares for E squares
- Cut:
- Fabric 2 (8734-02) – ¼ yard
- Cut (3) 1⅜” x WOF strips and (1) 1⅜” x 18″
- Fabric 3 (8735-03) – ¼ yard
- Cut (48) 2⅛” squares, cut once diagonally for B triangles
- Fabric 4 (8737-03) – ⅜ yard
- Cut (48) 2⅝” squares, cut once diagonally for C triangles
- Fabric 5 (8735-02) – 2 yards
- Cut (48) 3⅜” squares, cut once diagonally for D triangles
- Cut border strips and trim lengths as indicated.
- Fabric 6 (8732-03) – 1¼ yards
- Cut (41) 5⅞” squares, cut once diagonally for F triangles
- Fabric 7 (8731-03) – 5 yards
- Cut G triangles using the template and following instructions on page 6.
- Cut borders using Jinny Beyer’s border print techniques.
Other Materials:
- Rotary cutter, ruler, and mat
- Quilter’s pins
- Sewing machine with ¼” foot
- Iron for pressing seams
- Backing: 6 yards of 8732-03
- Binding: At least 342″ of 2¼” wide strips sewn together for continuous binding.
Getting Ready: Preparing for Precision Piecing
Before diving into your sewing, take the time to organize your pieces. I recommend labeling each piece with a small sticky note, especially when working with multiple fabrics and cuts. Keep your workspace tidy and ensure you have all your tools at hand, including a reliable rotary cutter and ruler. The key to a successful Hermitage Quilt is in the details—accurate cutting and precise seam allowances will make all the difference.
Step-by-Step Instructions
- Sew the Four-Patch Blocks
- Begin by sewing the A1 and A2 strips into four sets (3 WOF strips and 1 18″ strip). Press the seam allowances in the direction of the arrow indicated in your diagram.
- Once your strip sets are sewn, cut them into 96 units, each 1⅜” wide. These will form the basis for your four-patch blocks.
- Sew the units together into four-patch blocks. Press the seams and set these aside.
- Add the B1 and B3 Triangles
- Take your four-patch blocks and add a B1 triangle to opposite sides of the block, ensuring that the rotation matches the diagram provided. Press and trim the excess fabric.
- Repeat the process with B3 triangles on the remaining sides of the block. Press and trim again.
- Sew the Snail Trail Blocks
- Add C1 and C4 triangles to your four-patch blocks, pressing and trimming after each addition.
- Next, add the D1 and D5 triangles. Press and trim to complete the 48 Snail Trail blocks. These blocks should now measure 5½” square.
- Create HST Units
- Using F triangles, sew half-square triangle (HST) units and press them. Trim the edges to ensure they are clean and precise.
- Make QST Units
- Create quarter-square triangle (QST) units using the G7 triangles. First, sew them into halves, then into whole units. You will need 18 squares, each measuring 5½”.
- Assemble the Rows
- Lay out the blocks and units into rows as shown in the pattern. Sew the rows together, pressing the seam allowances toward the HST units. Once the rows are complete, sew them together into the quilt top, pressing toward the QST unit rows.
- Add the Borders
- Follow Jinny Beyer’s special technique for adding borders to a rectangular quilt. Begin with Border 1, then move on to the Border 2 strips. Sew the short border strips to the top and bottom of the quilt, followed by the long border strips to the sides. Finish by adding Border 3 using Jinny’s technique for mitering the corners.
- Finishing the Quilt
- Layer the quilt top, batting, and backing. Baste the layers and quilt as desired. Once the quilting is complete, trim the backing and batting to match the edges of the quilt top.
- Sew the binding to the quilt using a ¼” seam allowance, ensuring a neat, finished edge.
Additional Tips
- Careful Matching: Take your time aligning the motifs in the border print. Jinny Beyer’s technique ensures that your corners will match, but precise measuring and cutting are essential.
- Press As You Go: Press each seam before moving on to the next step. This helps keep the quilt top flat and ensures better alignment when piecing the blocks together.
- Mind the Miters: When mitering the corners, use a ruler to ensure the angles are accurate. A perfect miter adds a polished finish to your quilt.
The Hermitage Rectangle Quilt is more than just a project—it’s a timeless piece that showcases both traditional techniques and modern elegance. As you sew each block and carefully place each border, you’re not just creating a quilt; you’re creating a legacy. Whether draped over a bed or hung as a statement piece, this quilt will be a cherished reminder of the artistry and dedication behind every stitch. Enjoy the process, and happy quilting!