
When I first discovered quilting, I was captivated by the intricate patterns that seemed to explode with color and energy. The “Starburst Quilt” is one of those designs that instantly resonated with me—it’s bold, dynamic, and reminds me of the sunburst motifs I used to sketch in my notebooks. This quilt’s geometric playfulness is both a challenge and a joy to create, offering endless possibilities for personalizing with fabrics and color schemes.
Bursting with Creativity: The Starburst Design
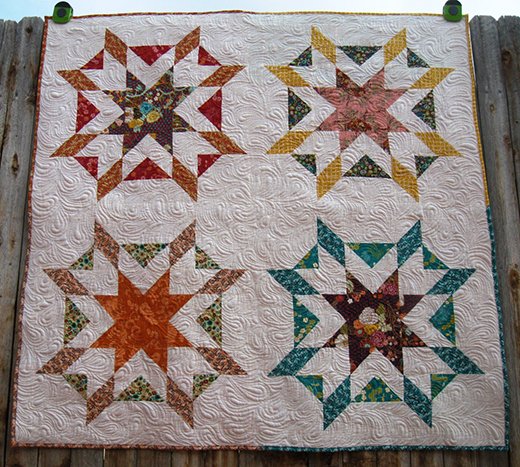
The Starburst quilt isn’t just about piecing together fabric—it’s about radiating joy through art. With its large star center and surrounding bursts, this design draws attention to the fine balance between symmetry and movement.
The star at the center anchors the eye, while the surrounding shapes create the impression of energy radiating outwards. It’s the perfect project to experiment with bold prints and vibrant colors, giving each quilt its own unique glow.
Mastering the Blocks: Precision and Technique
Before diving into cutting and stitching, it’s essential to break down the key components of the Starburst quilt. The main blocks used—Flying Geese, Half Square Triangles (HSTs), and Goose in the Corner—are traditional quilting elements, yet they combine to form this bold, contemporary design.
Each block requires precise measurements, as even slight misalignments can affect the overall pattern. This is where the beauty of fabric grouping comes in: by categorizing prints by scale and contrast, you can enhance the visual impact of the star and its surrounding bursts.
Flying Geese:
Flying Geese are pivotal in creating the quilt’s directional flow, helping guide the eye outward from the central star. The challenge here is maintaining the proportions while ensuring sharp points. These units often appear in a group, amplifying the radiating effect of the quilt.
Half Square Triangles:
HSTs are versatile and form the basis for many quilt designs, including the Starburst. They bring both symmetry and dynamic angles to the quilt. As you prepare them, pay special attention to trimming them accurately to ensure they fit smoothly with surrounding blocks.
Goose in the Corner:
This block, while simple, adds an interesting design twist to the quilt. It helps frame the larger star pattern, providing subtle texture and contrast to the otherwise straight lines of the Flying Geese and HSTs. Getting these corners to line up correctly requires patience but is key to the quilt’s visual harmony.
By thoughtfully grouping and cutting fabrics based on contrast—such as light and dark tones or busy prints versus solids—you can highlight the intricacies of the star design, ensuring that each part of the quilt stands out while contributing to the overall burst effect.
Materials:
- 12 Fat Quarters in varying prints
- Background fabric (amount varies by quilt size)
- Rotary cutter and ruler
- Pins and thread
- Sewing machine
- Iron and pressing board
Tips Before Starting
- Fabric Grouping: Separate your Fat Quarters into three groups: large prints for the center star, medium prints for the star surround, and smaller prints for the burst points.
- Chain Piecing: To save time, work on blocks in assembly-line fashion. This method is great for creating consistency and speeding up the process.
Full Pattern: Click Here
Step-by-Step Instructions
- Cutting the Fabrics: Divide your fabrics into three groups (large, medium, and small prints). Follow the cutting chart to prepare the necessary pieces, including squares, rectangles, and triangles. Sorting them by block type will make the process smoother.
- Flying Geese Block:
- Draw a diagonal line on the back of two smaller squares.
- Pin them to a larger square and sew ¼” on each side of the line.
- Cut along the drawn line and press.
- Add another small square to each section, sew again, and cut. This will give you two perfect Flying Geese blocks.
- Half Square Triangles (HSTs):
- Place a background square right sides together with a print square.
- Sew ¼” on each side of the diagonal line.
- Cut along the line and press open.
- Trim to the correct size.
- Goose in the Corner:
- Draw a diagonal line on a small square and place it in the corner of a larger background square.
- Sew on the line, trim the excess, and press open.
- Assembling the Blocks: Now that all sub-blocks are made, start piecing them together. Begin with the center star and move outward, paying attention to the direction of the prints and seams. Align and pin carefully for crisp points.
- Adding the Sashing: After completing the blocks, sew sashing strips between the blocks to tie them together, following the size chart. Press your seams after each step.
- Finishing Touches: Once your quilt top is assembled, baste, quilt, and bind it. Whether you choose an intricate quilting design or simple straight lines, take your time to ensure each stitch adds to the beauty of your quilt.
Additional Tips:
- Pressing Seams: Always press seams towards the darker fabric to prevent shadows.
- Perfect Points: Use pins to align intersecting points and avoid losing the sharpness of the star’s points.
- Experiment with Fabrics: Try using gradient colors for the star and burst points for a dynamic effect.
Completing the Starburst Quilt is an achievement that reflects both patience and artistry. Each block you piece together is a testament to the time and care you’ve invested in mastering a range of quilting techniques.
As you step back and admire the radiant design, let it remind you that quilting, like life, is about taking joy in each moment, in every new challenge, and in the vibrant patterns that emerge from your efforts. With the Starburst Quilt, you’ve added a brilliant burst of creativity to the world, one that will continue to inspire others.